Batch Change with Database Group
Bytebase 2.2.0 introduced database group, a new feature that provides a new way to facilitate batch change, in addition to batch changing multiple environments and multiple tenants.
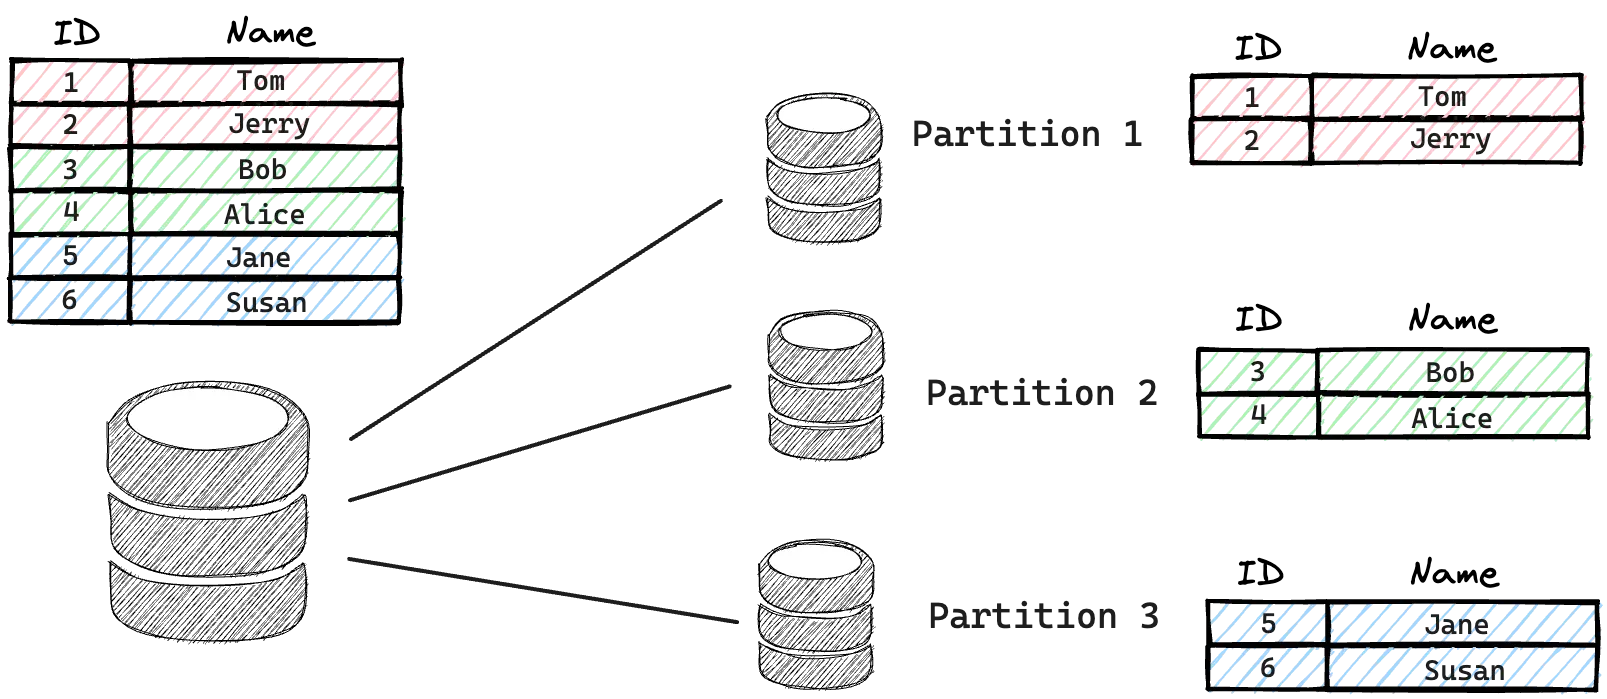
As data grows, databases and tables maybe partitioned into smaller chucks. Meanwhile, you still want to apply the same database change to all partitions since they share the same schema. It's painful and error-prone to make sure a database change is consistently applied to each partition.
You can use Database Group to model those database partitions and change them in a consistent way.
Prerequisites
This tutorial requires Docker to be installed.
Step 1 - Start Bytebase and MySQL
- Make sure your Docker daemon is running. Copy and paste the commands to start one Bytebase and two MySQL instances via Docker.
docker run --rm --init \
  --name bytebase \
  --publish 8080:8080 --pull always \
  --volume ~/.bytebase/data:/var/opt/bytebase \
  bytebase/bytebase:2.16.0
docker run --name mysqldtest \
--publish 3307:3306 \
-e MYSQL_ROOT_HOST=172.17.0.1 \
-e MYSQL_ROOT_PASSWORD=testpwd1 \
mysql/mysql-server:8.0docker run --name mysqldprod \
--publish 3308:3306 \
-e MYSQL_ROOT_HOST=172.17.0.1 \
-e MYSQL_ROOT_PASSWORD=testpwd1 \
mysql/mysql-server:8.0Step 2 - Prepare the Console
-
Register and sign in Bytebase Console via
localhost:8080. Click Add Instance to add two instances in two environments respectively.- Host or Socket:
host.docker.internal| Port:3307/3308 - Environment:
Test/Prod - Username:
root| Password:testpwd1
- Host or Socket:
-
Create project
Group Demoas Name,GDas KeyBatch Modeas Mode and click Create. Here you need to upgrade to Enterprise Plan with 14 days trial period.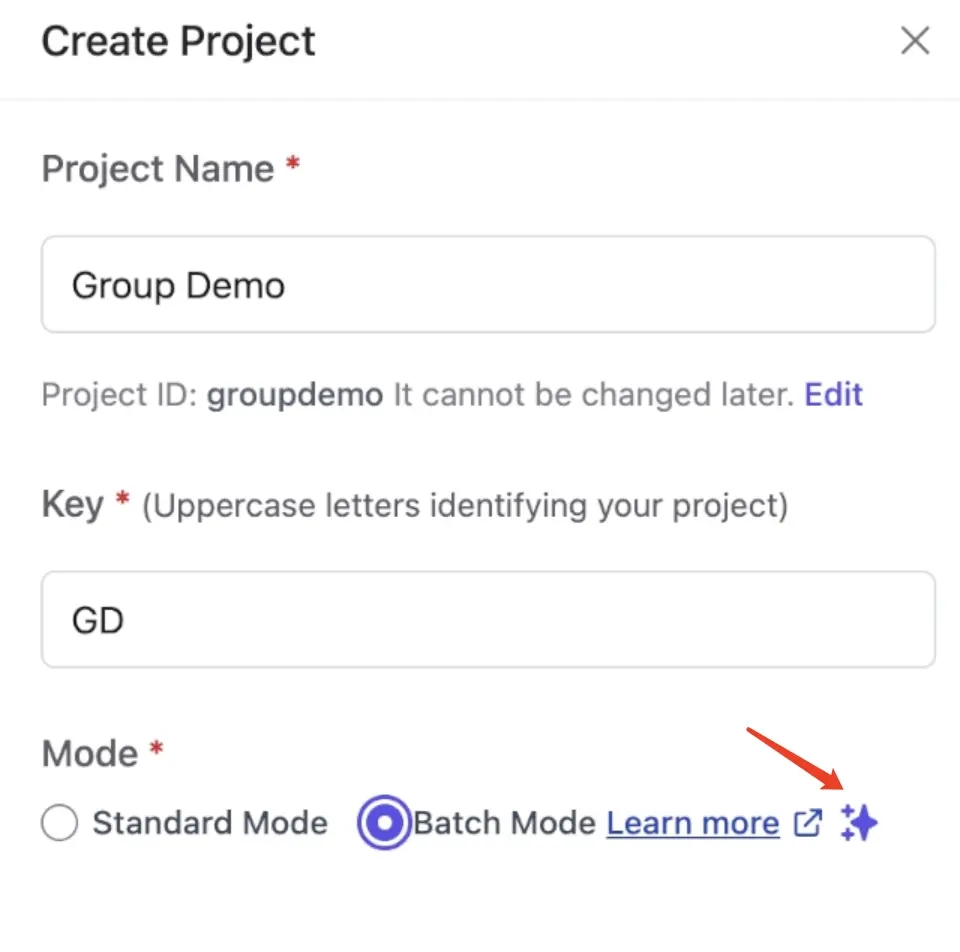
-
Within the project, click Create DB to create eight databases as follows:
demo_db_testinTestenvironment and it will run automatically. Because by default, issue inTestenvironment will rollout automatically;demo_db_prod_asiainProdenvironment and click Rollout;demo_db_prod_europeinProdenvironment and click Rollout;demo_db_prod_africainProdenvironment and click Rollout;demo_db_prod_australiainProdenvironment and click Rollout;demo_db_prod_north_americainProdenvironment and click Rollout;demo_db_prod_south_americainProdenvironment and click Rollout;demo_db_prod_antarcticainProdenvironment and click Rollout.
Step 3 - Group Databases and Create Tables in Batch
-
Within the project
Group Demo, click Database Groups tab, and click New database group. Fill in the form as follows:- Name:
demo-all| Environment:Prod - Condition: Where
Database namestartsWithdemo_db_prod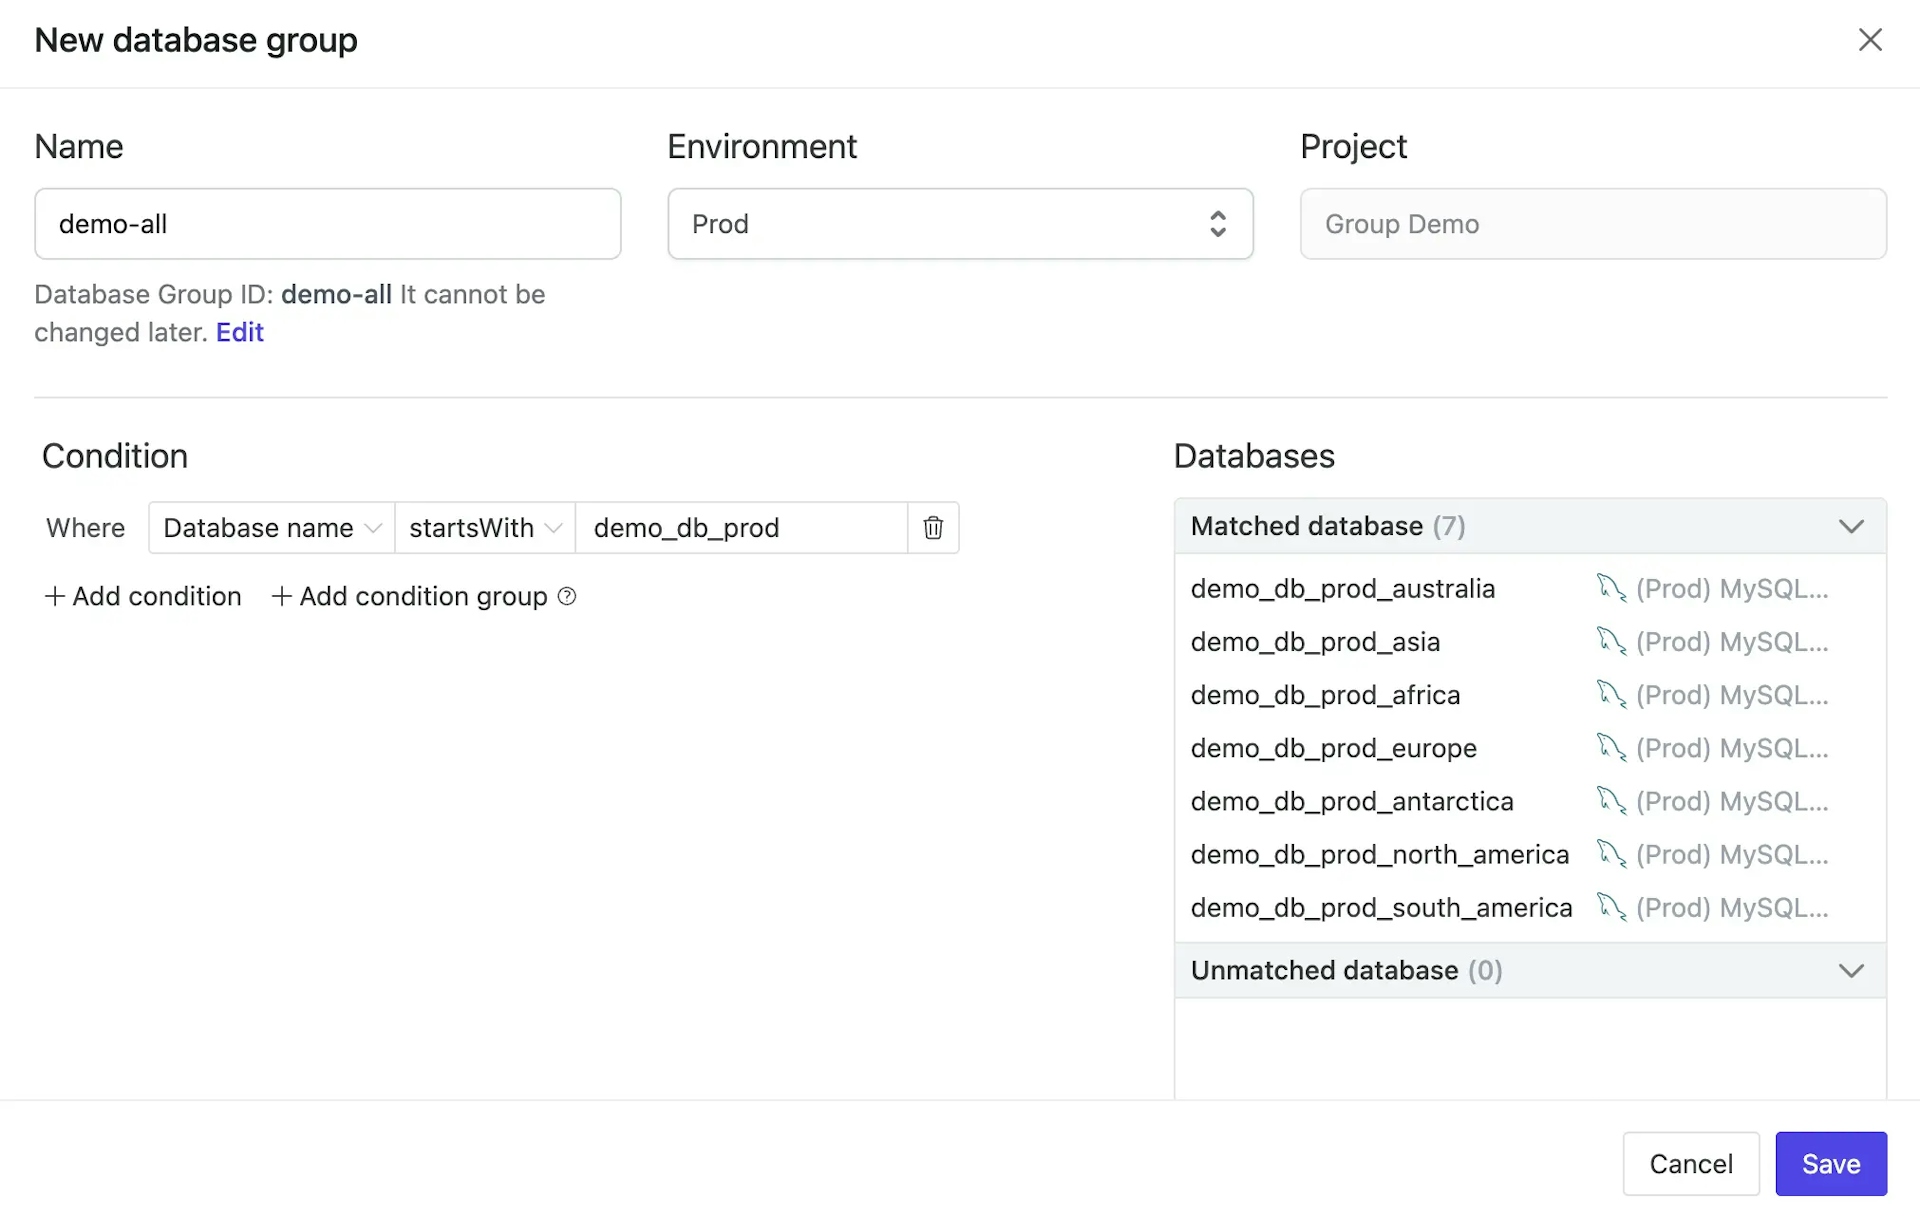 You may create other database group such as:
 - Name:
demo-human| Environment:Prod - Condition: Where
Database namestartsWithdemo_db_prodandDatabase name!=demo_db_prod_antarctica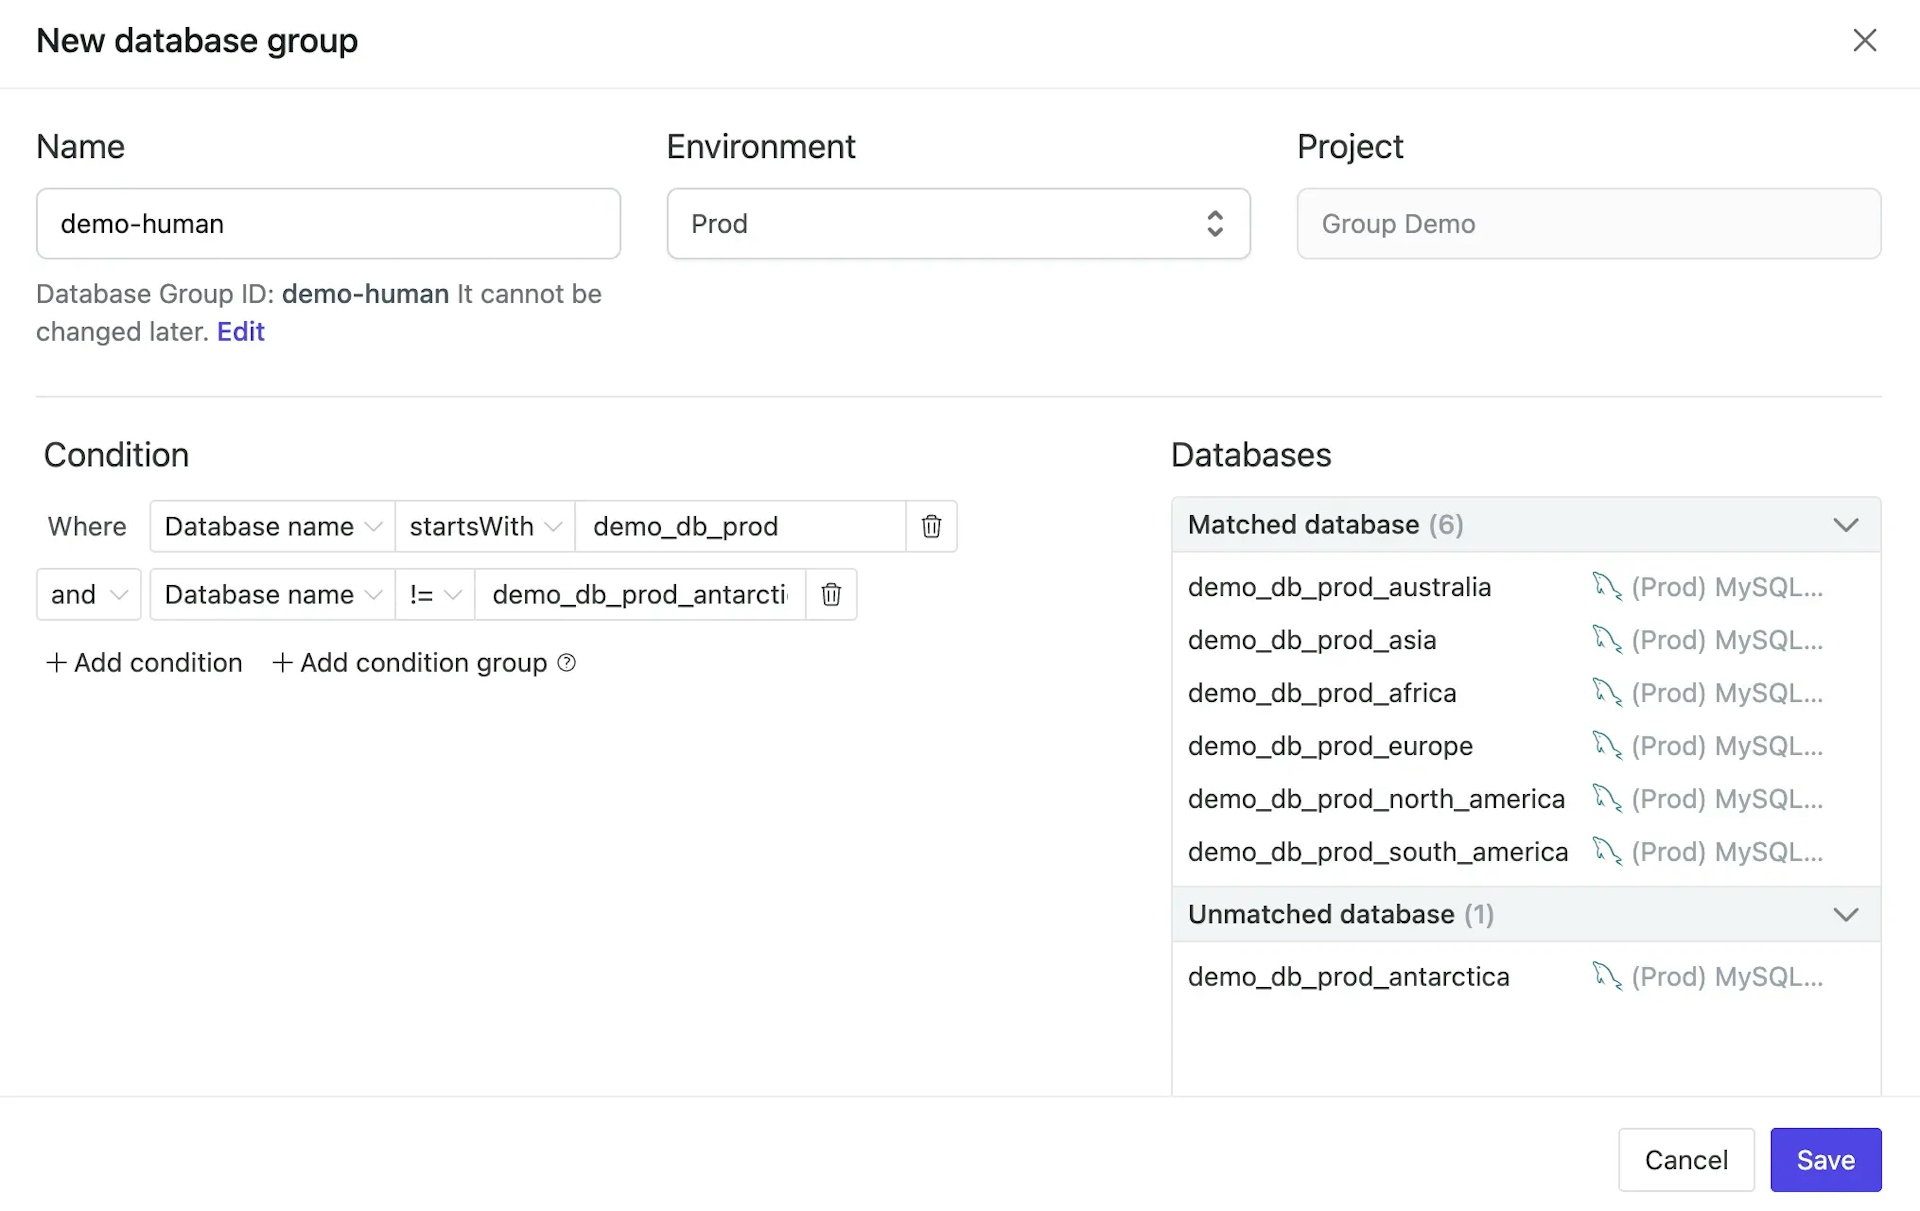
- Name:
-
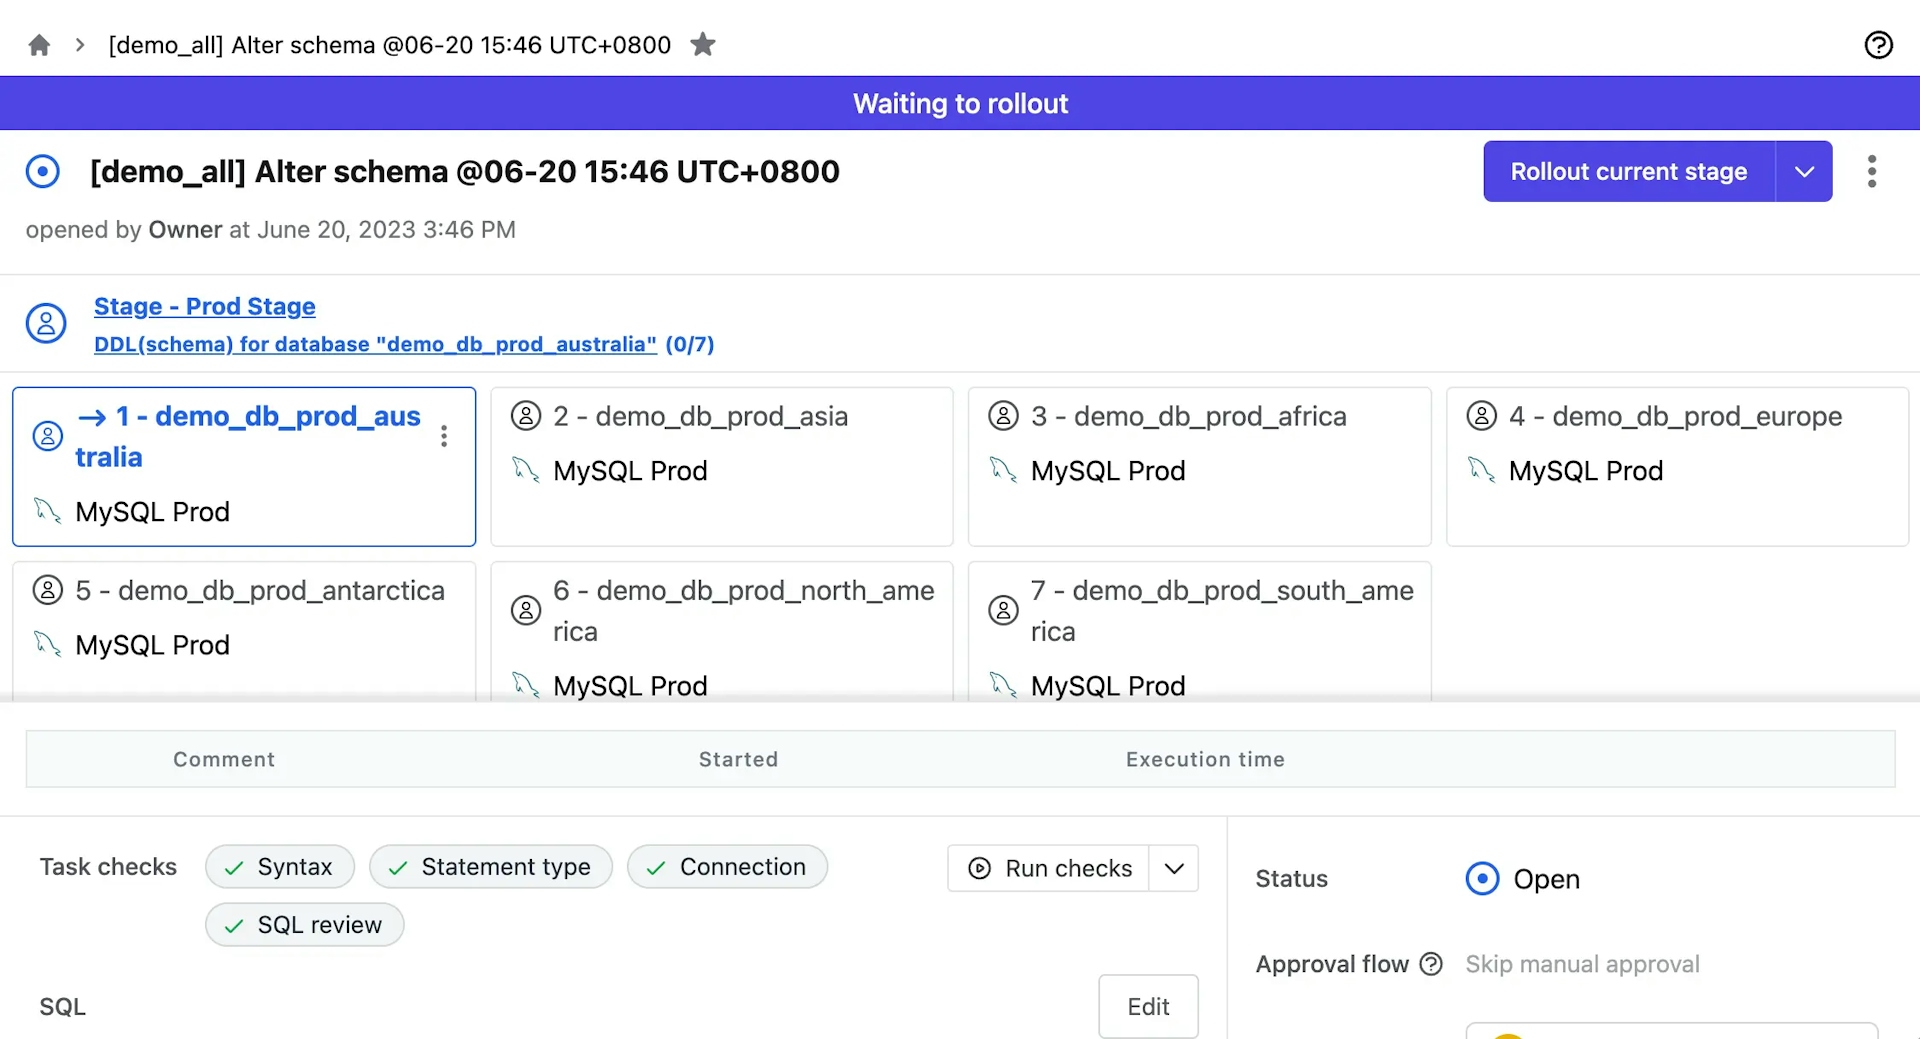
Within the project, click Alter Schema. Choose Manual Selection > Database Group >
demo-all, and click Next. Copy and paste the SQL below and click Create.CREATE TABLE t1 ( id INTEGER PRIMARY KEY ); -
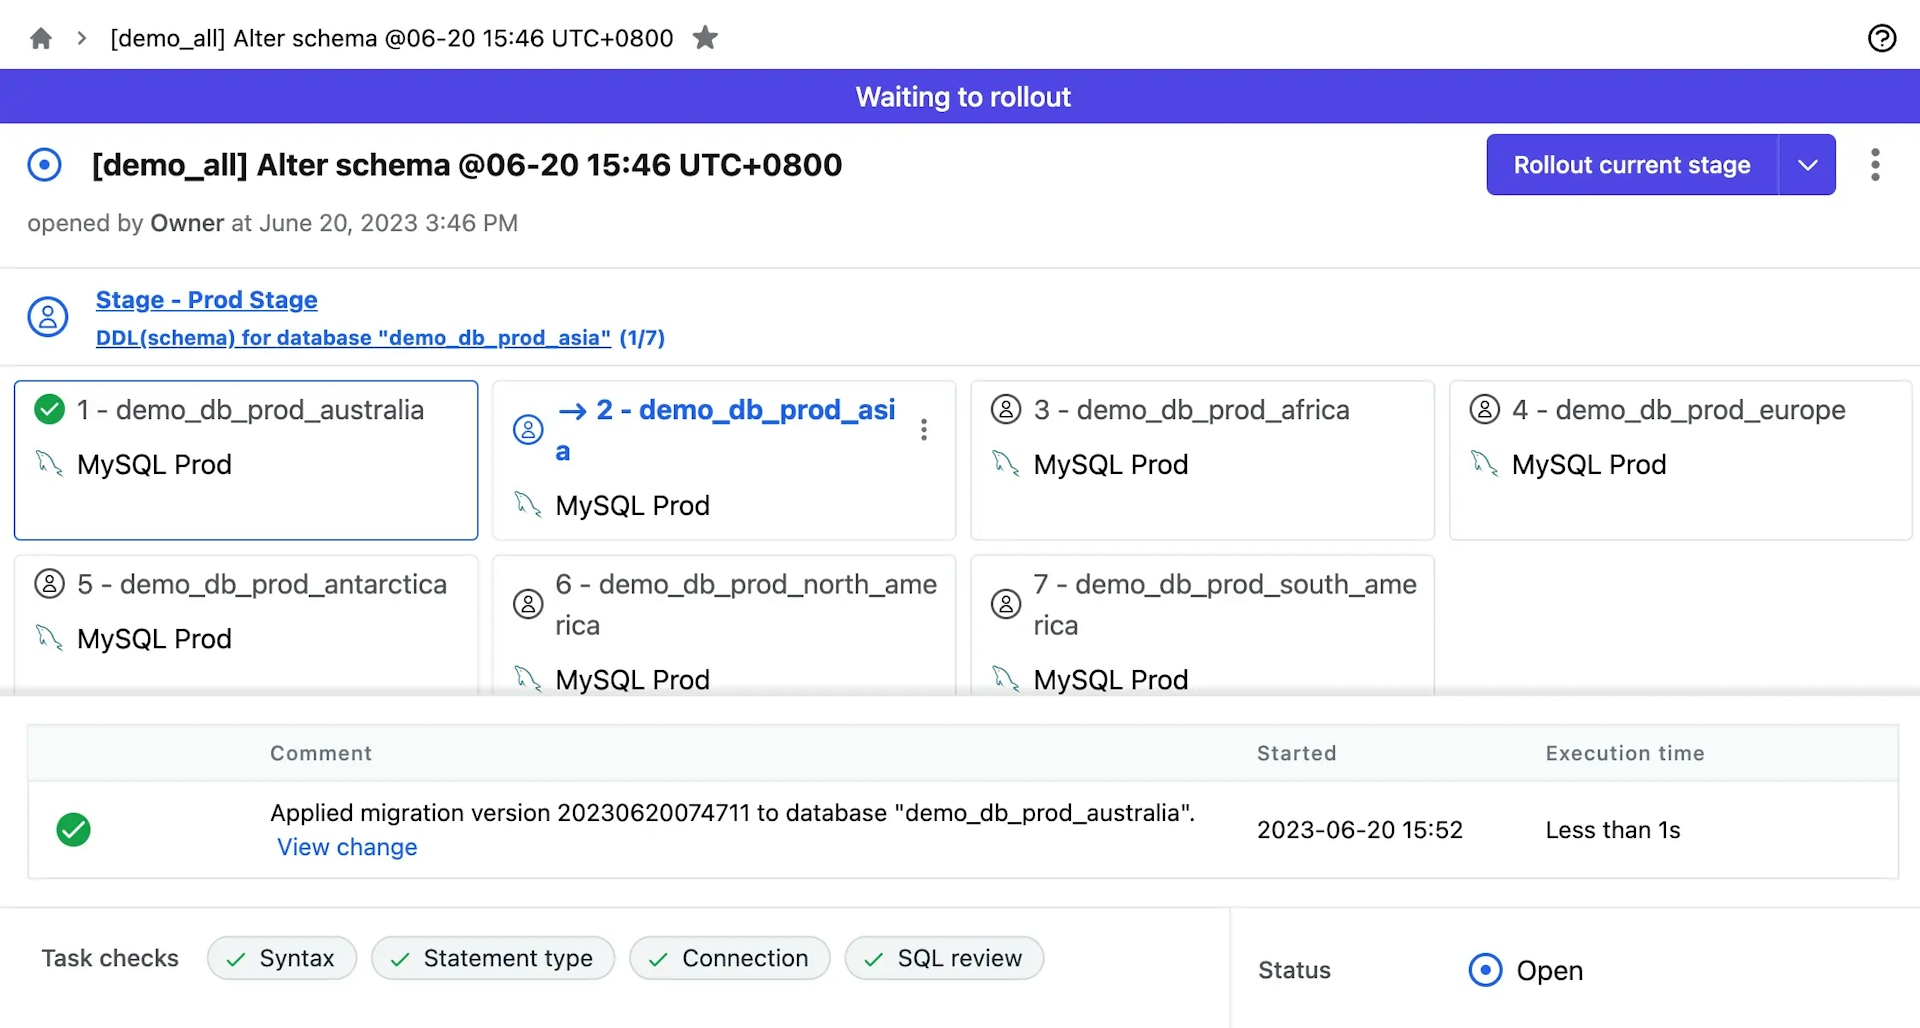
On the issue page, click the down arrow and choose Rollout to run one database first. If it's OK, then click Rollout current stage to run all.
-
Repeat 2 to 3 to create another issue for another table
t2:CREATE TABLE t2 ( id INTEGER PRIMARY KEY );
Step 4 - Group Tables and Alter tables in Batch
-
Within the project
Group Demo, click Database Groups tab, and click New table group. Fill in the form as follows:- Database Group:
demo-all| Environment:Prod| Name:demo-all-t - Condition: Where
Table namestartsWitht
- Database Group:
-
Click New table group again. Fill in the form as follows:
- Database Group:
demo-all| Environment:Prod| Name:demo-all-t1 - Condition: Where
Table name==t1
- Database Group:
-
Within the project, click Alter Schema. Choose Manual Selection > Database Group >
demo-all, and click Next. You'll see the following field.
-
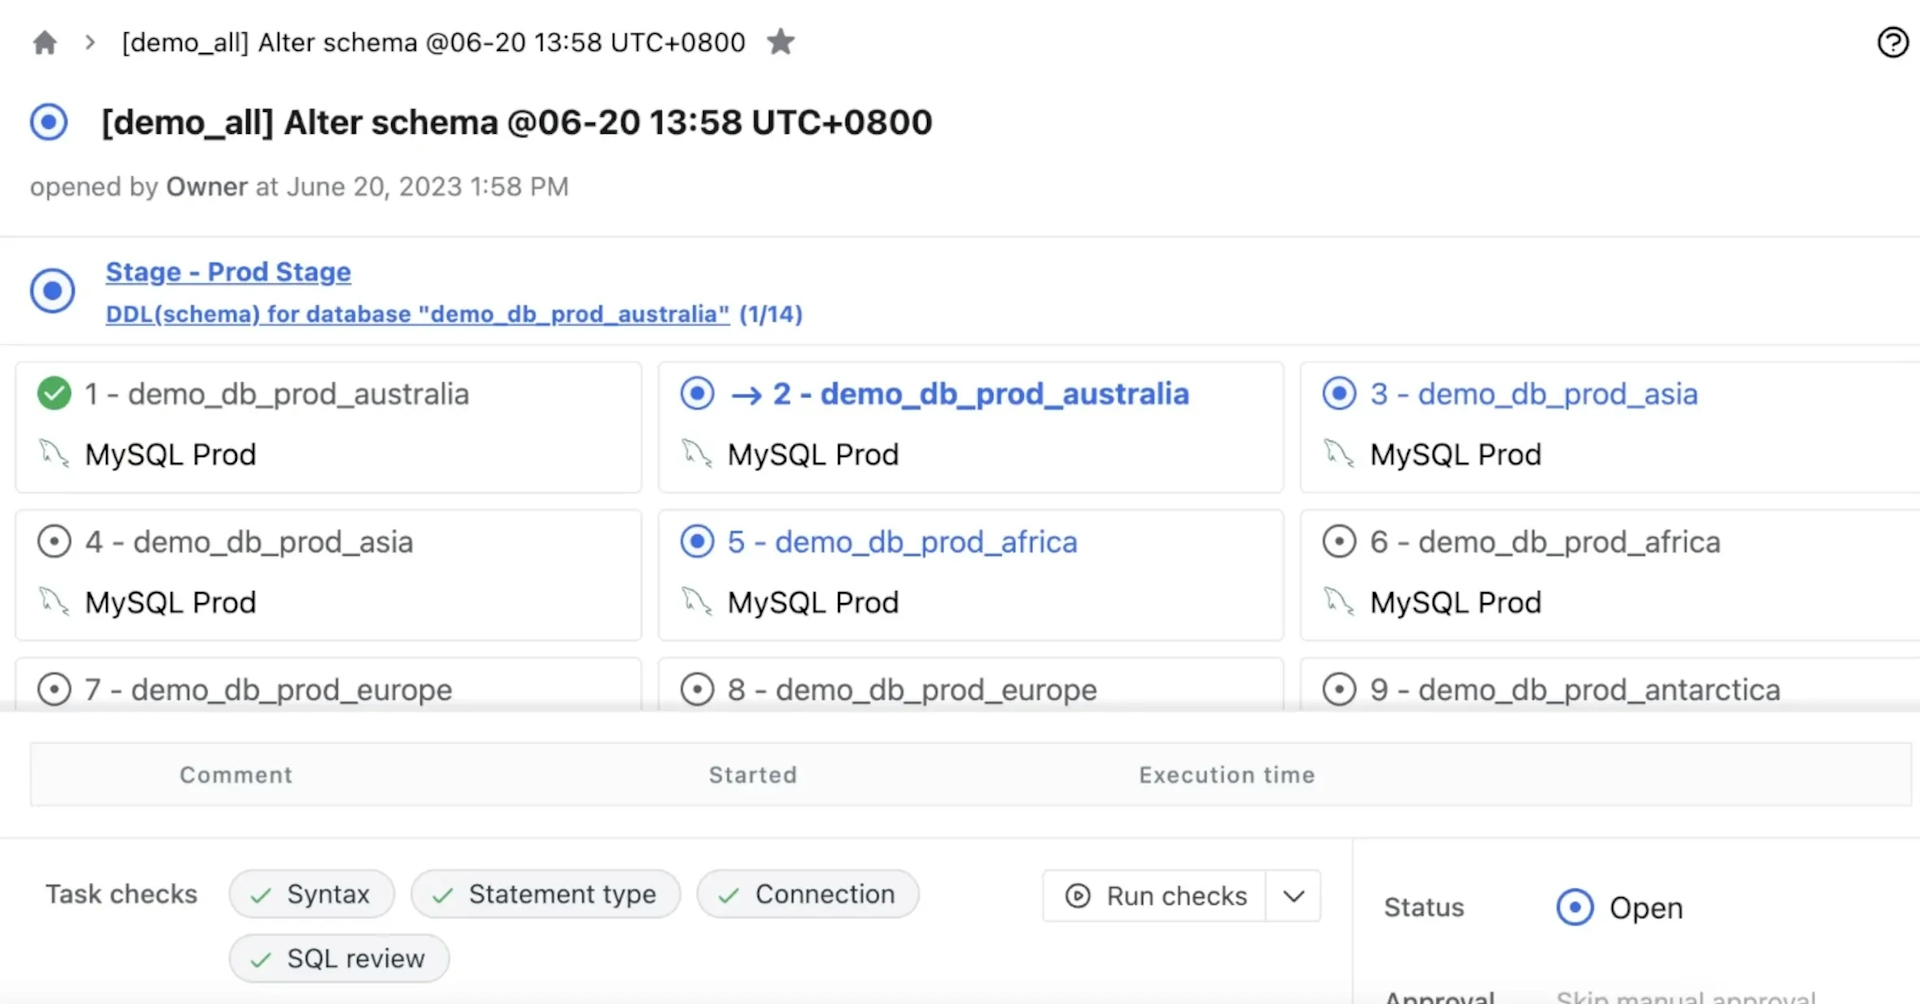
Here we choose
demoall_twhich includest1andt2. Uncomment the last line, replace it with the SQL below and click Create.ALTER TABLE demoall_t ADD COLUMN name VARCHAR(255) NOT NULL; -
On the issue page, click the down arrow and choose Rollout to run one database first. If it's OK, then click Rollout current stage to run all.
Summary
Now you have learned how to use database group and table group to run batch changes in Bytebase. Bytebase also provides other ways to batch change databases across multiple environments, SaaS tenants. Please refer to Batch Change for more details.