Deploy Schema Migration with Rollout Policy
Bytebase offers a powerful GUI for schema migration deployments. This tutorial will show you how to use Bytebase to deploy schema migrations with features like SQL Review, custom approval, time scheduling, and more.
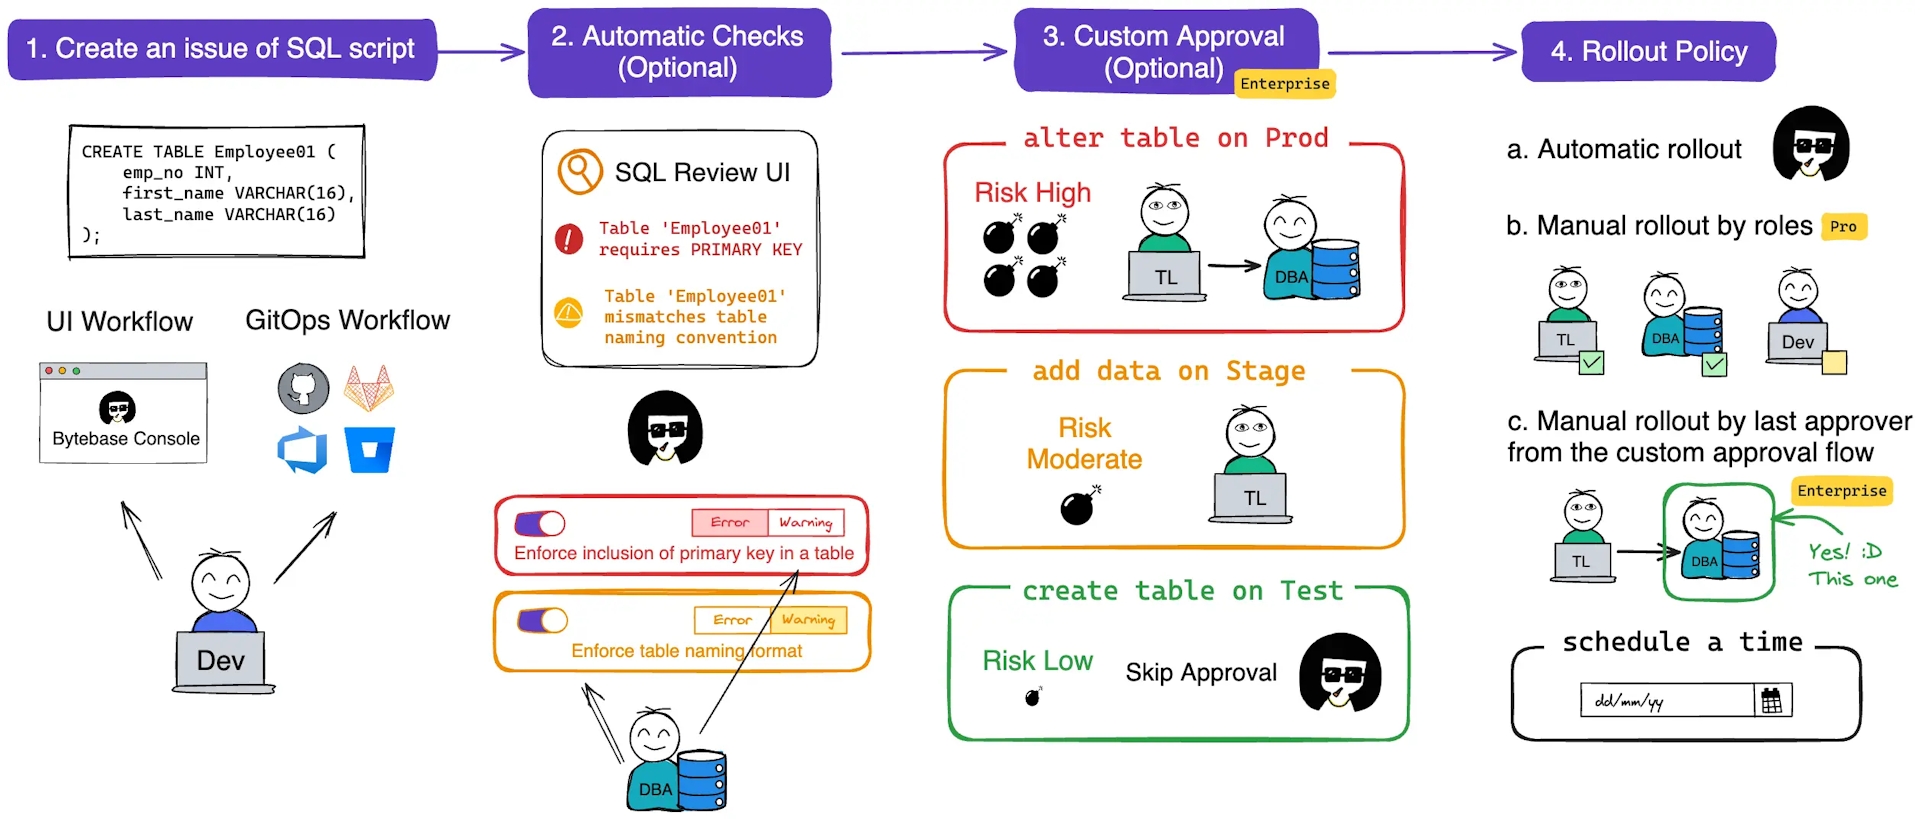
Bytebase offers Community, Pro and Enterprise Plans. Advanced plans unlock new capabilities of deploying schema migrations and this tutorial will walk you through them progressively.
Features covered
- Level 1 - Automatic SQL Review (available in all plans)
- Level 2 - Rollout Policy (available in Pro and Enterprise)
- Level 3 - Custom Approval (available in Enterprise)
Preparation
-
Make sure your Docker is running, and start the Bytebase Docker container with the following command:
docker run --rm --init \ --name bytebase \ --publish 8080:8080 --pull always \ --volume ~/.bytebase/data:/var/opt/bytebase \ bytebase/bytebase:2.16.0 -
Bytebase is running successfully in Docker, and you can visit it via
localhost:8080. Register an admin account and it will be granted theworkspace adminrole automatically.
Level 1: Automatic rollout with SQL review (Community Plan)
- Go to Environments > Test and Environments > Prod, you'll see
- The
Rollout policyisautomatic. Unless there's some warning or error, the rollout will be automatically executed after the issue is created. SQL Reviewis enabled onProdwith a sample policy.
- The
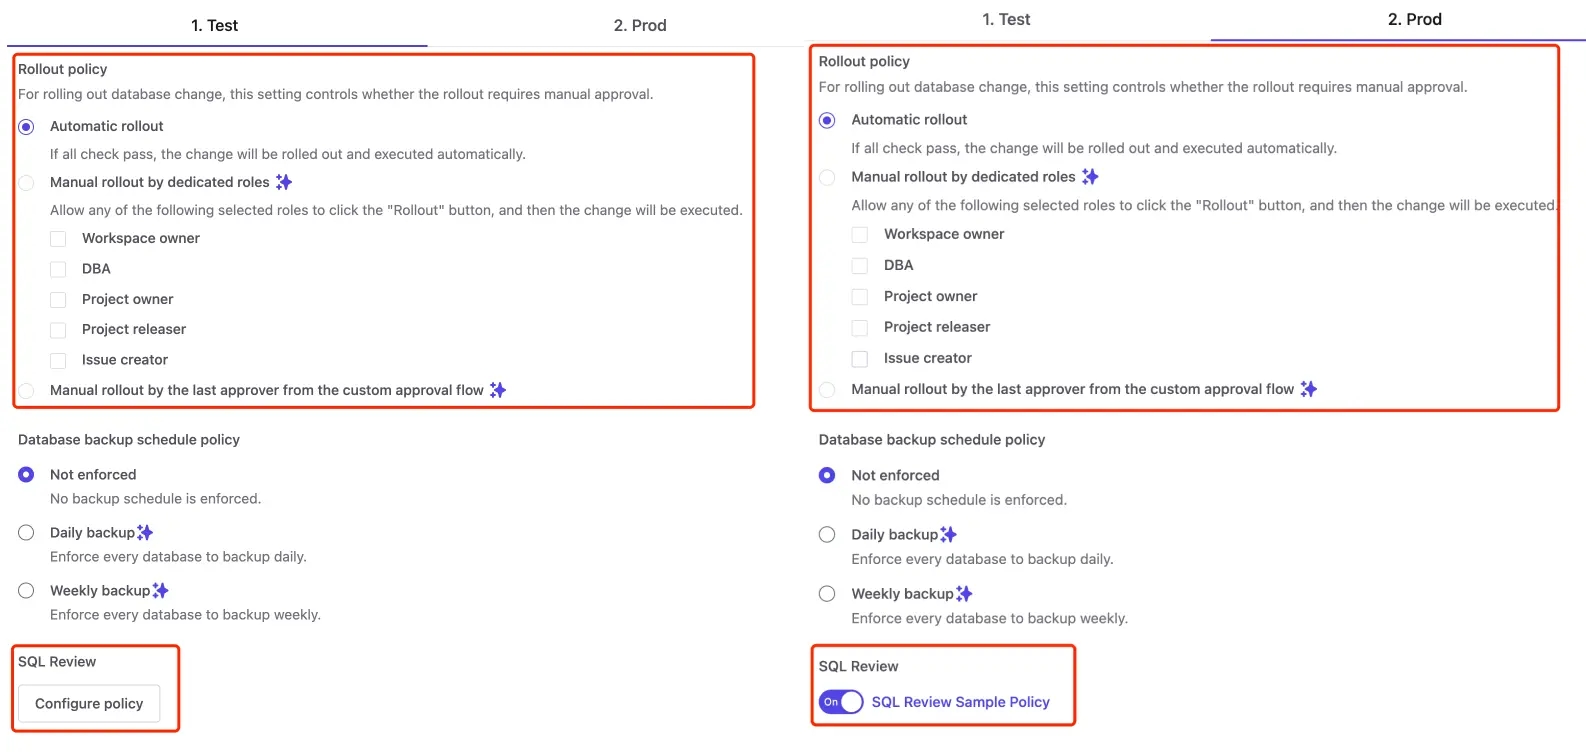
- Click
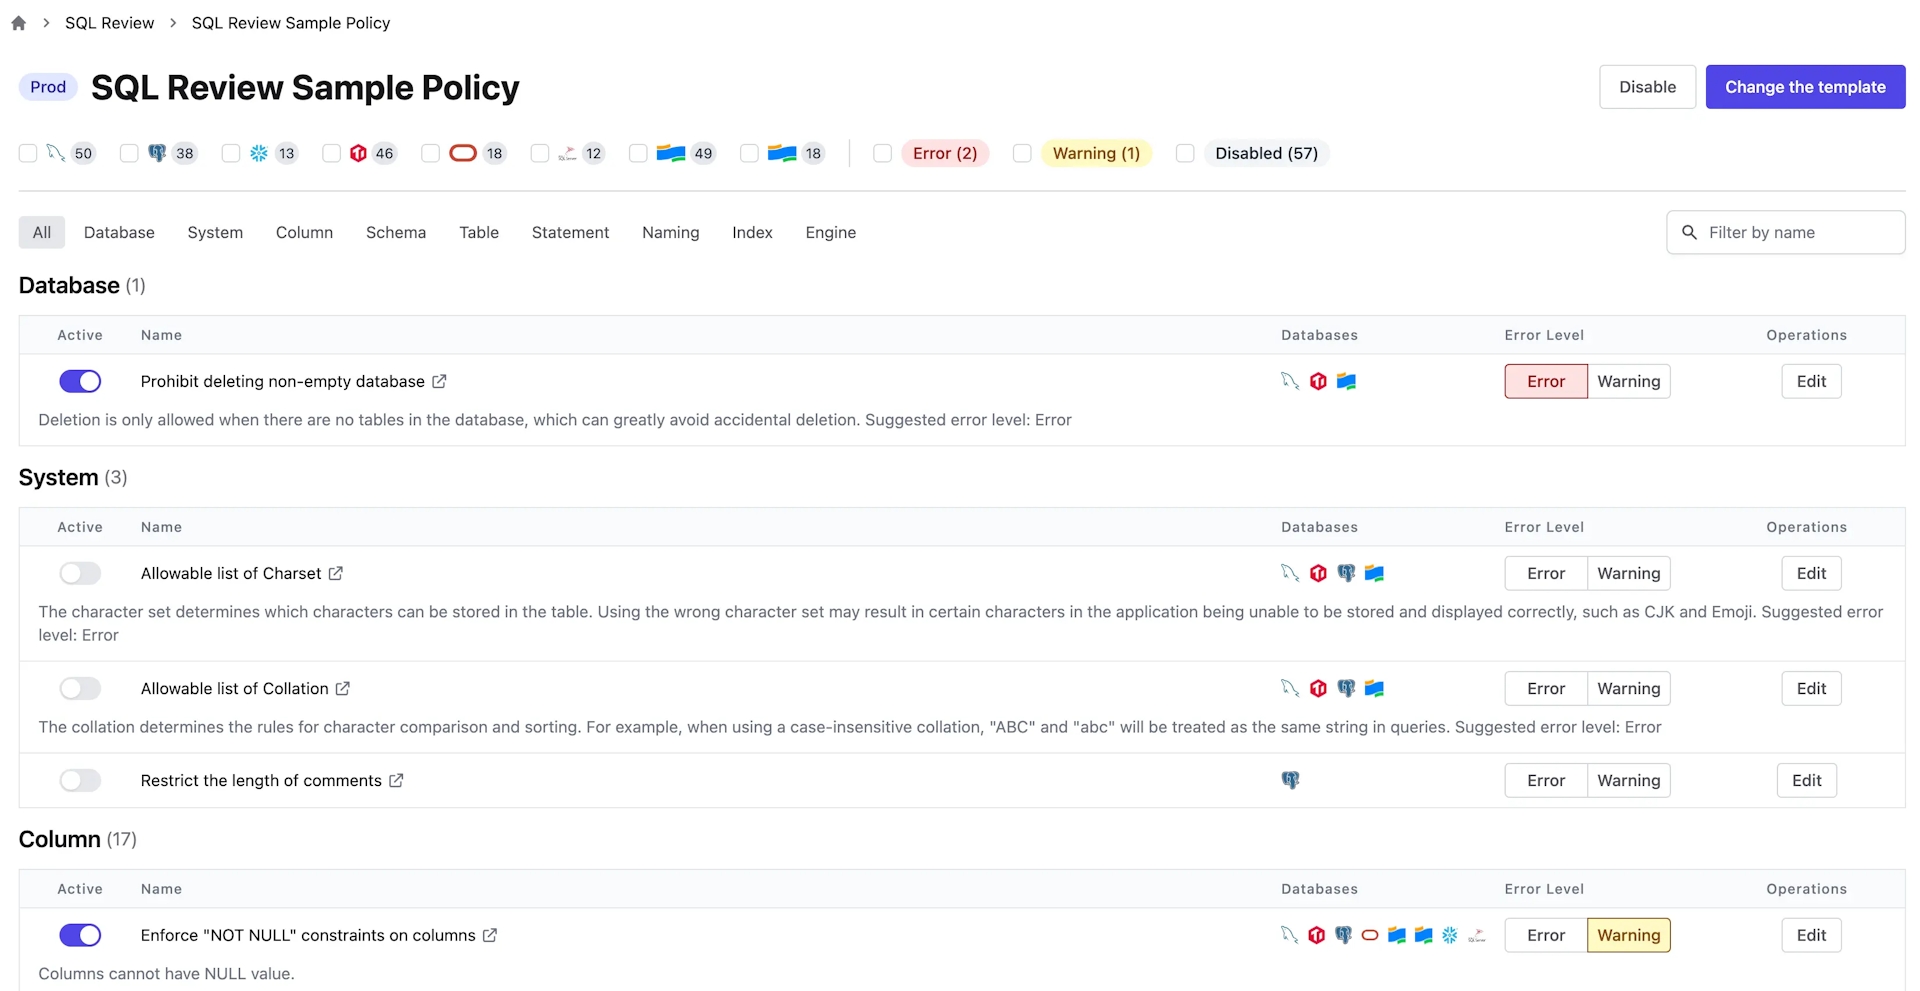
SQL Review Sample Policyto go to SQL Review policy, there're three rules activated. Let's pay attention toEnforce NOT NULL constraints on columnsrule, and we'll try to violate it.
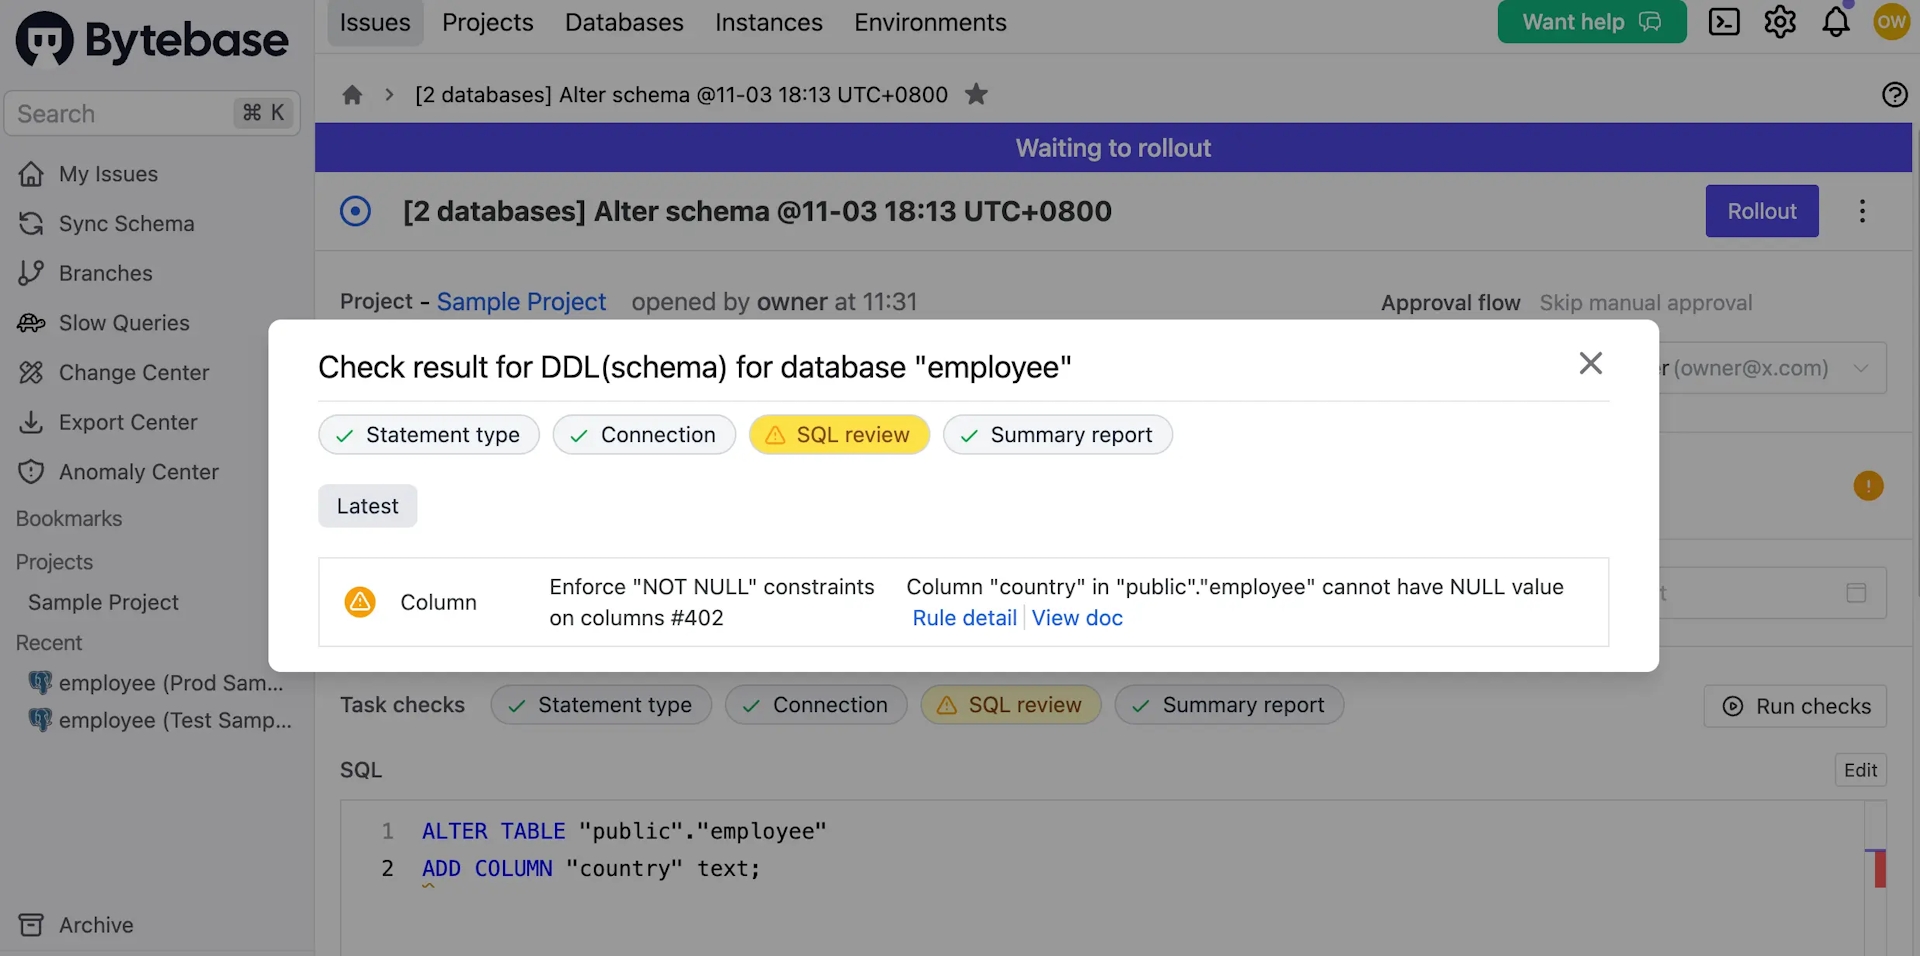
- Go to
Sample Project, click Edit Schema, choose bothTestandProddatabases, and click Next. Paste the following SQL statements into Raw SQL, and click Preview issue.
ALTER TABLE "public"."employee"
ADD COLUMN "country" text;- SQL Review checks will dry run before the issue is created. Here let's create the issue regardless of the dry run result.
- After the issue is created, SQL Review will run automatically along with some other checks. You'll see there's a warning for the task on
Prod.
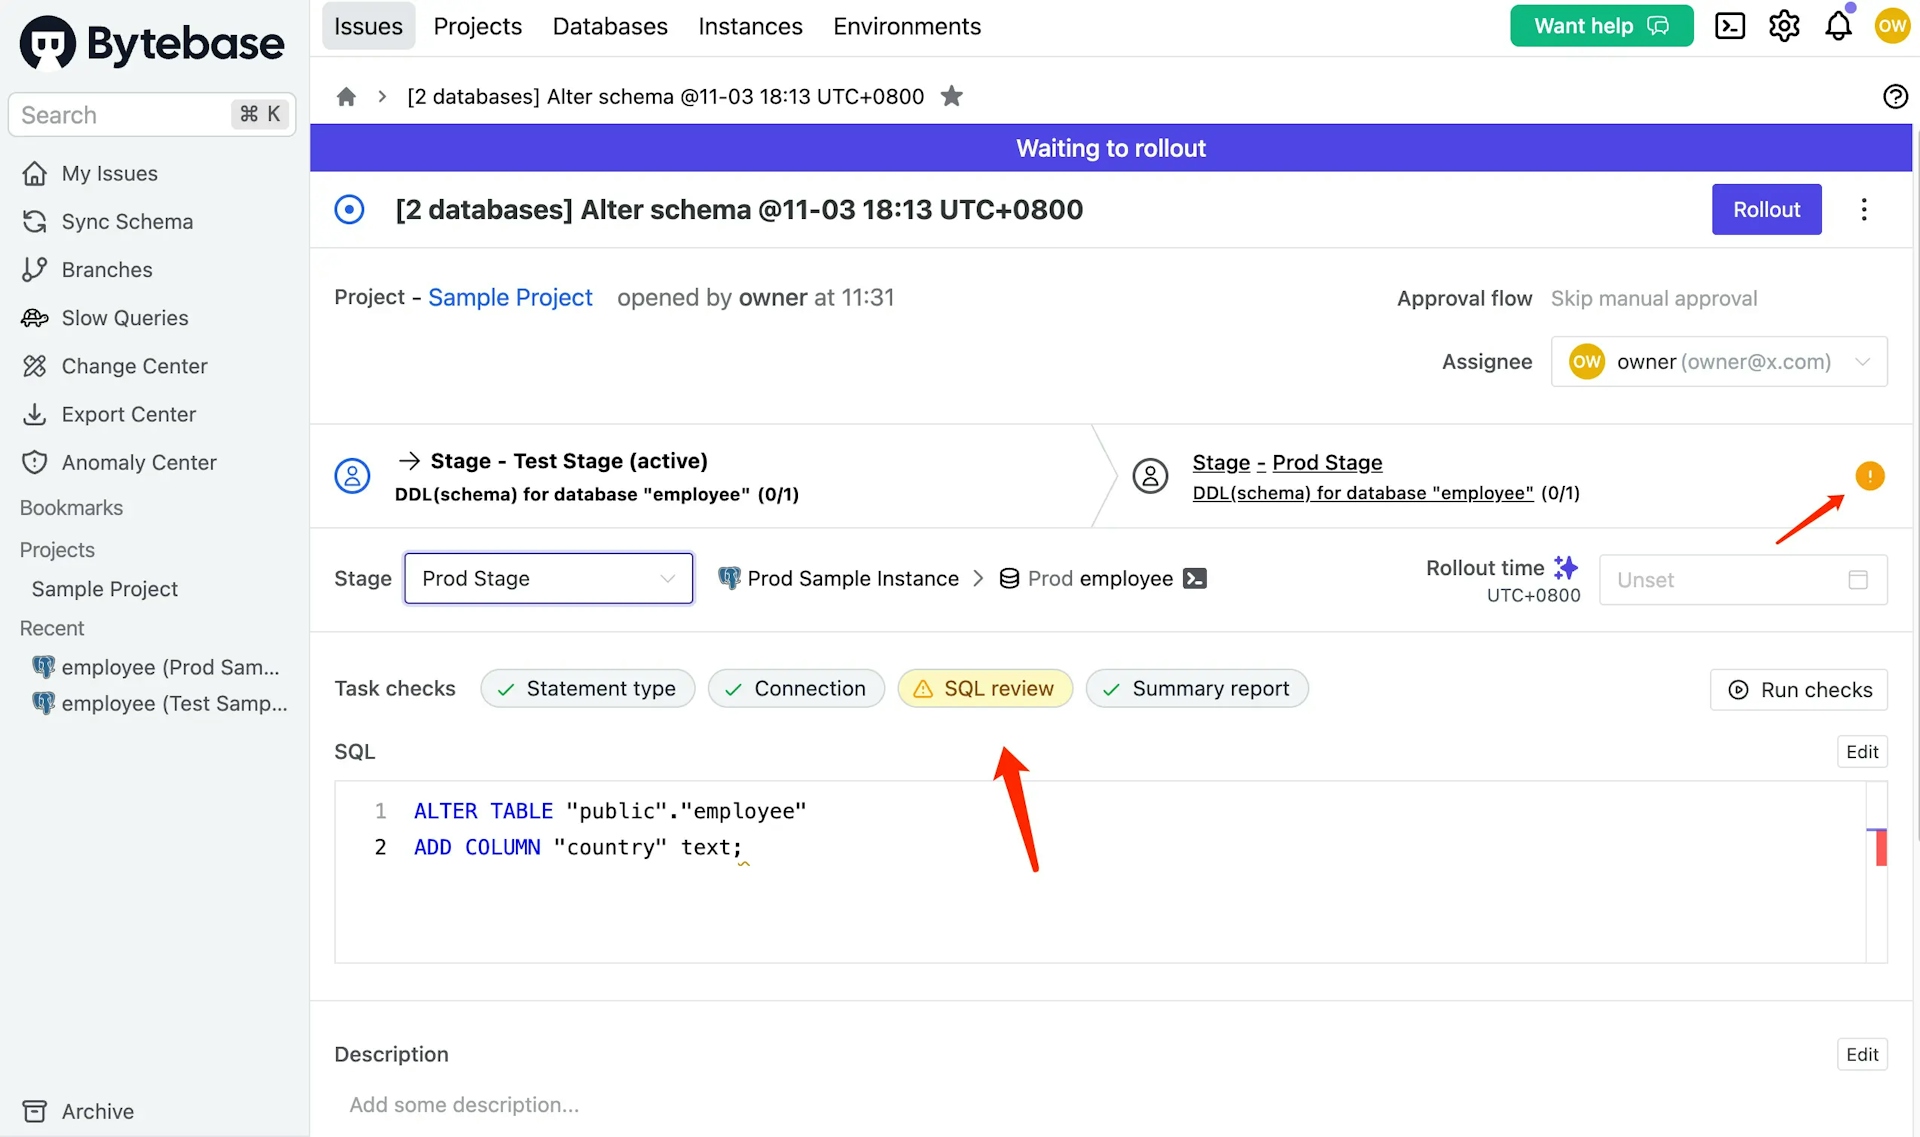
- Click Edit, paste this SQL statement and click Save. Apply this change to all tasks. The SQL checks will run again, and you'll see the warning disappear and it will roll out automatically.
ALTER TABLE "public"."employee"
ADD COLUMN "country" text NOT NULL DEFAULT '';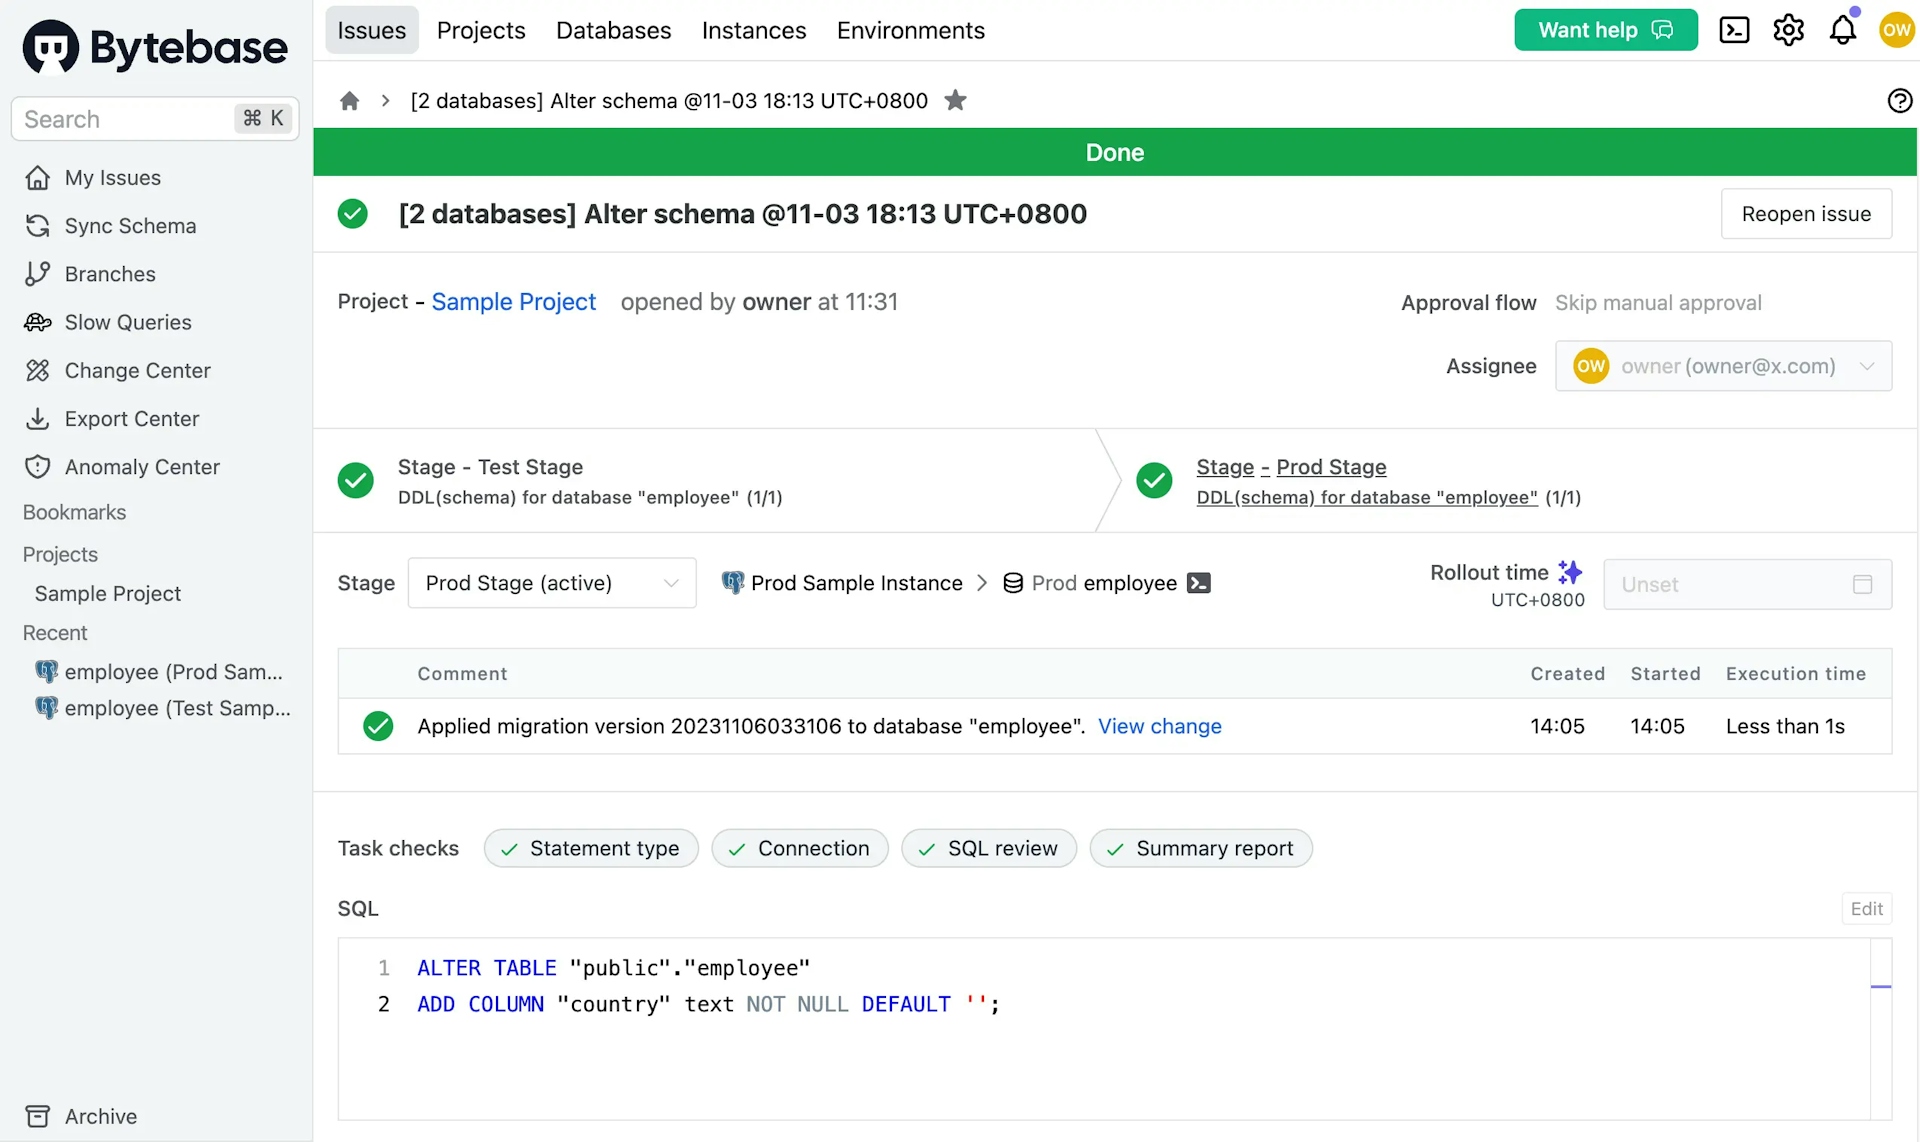
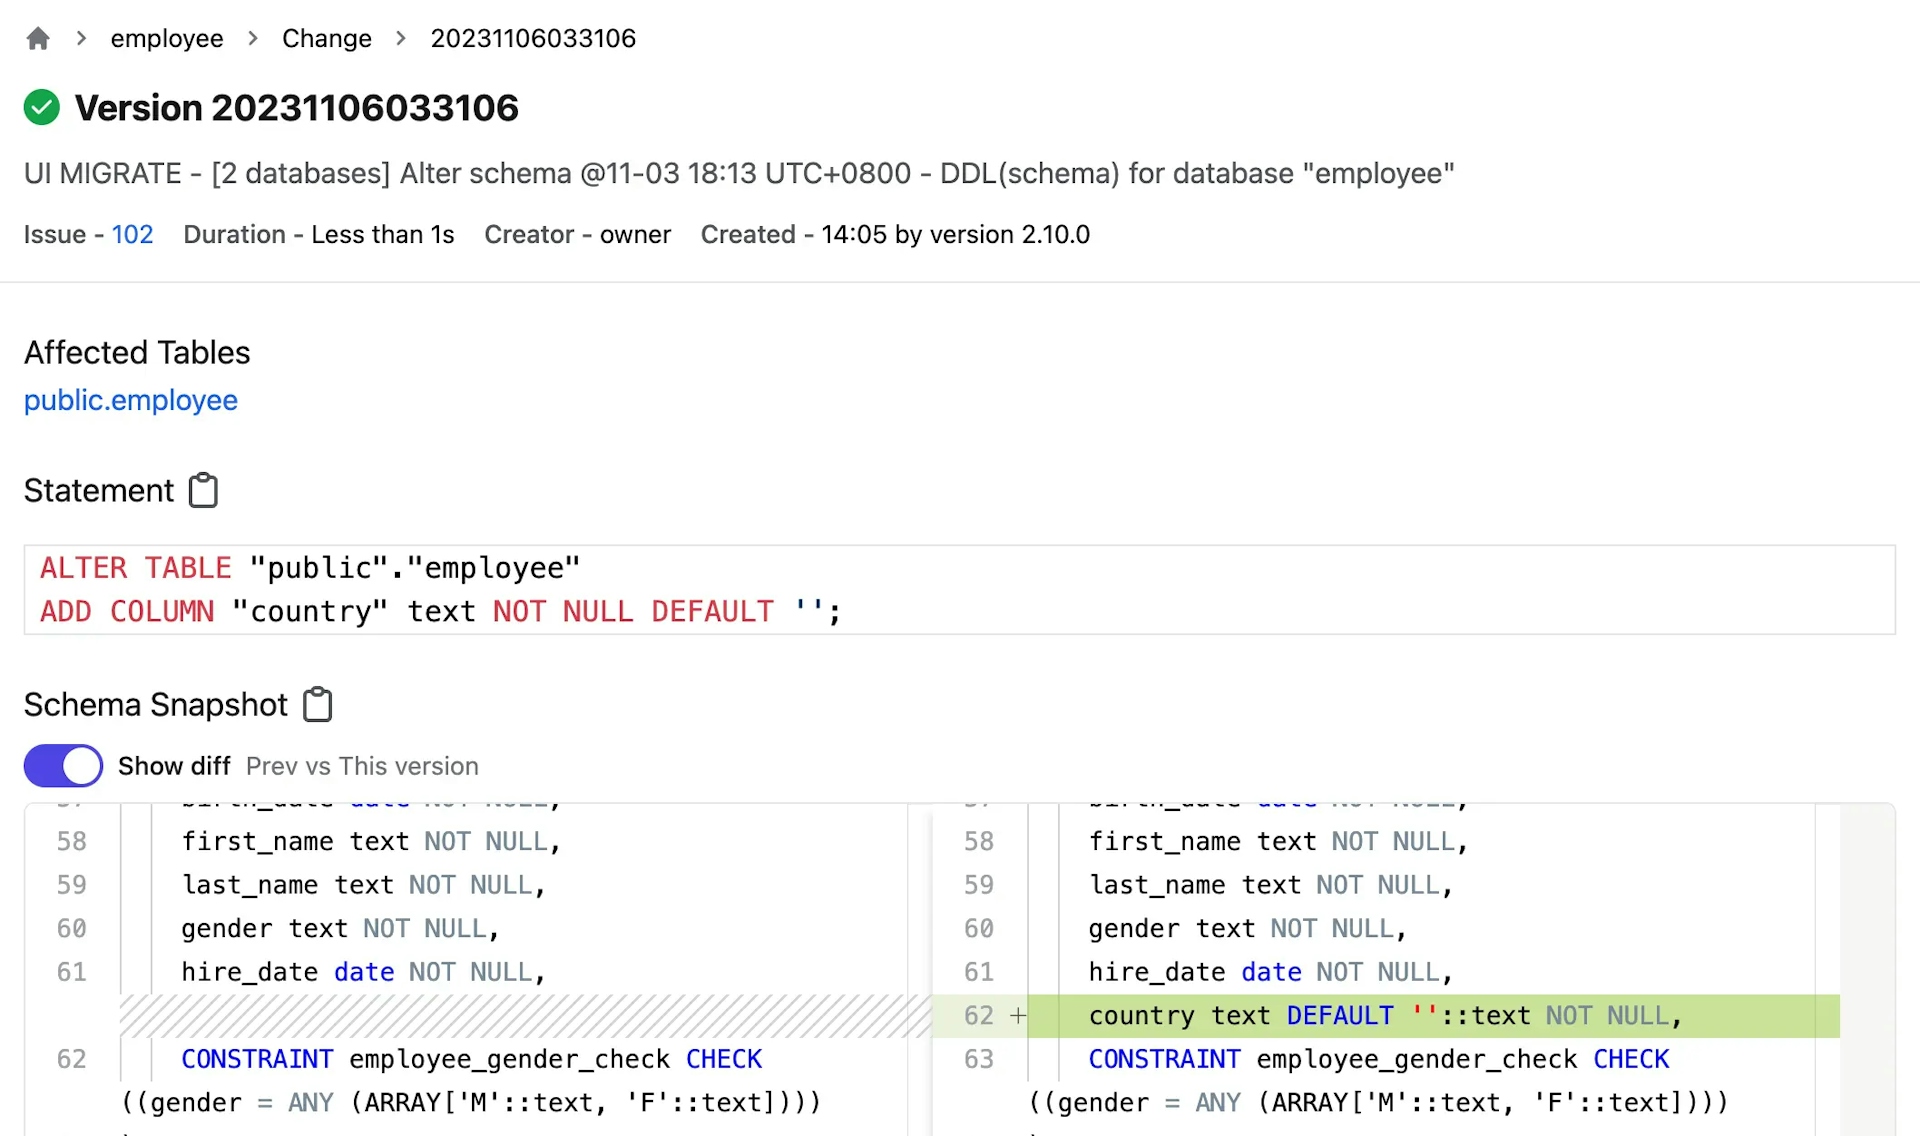
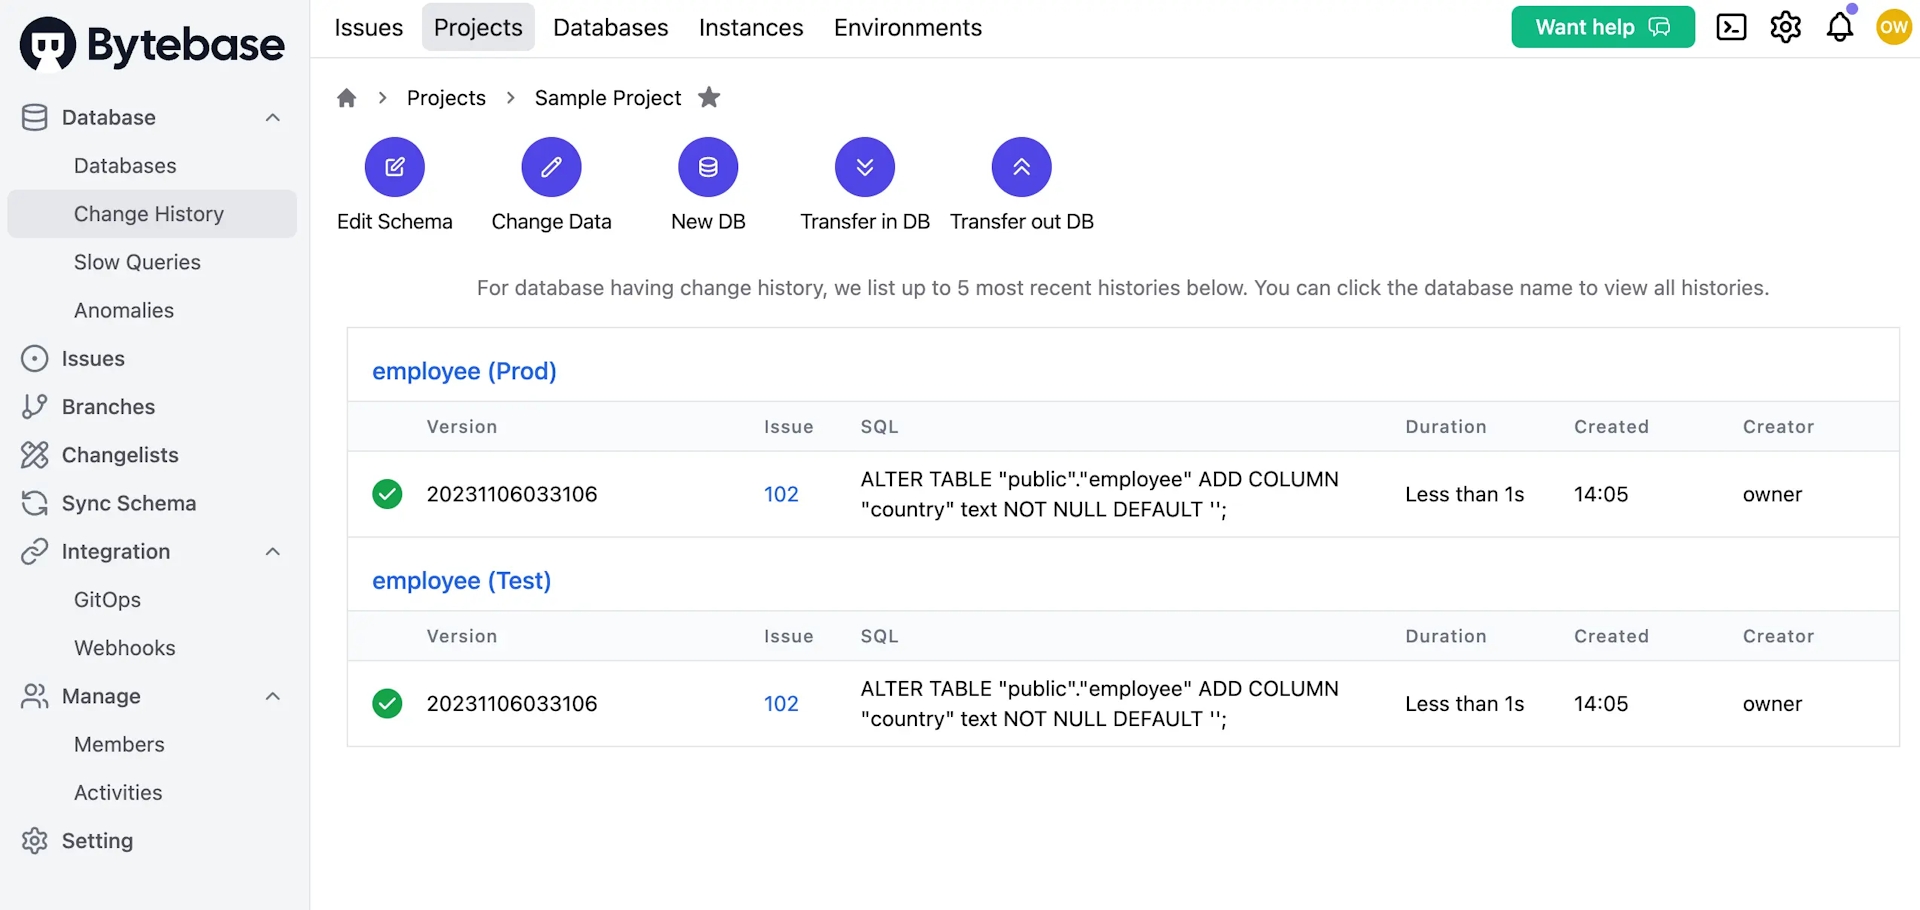
- Click View change to see the diff or go to Change History to view all changes.
Level 2: Manual rollout with dedicated roles and scheduled time (Pro Plan)
With Pro Plan, you'll get two additional features:
- Manual rollout policy. You can specify multiple pre-defined roles to manually roll out the change.
- Time scheduling. You can specify a particular time to roll out the change.
To simplify the process, we'll use 14-day enterprise trial here. Click the Start free trial to upgrade.
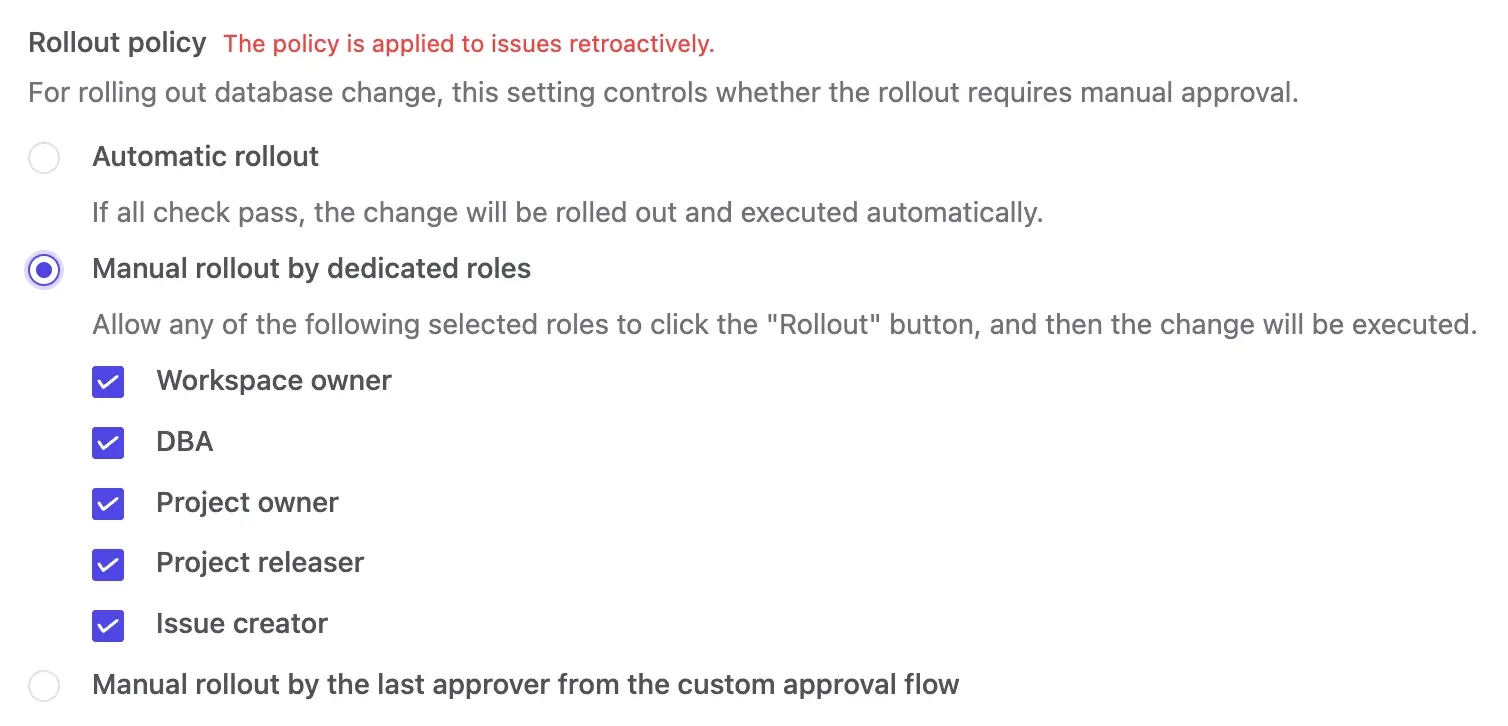
- Go to Environments > Prod, choose
Manual rollout by dedicated rolesand check all the roles. Click Update.
- Go to
Sample Project, click Edit Schema, choose bothTestandProddatabases, and click Next. Paste the following SQL statements into Raw SQL, and click Preview issue.
ALTER TABLE "public"."employee"
ADD COLUMN "city" text NOT NULL DEFAULT '';- Click Create, and after Task checks runs, you'll see the SQL running on
Testautomatically but waiting to run onProd.
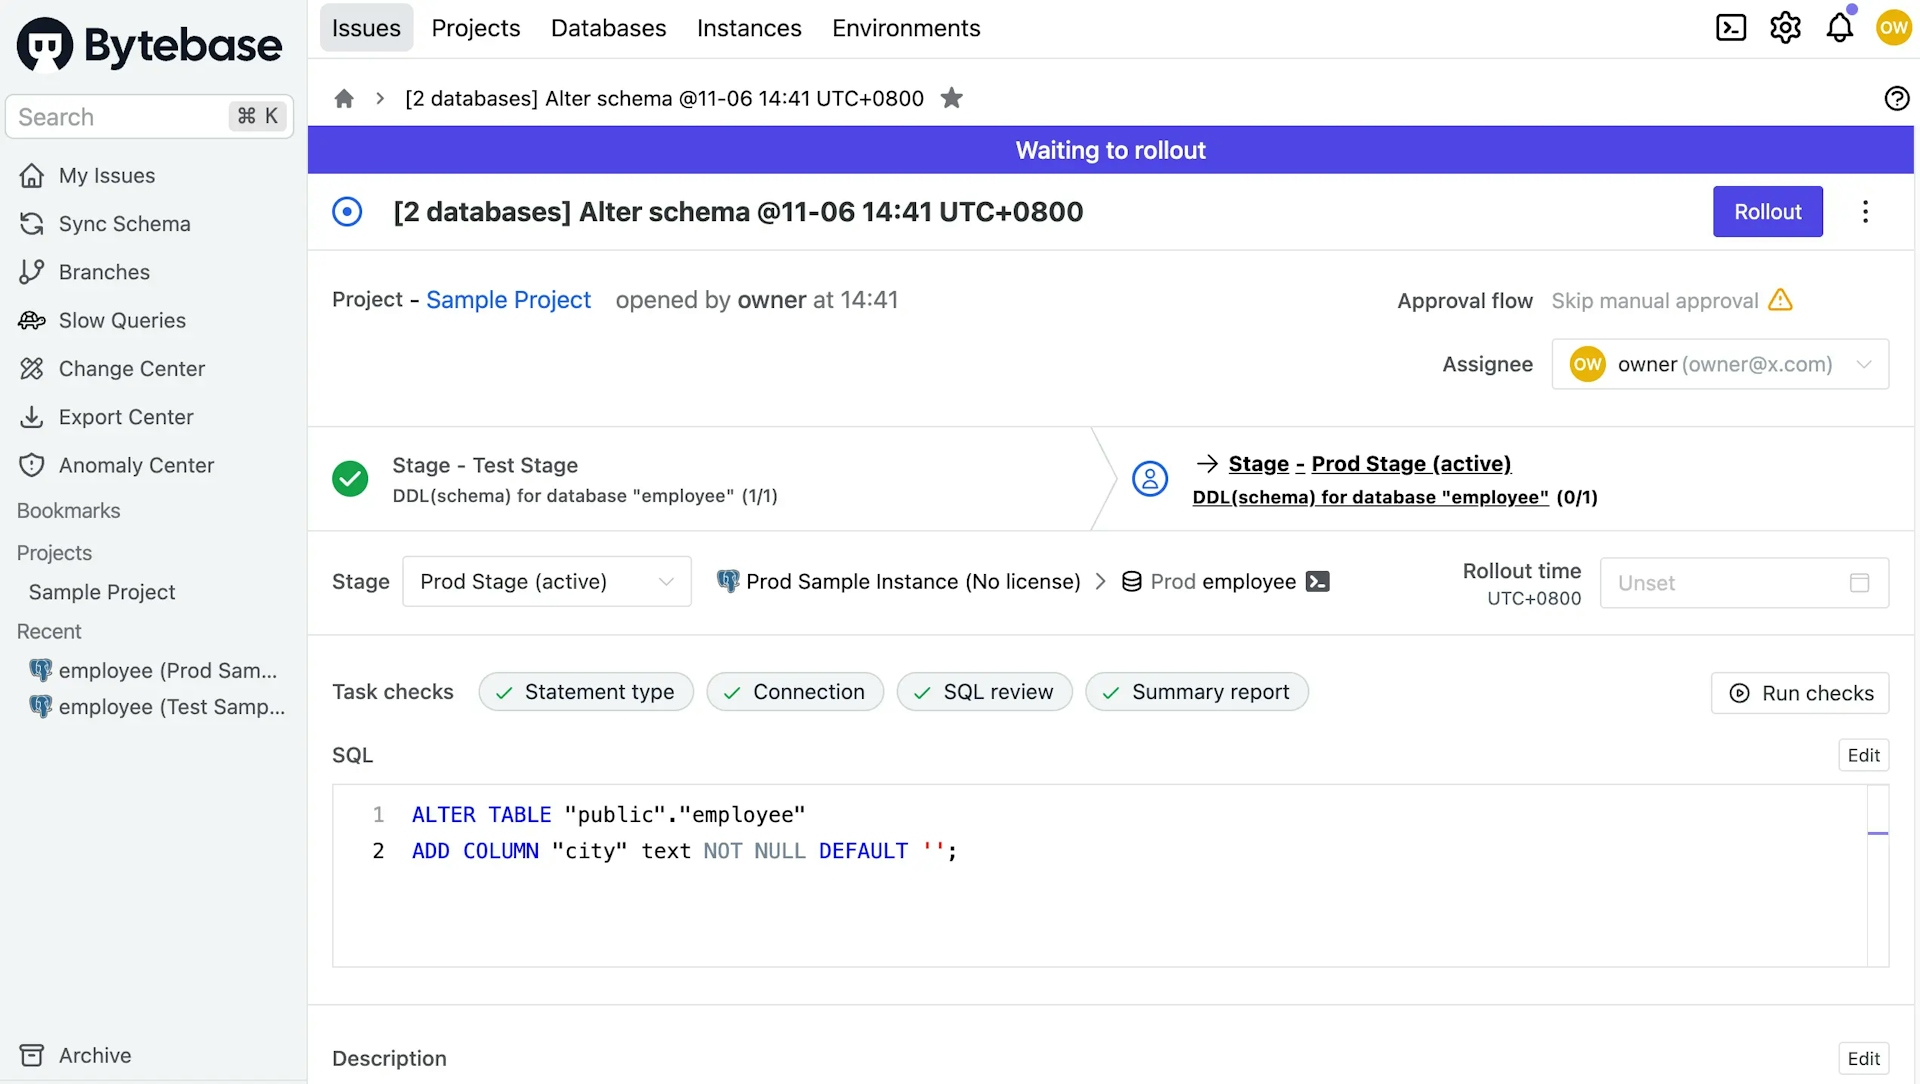
- Click Rollout to trigger directly or set a Rollout time.

Level 3: Manual rollout with custom approval (Enterprise Plan)
If you want the approval flow to be more dynamic based on the context like the type of SQL statements, the affected rows and etc, then you can configure custom approval flow.
Go to Instances and click Assign License for both instances. Without doing this, the enterprise plan required for custom approval won't be enabled on instances.
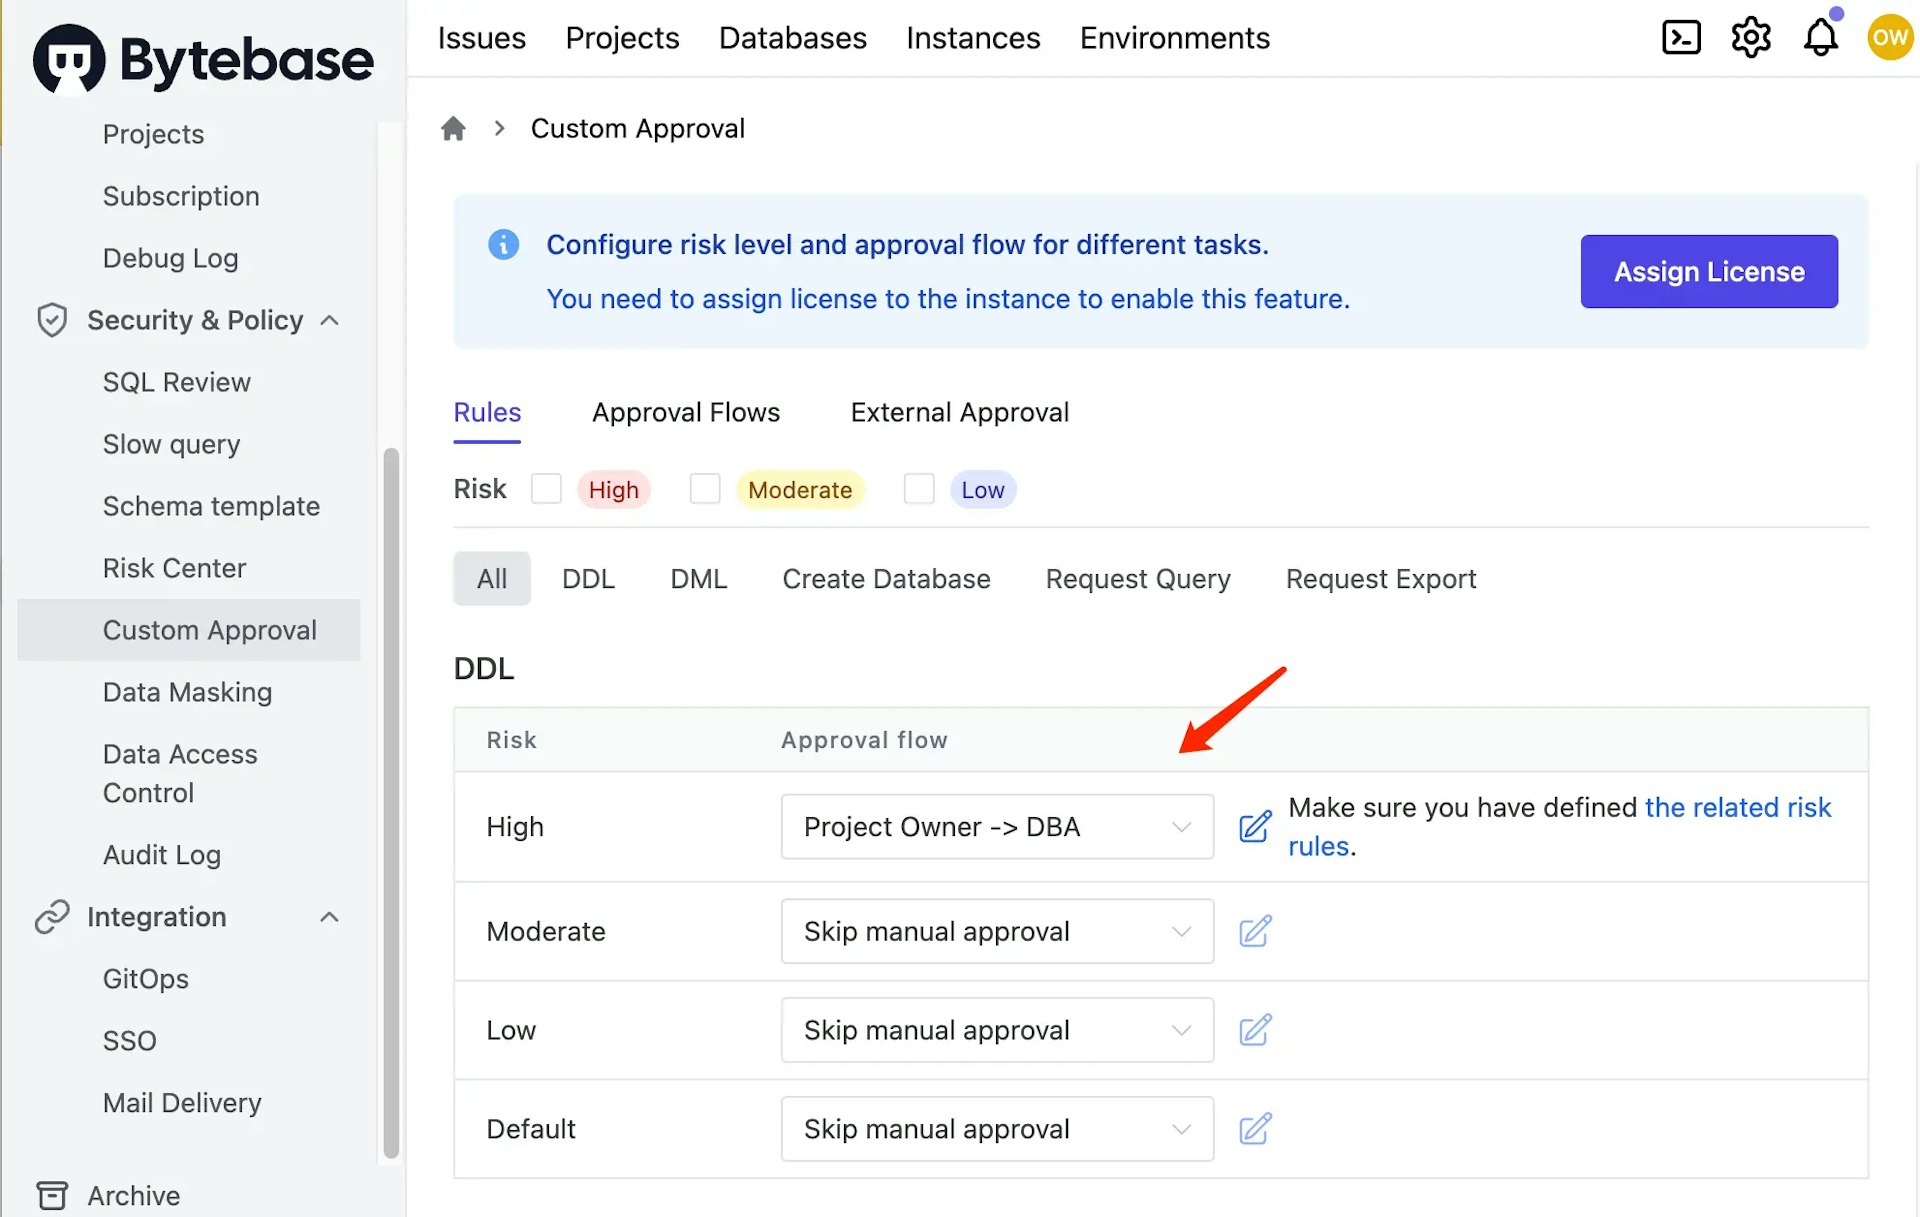
- Click Settings (the gear icon) > Security & Policy > Custom Approval. Choose
Project Owner -> DBAas High Risk for DDL.
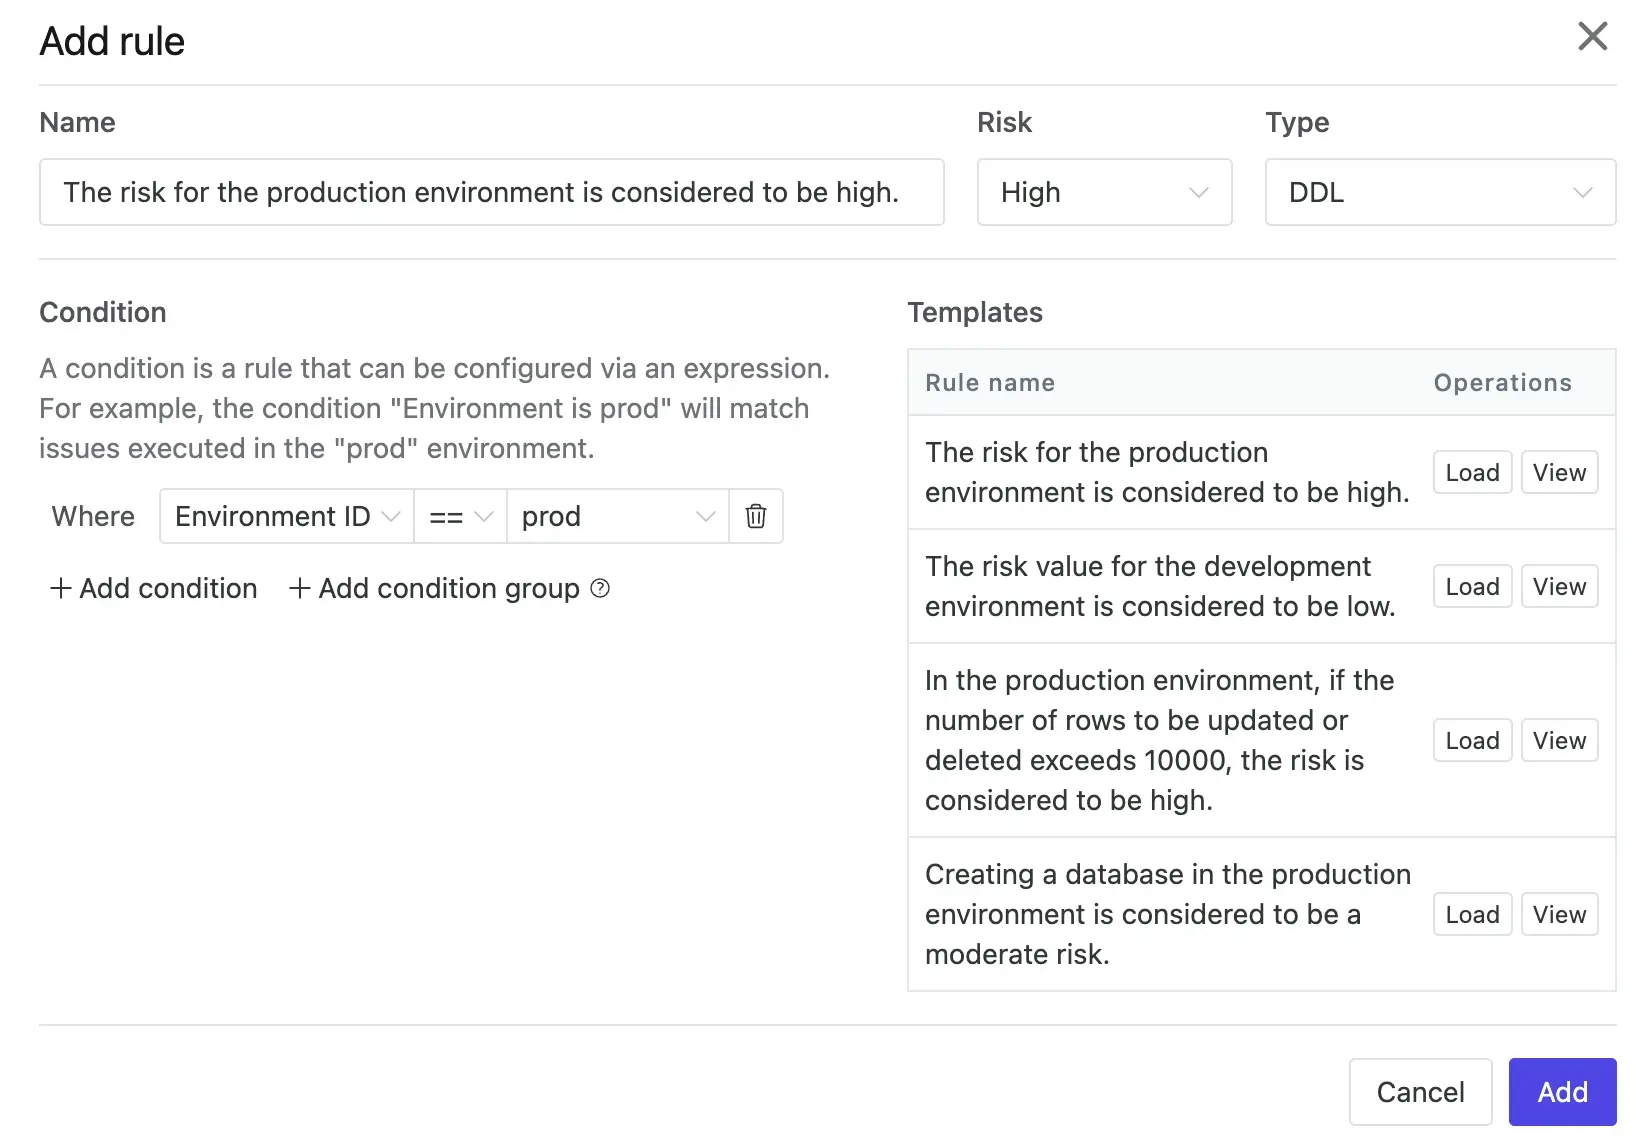
- Click the related risk rules or Settings (the gear icon) > Security & Policy > Risk Center. Click Add rule. Set
HighRisk andDDLasThe risk for the production environment is considered to be high.
-
Click Settings (the gear icon) and add a DBA account. Click it in the Active members list, and edit its password. You'll need this account later to do the approval.
-
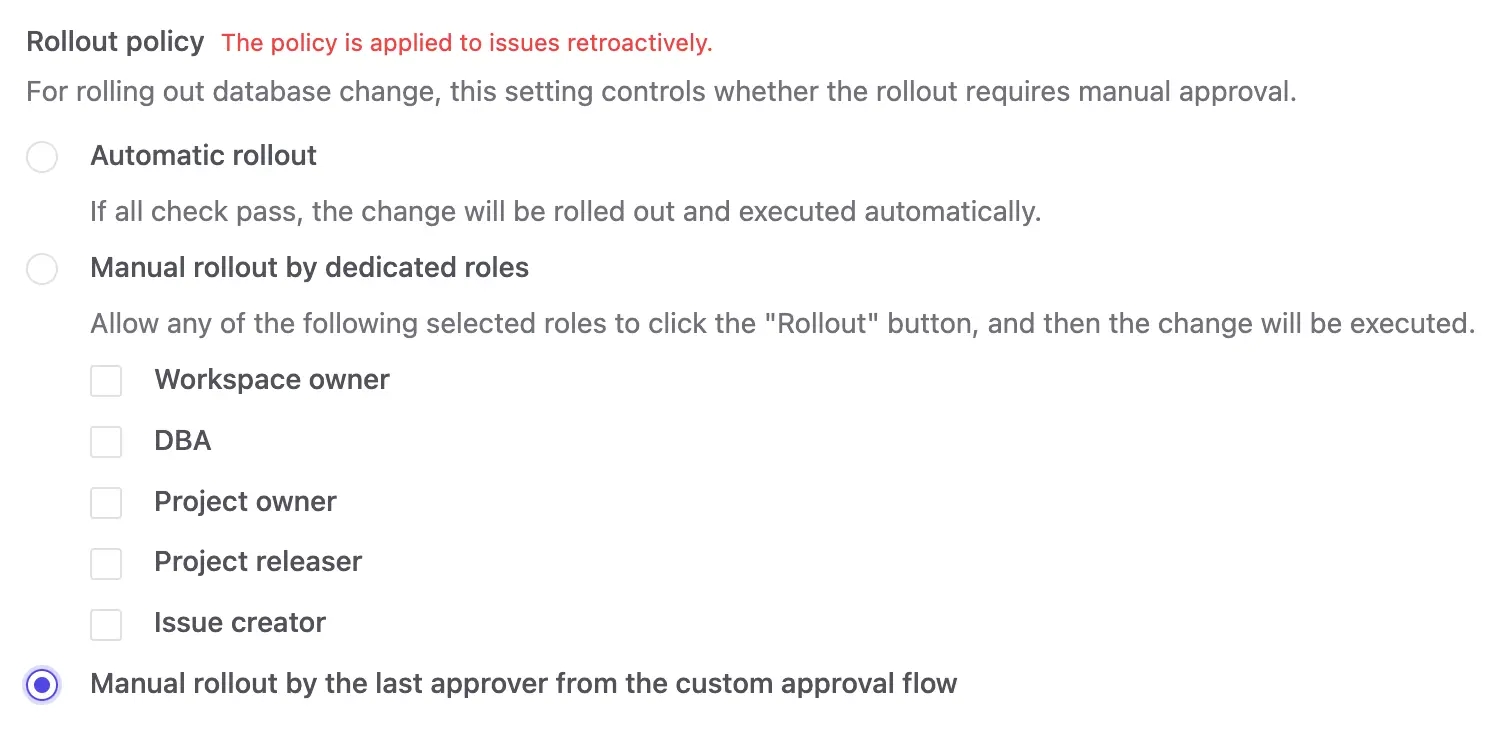
Go to Environments > Prod, you now unlock the third option for rollout policy
Manual rollout by the last approver from the custom approval flow. Choose it.
- Go to
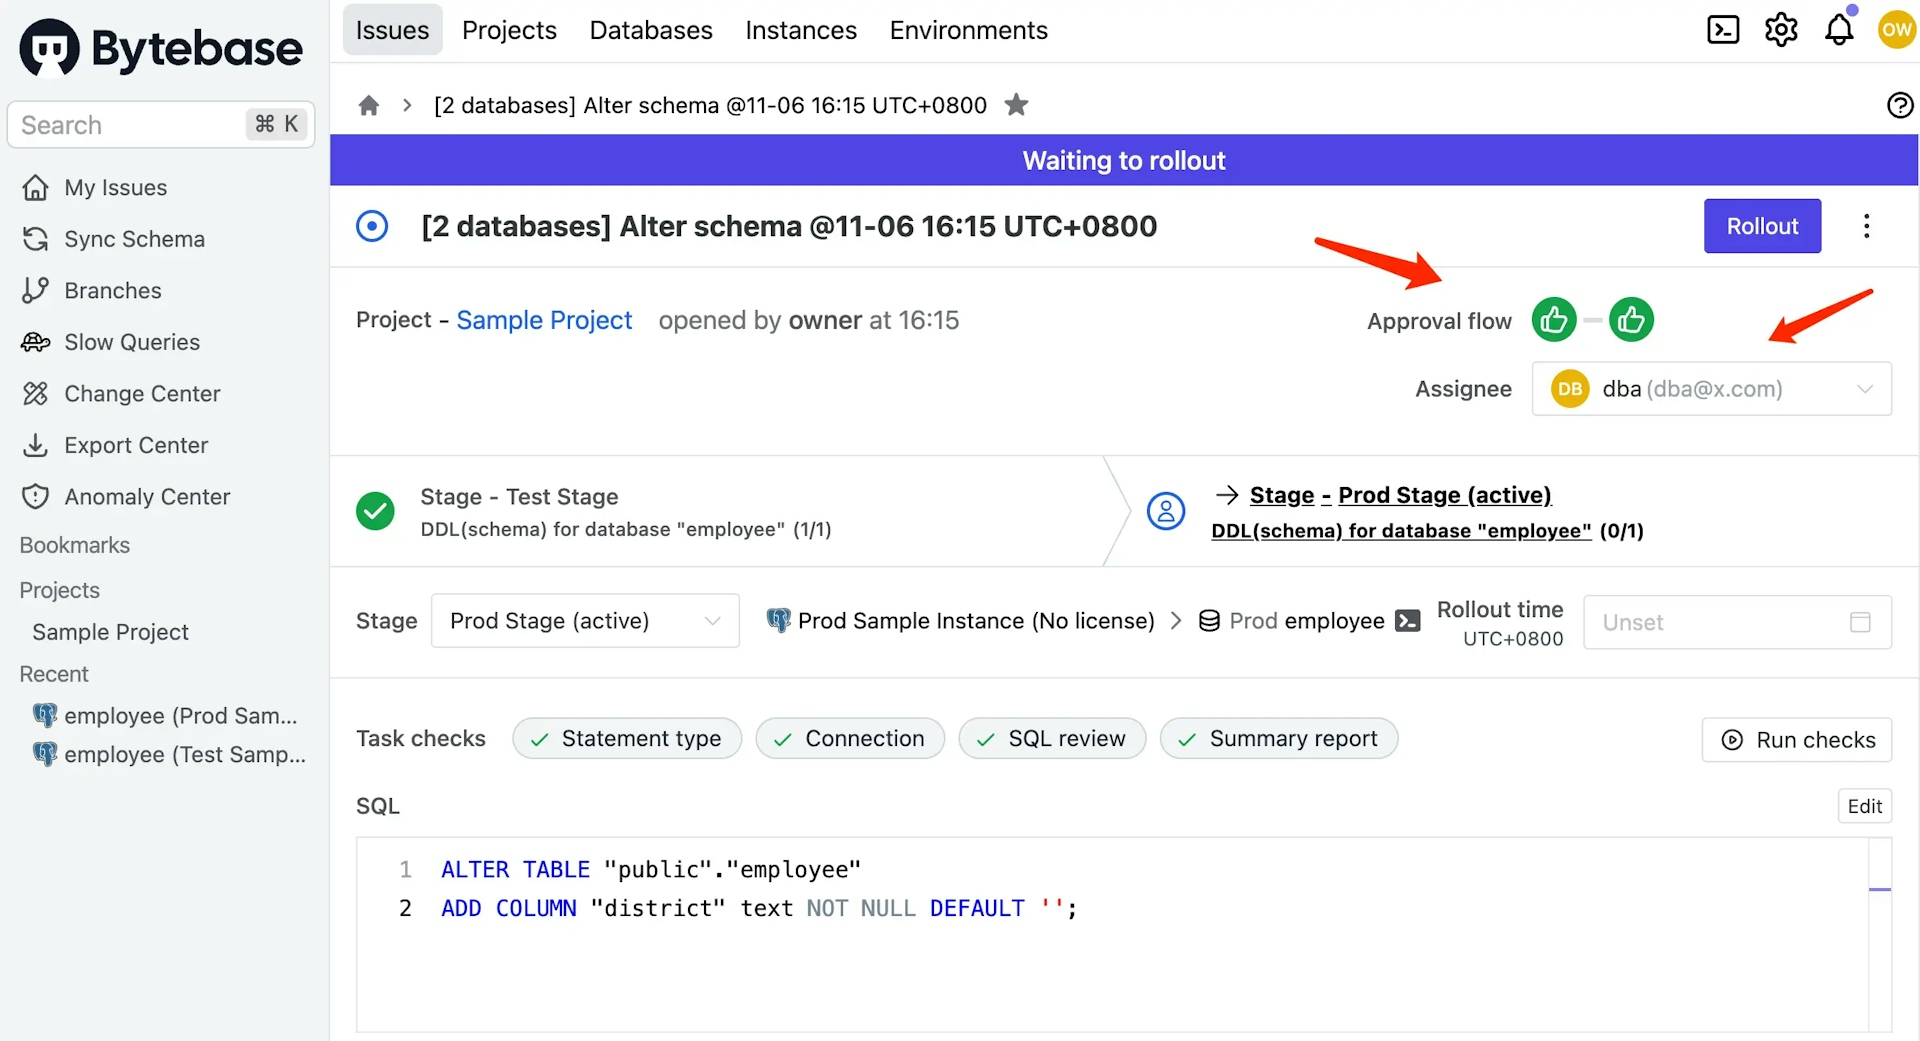
Sample Project, click Edit Schema, choose bothTestandProddatabases, and click Next. Paste the following SQL statements into Raw SQL, and click Preview issue.
ALTER TABLE "public"."employee"
ADD COLUMN "district" text NOT NULL DEFAULT '';- Create the issue and the approval flow is matched. Since it's in the pipeline, it will be brought forward to the
Teststage to review earlier. Follow its order to approve.DBAwill be the one to do the rollout.
Summary
You have now learned how to use Bytebase to deploy schema migration in a basic way. Bytebase also provides other advanced features for your interests:
- GitOps - Observe Git code push events and trigger schema migration;
- Batch changes - Change multiple databases in a single workflow;
- Branching - Collaborate on schema changes using Git-like branching;
- Changelist - Organize and apply changes sequentially, or export them for offline execution.
Join our Discord channel to discuss.