Starting with a fresh PostgreSQL database, what does it actually take a beginner to complete their first managed schema migration?
Short answer: Flyway Desktop and Bytebase Cloud got there in about half an hour each; Liquibase Community CLI took about an hour and a half, not because of its migration engine but because its beginner guide sent me to the wrong Java version and skipped a required PostgreSQL driver.
For this experiment I started as a new user with Flyway, Liquibase, and Bytebase, applied the same SQL change to three fresh databases hosted on Neon, and recorded what happened along the way.
One methodology choice shapes everything below: I let each vendor pick the on-ramp. Rather than forcing the three products into the same shape, I took whatever path their own beginner documentation recommends.
- This is Flyway Desktop rather than the Flyway CLI — Redgate's Get Started guide steers new users to the desktop app.
- This is Bytebase Cloud rather than self-hosted Docker — the Bytebase quickstart presents Cloud first, as the path with no installation.
- Liquibase is the Community CLI, the easiest entry point its documentation offers.
| Flyway Desktop | Liquibase Community CLI | Bytebase Cloud | |
|---|---|---|---|
| Vendor's recommended on-ramp | Desktop app | CLI | Cloud, no install |
| Installed locally | Desktop app, 663 MB | JDK 17+, CLI, JDBC driver | nothing |
| Account required | Redgate ID + email confirmation | none | Bytebase Cloud sign-in |
| Times the guide did not match reality | 0 | 3 | 0 |
| Times I left the guide to find an answer | 0 | 2 | 0 |
| Rough time to first migration | ~30 minutes | ~1.5 hours | ~30 minutes |
A disclosure: I work at Bytebase, so it's the one product here I already knew going in — for Flyway and Liquibase I was starting from zero. I controlled for that by following each vendor's own quickstart to the letter rather than improvising. The times above are approximate, not stopwatch measurements — read them as orders of magnitude, not a benchmark; the countable rows are the more reliable comparison.
Official guides followed
Rather than design an idealized workflow for each product, I started from the official beginner documentation available at the time of the test and adapted only the connection details and the SQL, so all three runs used Neon PostgreSQL and the same schema change.
| Tool | Official getting-started documentation followed | How it was adapted for this test |
|---|---|---|
| Flyway Desktop | Quickstart — Flyway Desktop | The guide's sample database and SQL were replaced with the Neon flyway_demo database and the shared CREATE TABLE users migration. |
| Liquibase Community CLI | Install Liquibase and Introduction to Liquibase | I followed the installation and introductory project flow, then connected the generated project to the Neon liquibase_demo database and used a formatted SQL changeset. |
| Bytebase Cloud | Step 1: Start Bytebase, which opens the step-by-step quickstart by offering Bytebase Cloud and self-hosted Docker side by side | I took the Cloud path the page presents first, connected the Neon instance, and applied the shared SQL to bytebase_demo. |
Worth flagging: Flyway also ships a free CLI that needs no Redgate account, and Bytebase also self-hosts with Docker, which would have added deployment time. I followed each vendor's own beginner path either way.
Liquibase also sent me to two supplemental pages: Connect Liquibase with PostgreSQL when the driver turned out to be missing, and the 5.0.3 system requirements when the Java runtime became an issue.
The setup
Each tool got its own empty Neon PostgreSQL database — flyway_demo, liquibase_demo, and bytebase_demo — with the host, port, credentials, and database name saved in advance. Neon requires SSL, so every connection had to be configured for it: a small tax paid equally by all three, and one a local PostgreSQL instance would not have charged.
Each database then received exactly the same migration:
CREATE TABLE users (
    id BIGINT GENERATED ALWAYS AS IDENTITY PRIMARY KEY,
    name TEXT NOT NULL,
    created_at TIMESTAMPTZ NOT NULL DEFAULT NOW()
);
The finish line is the same too: the migration succeeds, the users table exists, and the tool shows a record of the applied change.
Flyway Desktop: install, connect, migrate
I followed Redgate's Quickstart — Flyway Desktop, replacing its sample database and SQL with Neon and my shared migration.
Installing and creating the project
I downloaded Flyway Desktop — 663 MB for the macOS Arm64 build, the single largest download in this experiment — and installed it. On first launch, the application asked me to sign in with a Redgate ID. Because I was starting from zero, this also meant registering an account, confirming my email address, signing in again, and choosing between Community and an Enterprise trial. I selected Flyway Community — free to use.
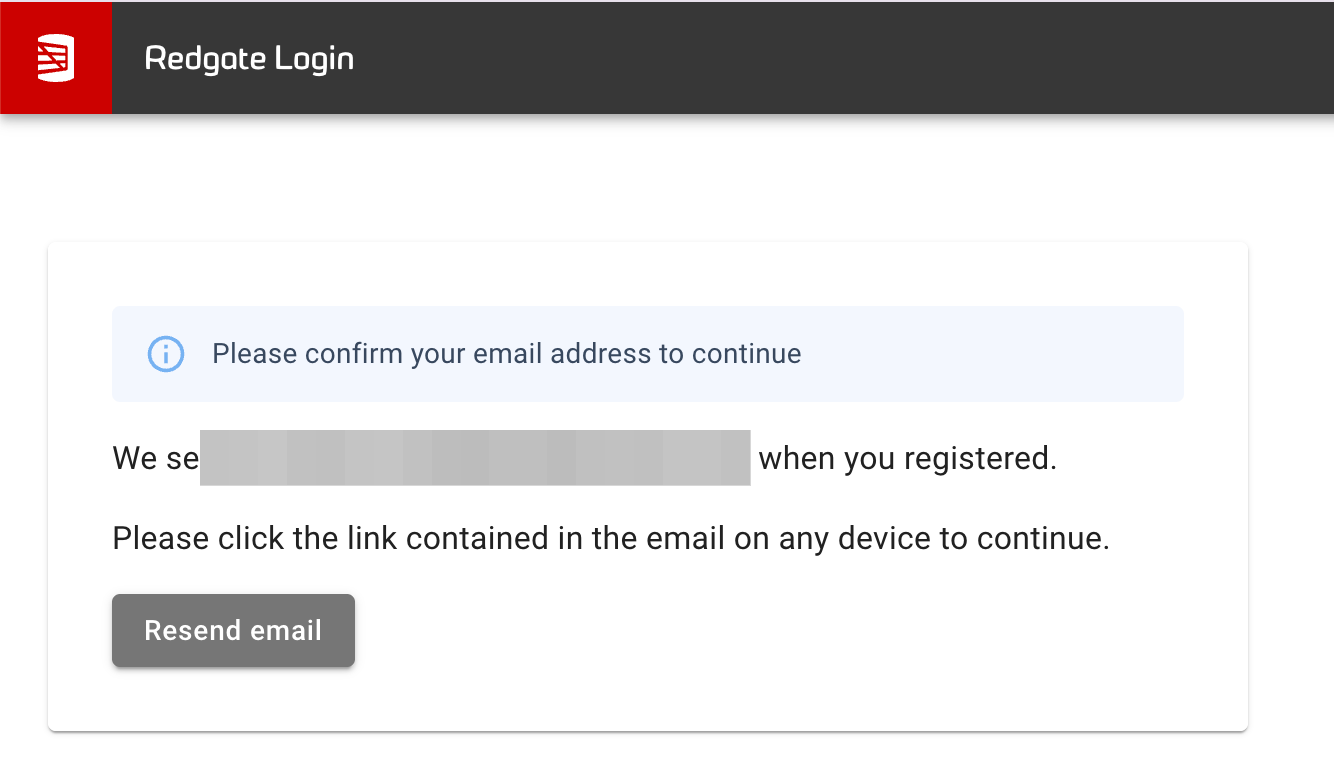 Redgate asking me to confirm my email address
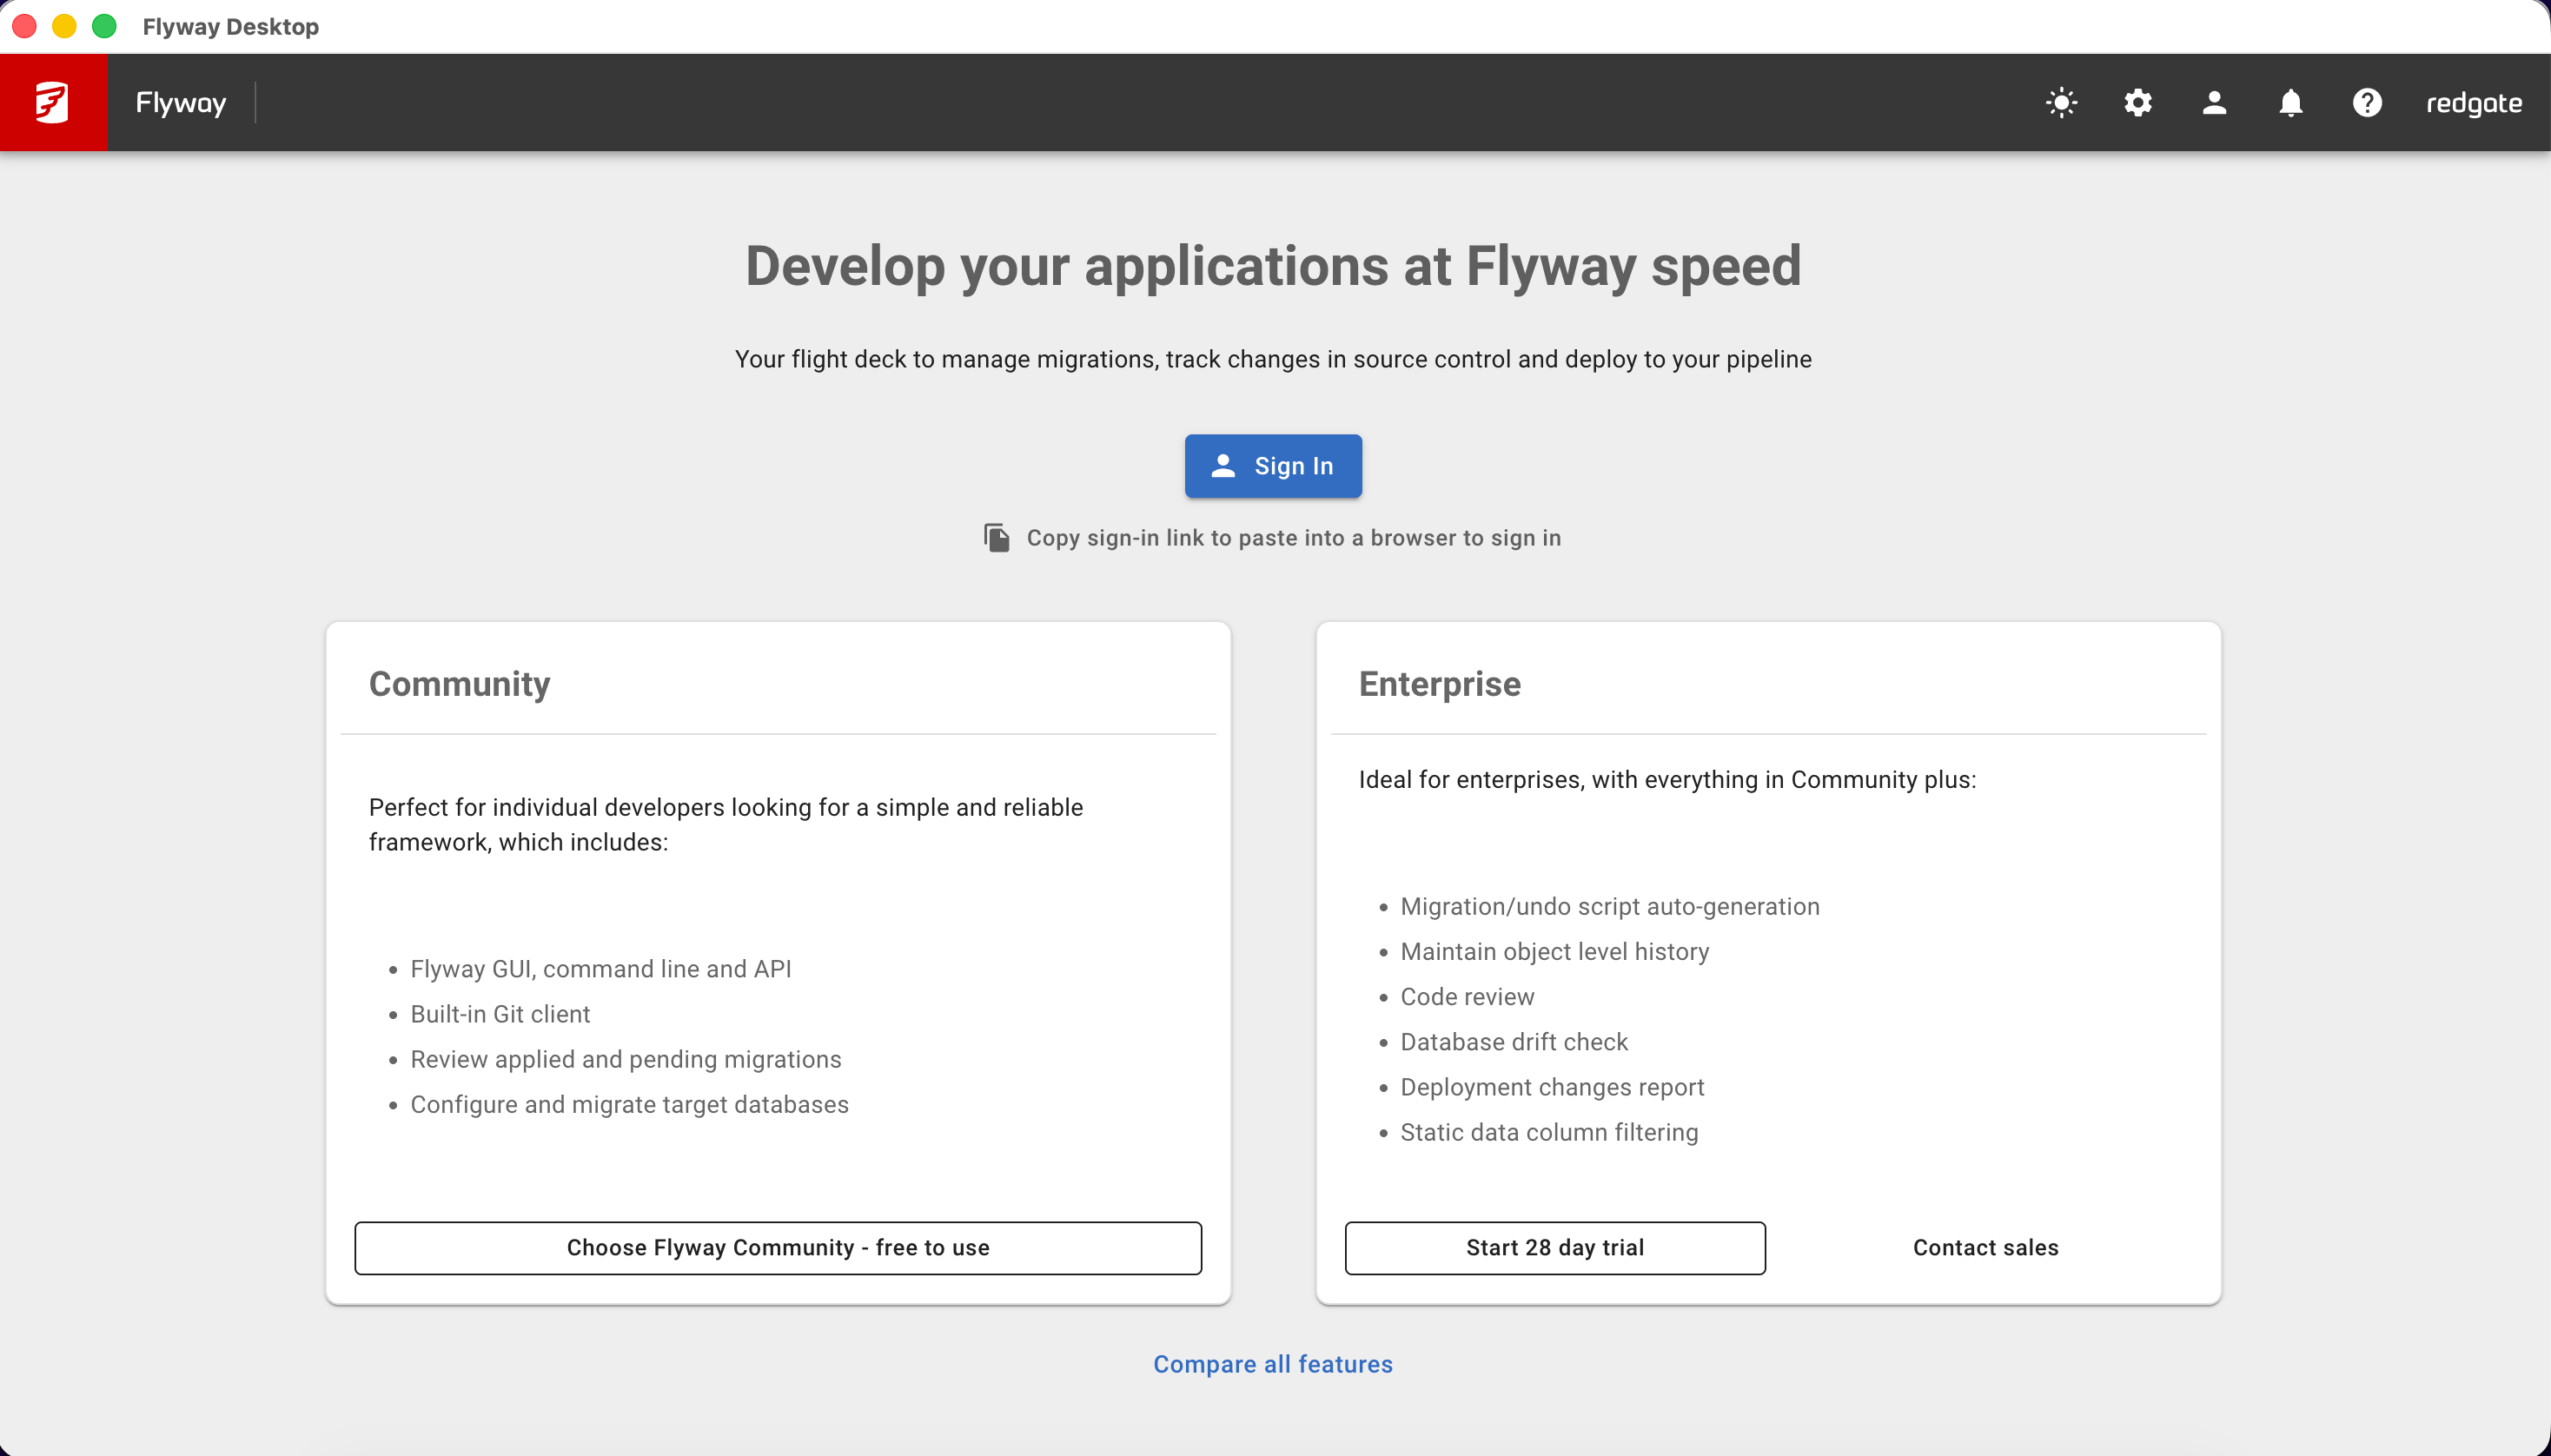 Flyway Desktop asking me to choose between Community and an Enterprise trial
After signing in, I landed on the project screen. I selected New project, chose PostgreSQL as the database type, and created a local flyway-demo project.
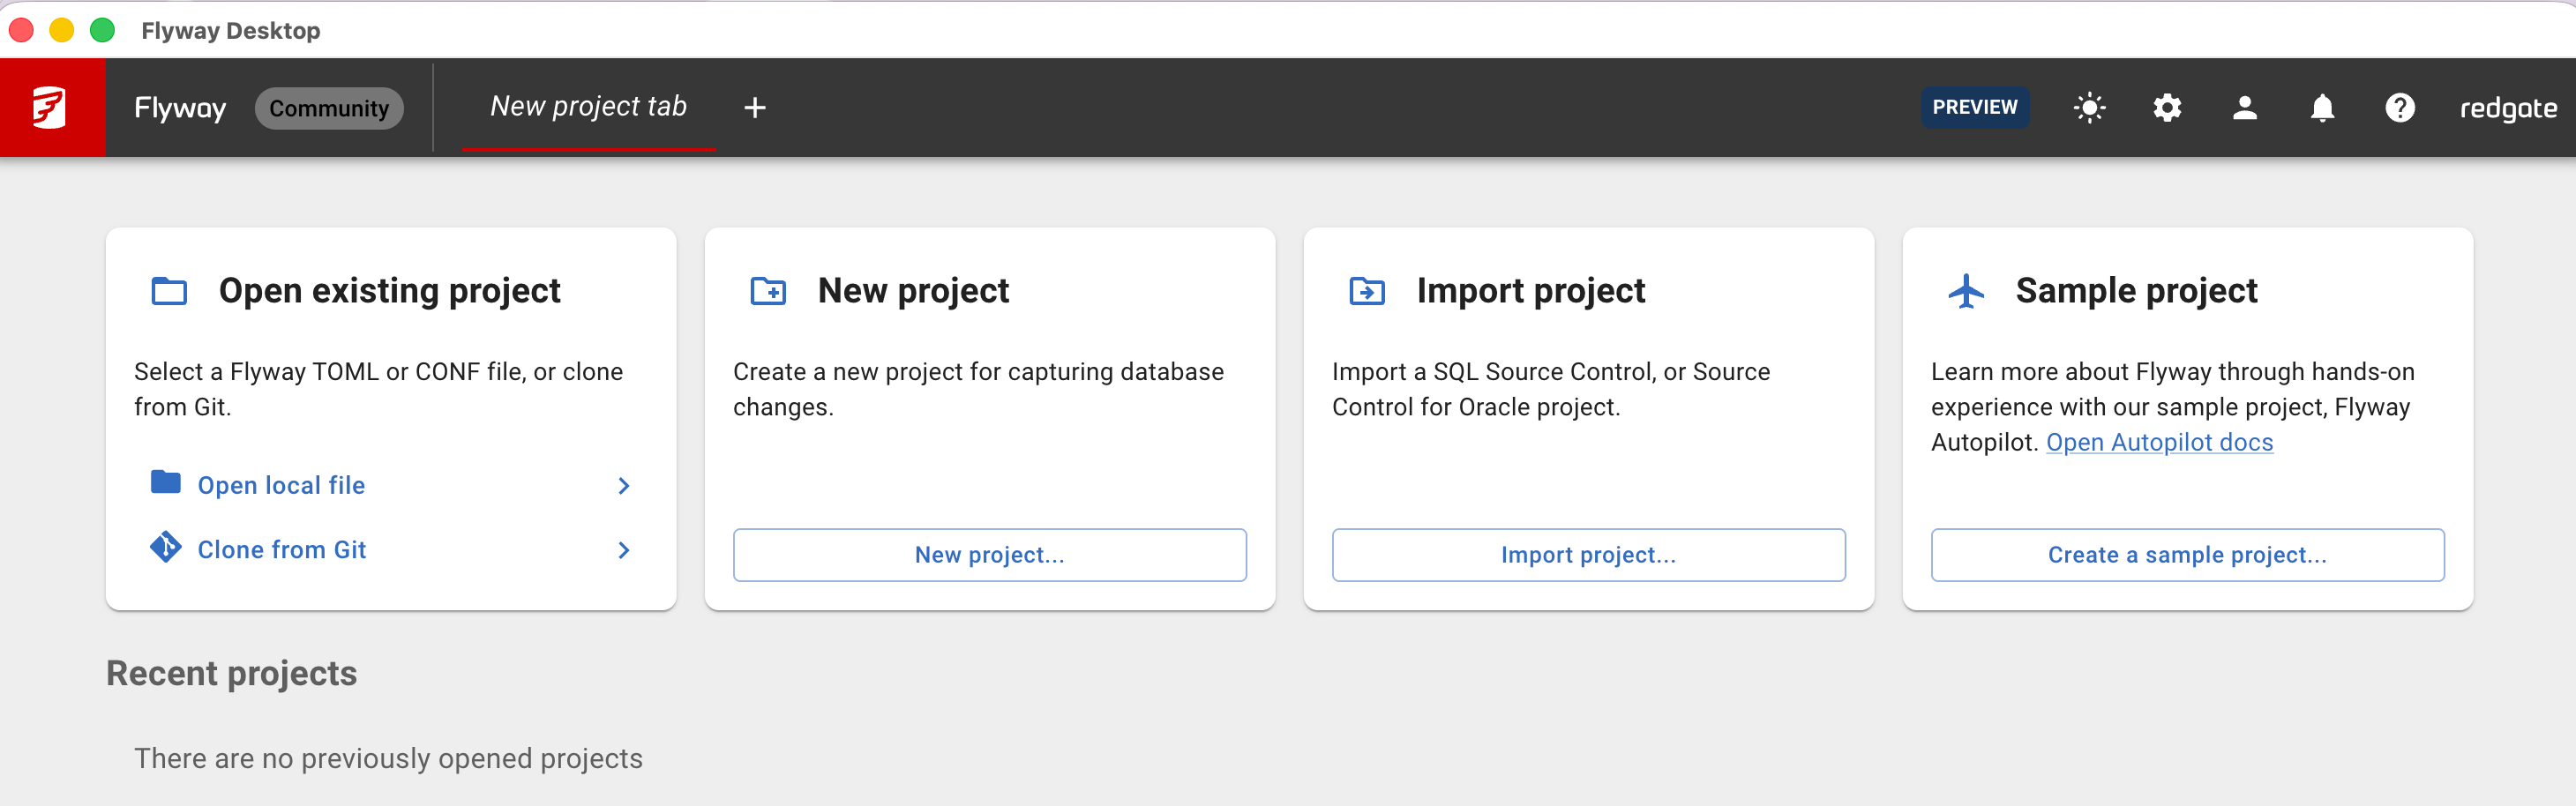 Flyway Desktop new-project screen
Connecting Neon
I added the Neon PostgreSQL database as the target environment, entered the connection details for flyway_demo, and tested the connection.
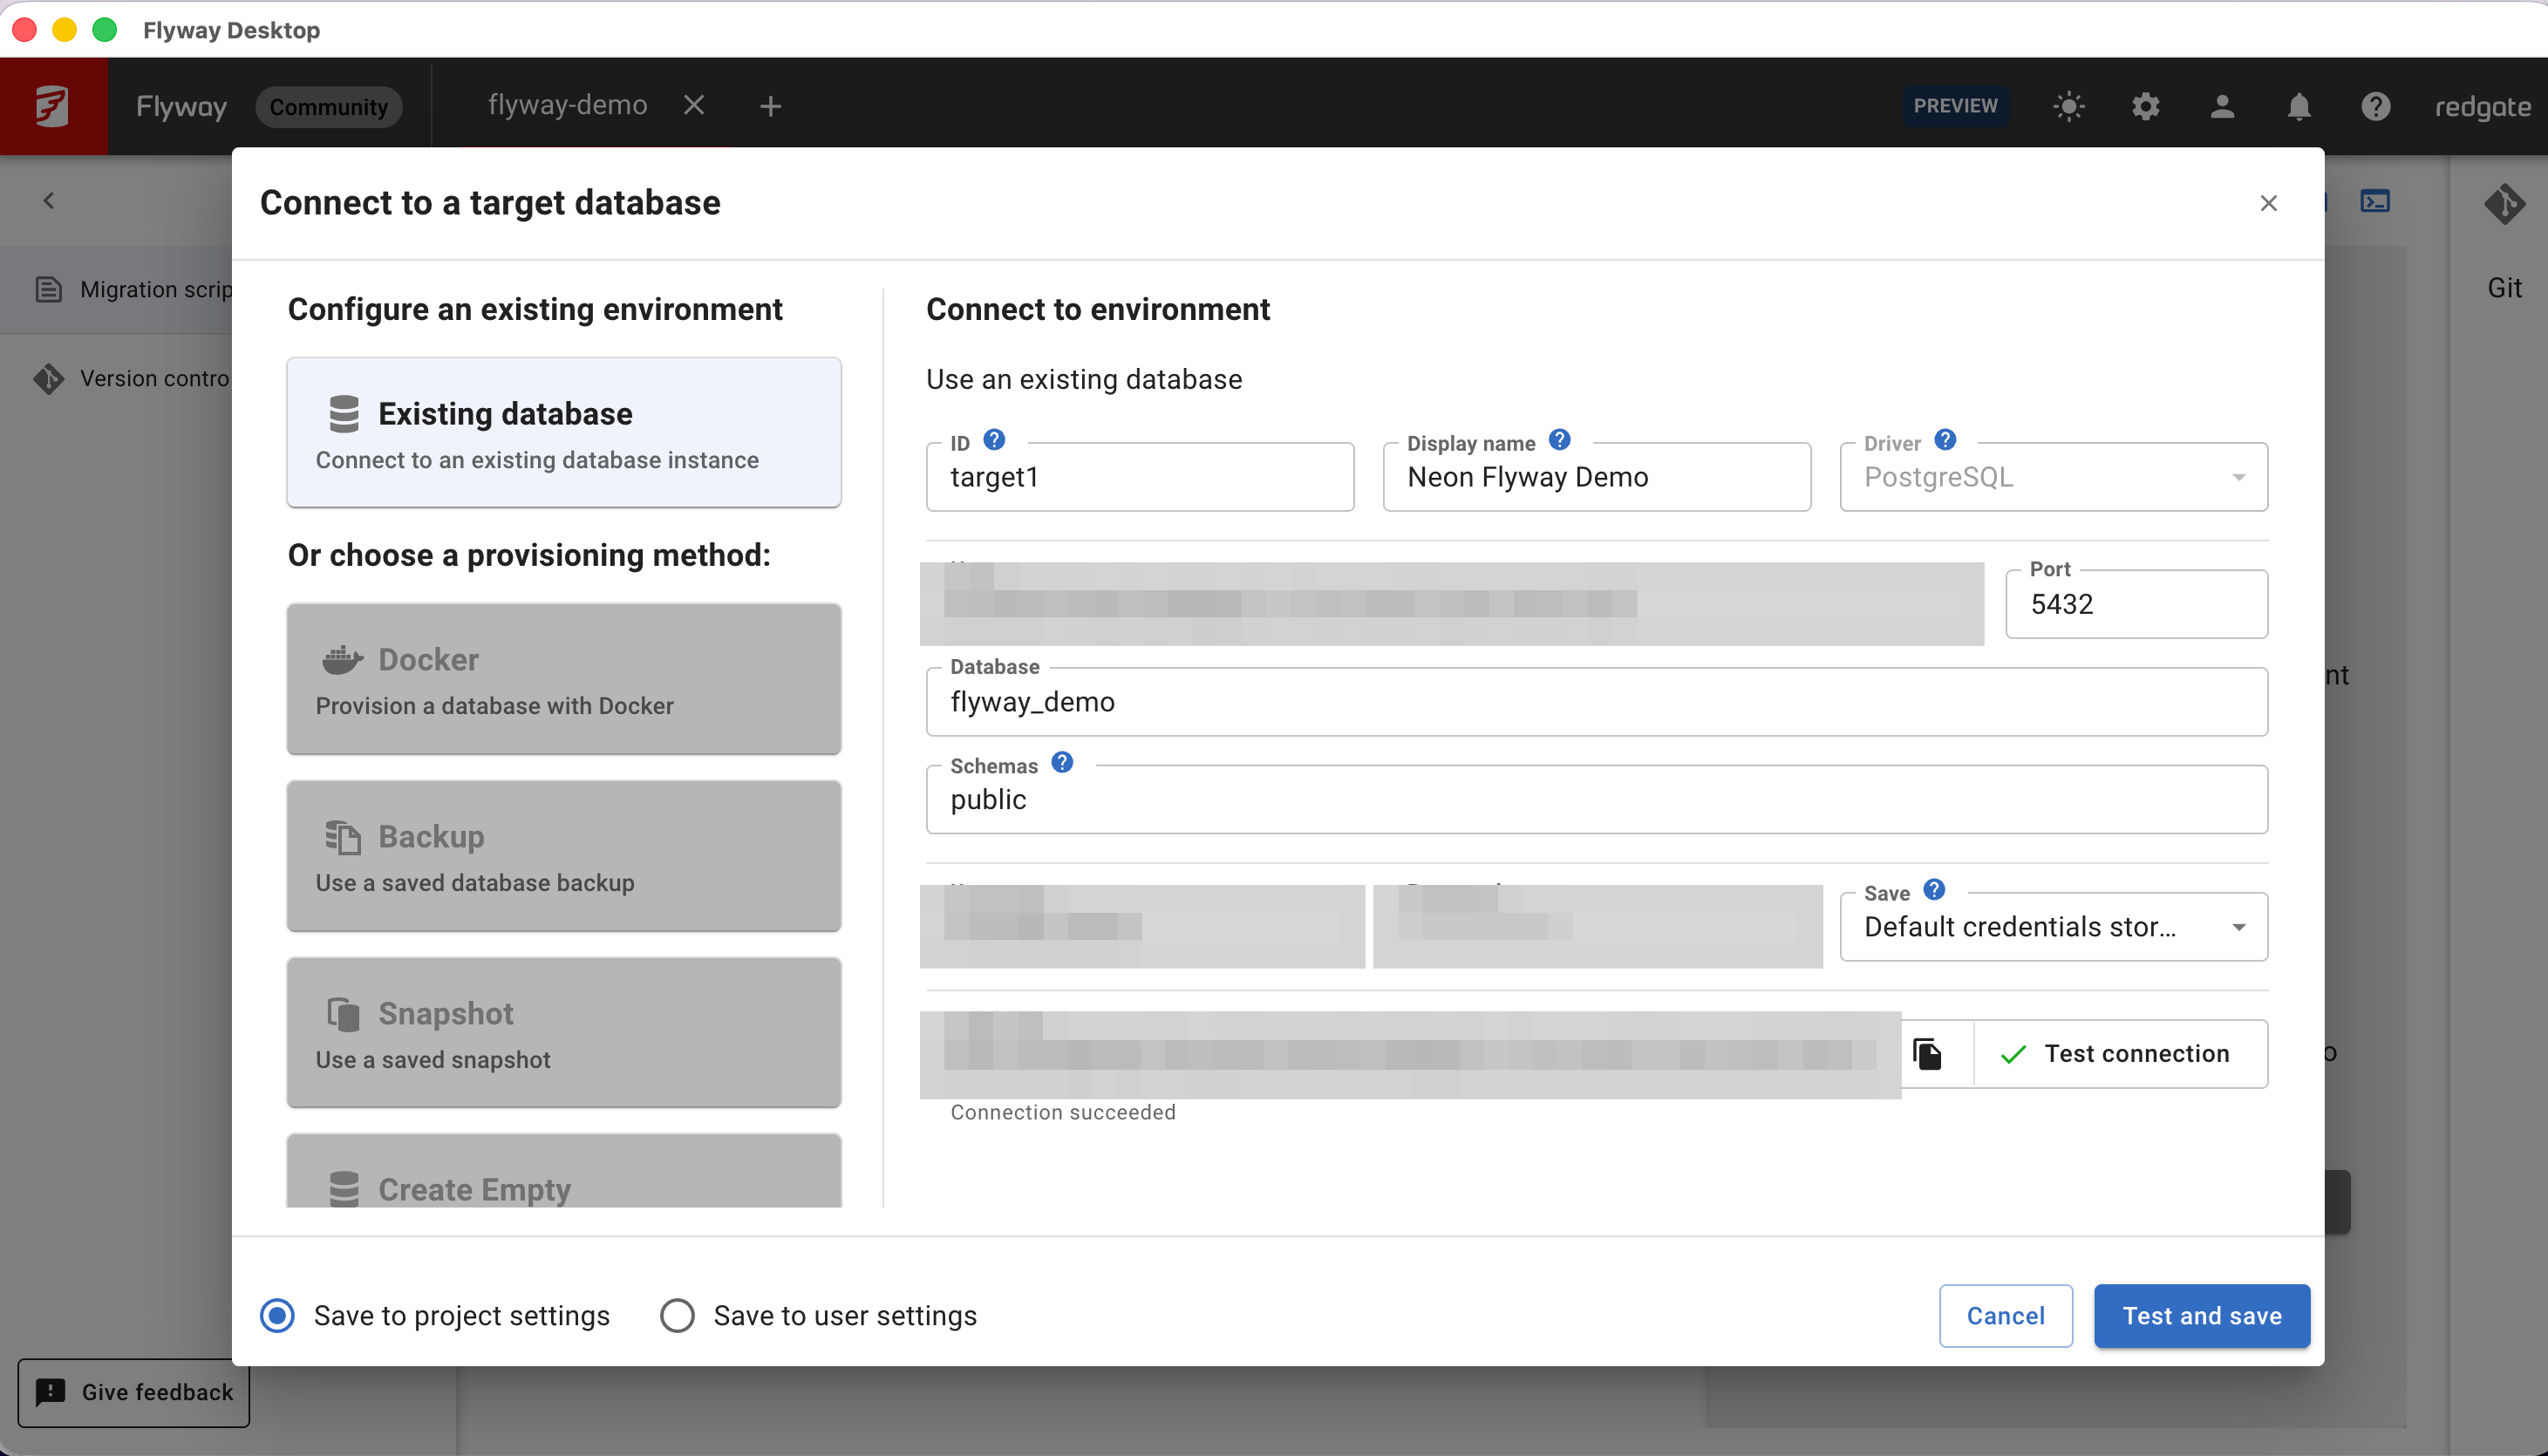 Flyway Desktop successfully connecting to the Neon target database, with credentials redacted
Adding the migration
I created a versioned migration and pasted in the shared SQL. Flyway Desktop generated a timestamp-based version, and I used create_table_users as the description.
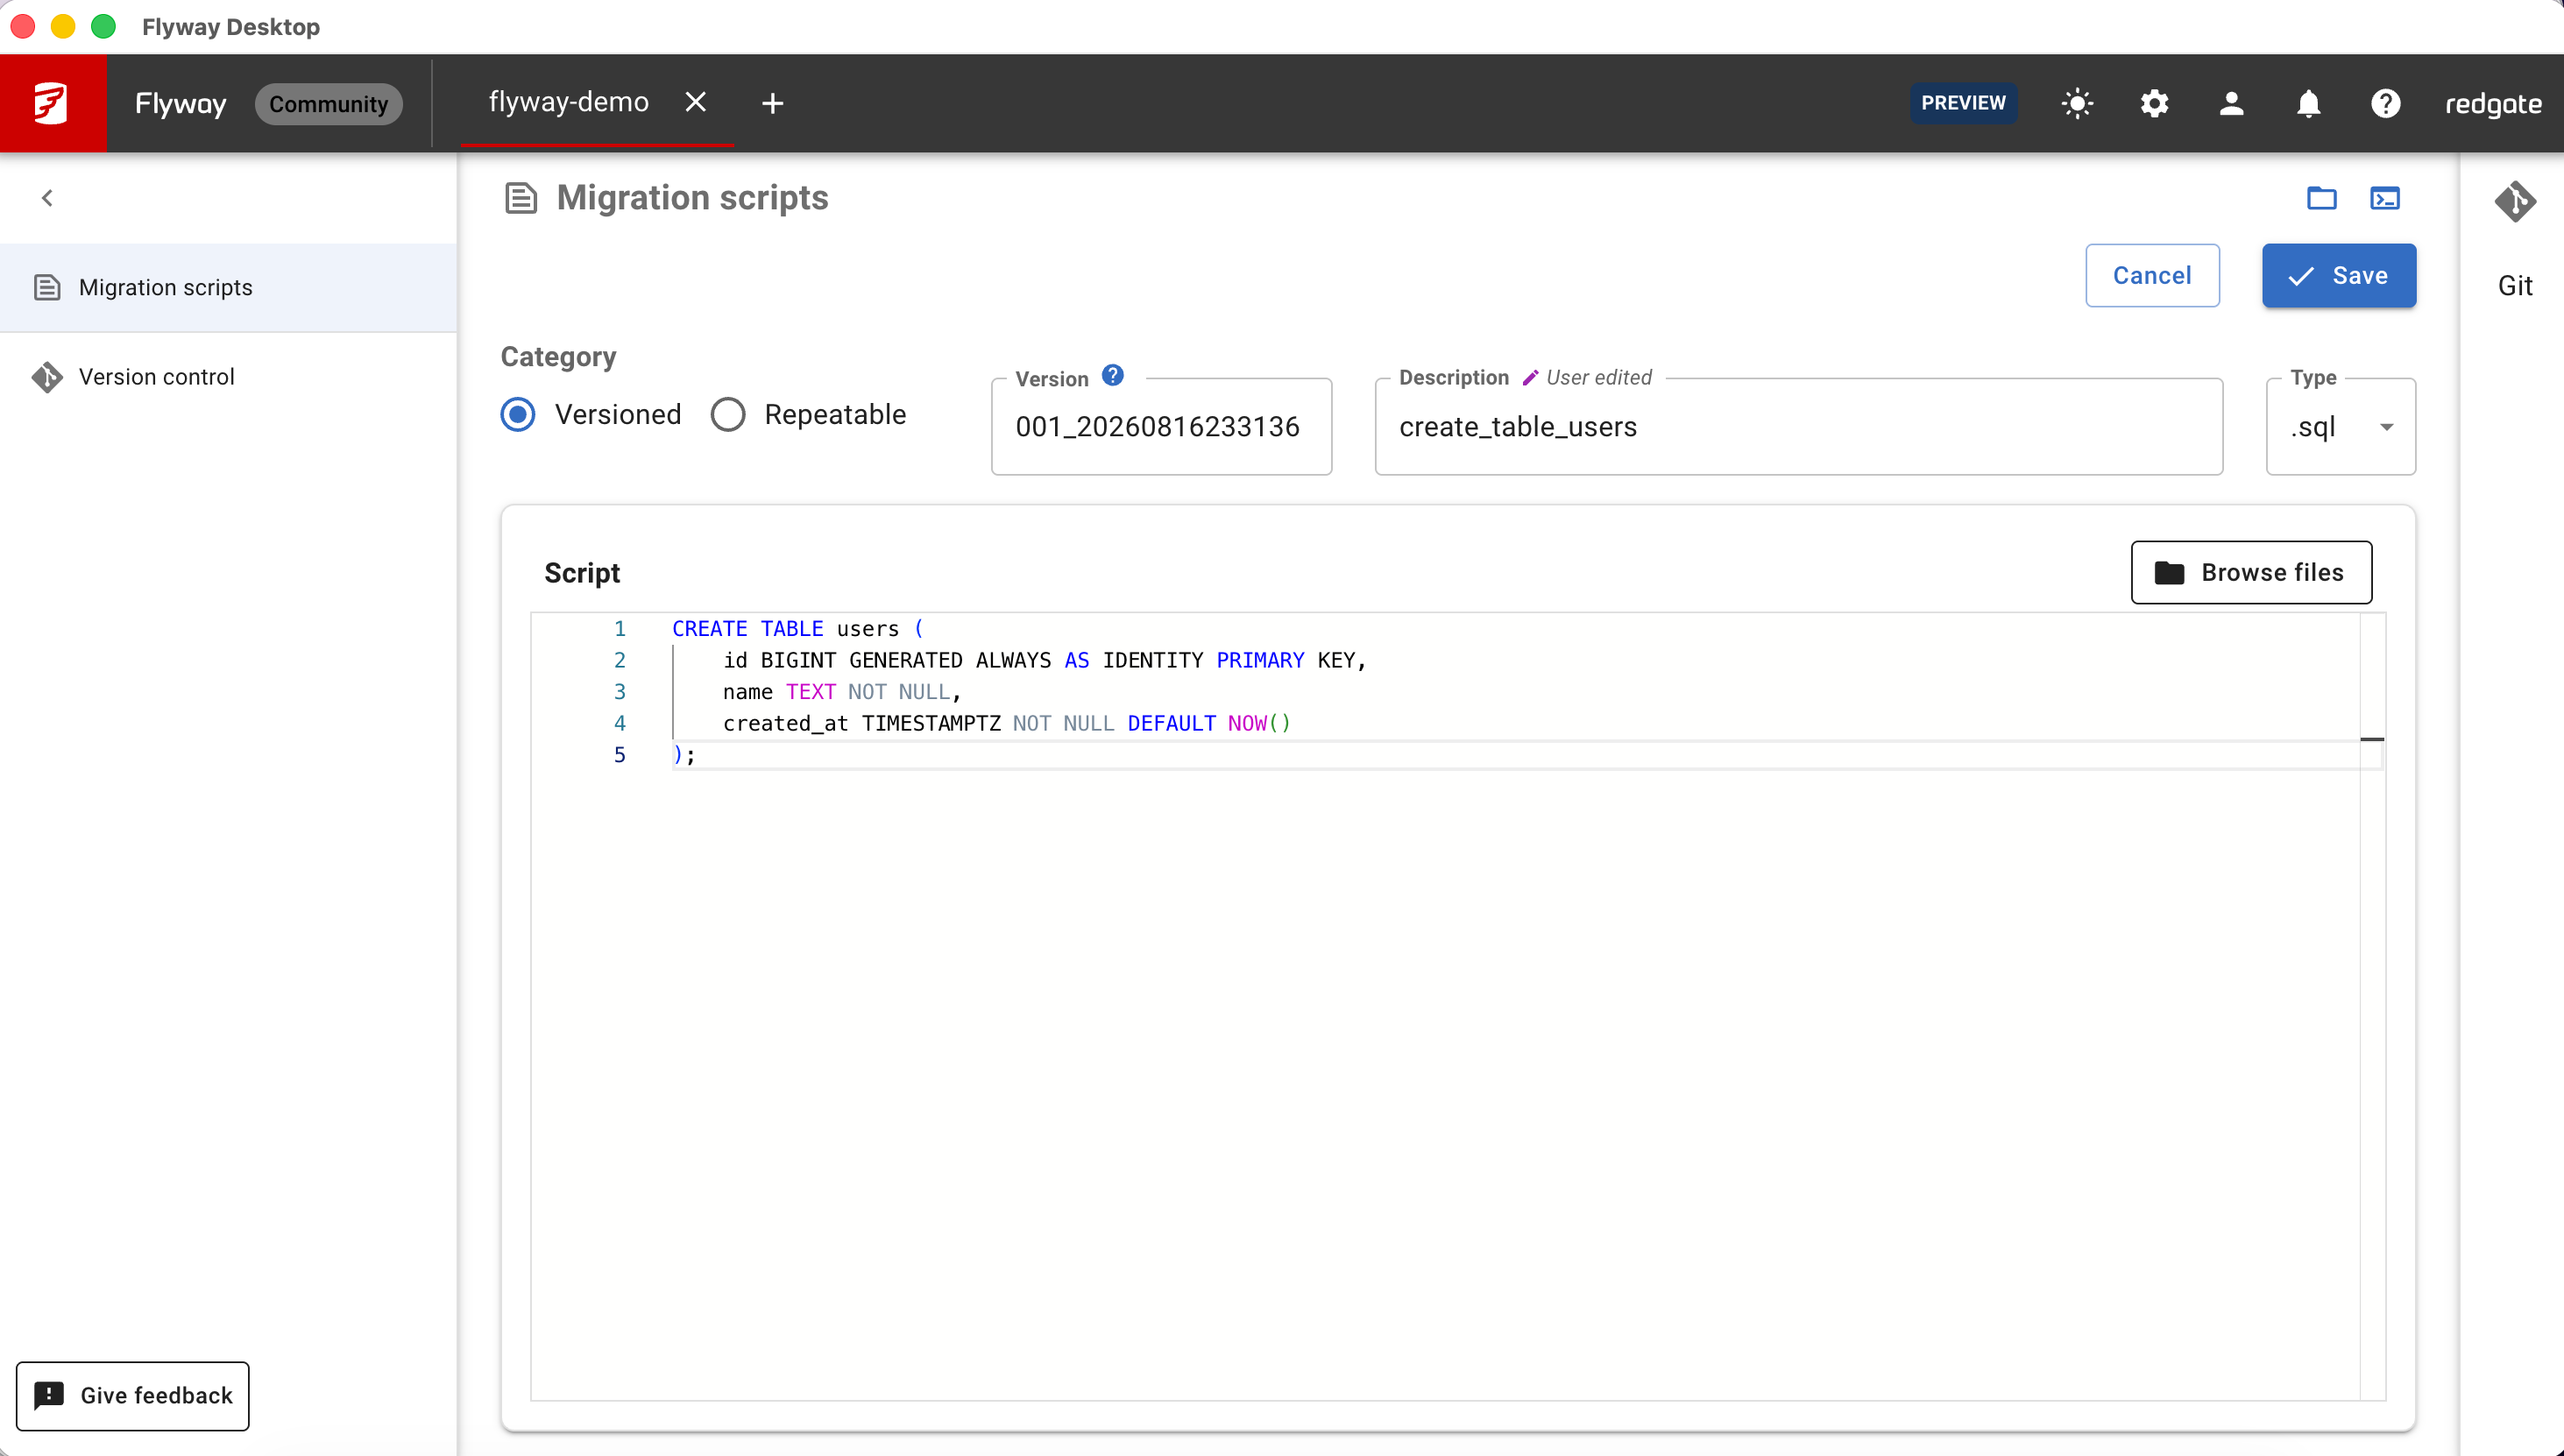 Creating the versioned migration in Flyway Desktop
The version prefix gives Flyway the order in which migrations should run, while the description makes the change recognizable in history.
Running Migrate
After I saved the file, Flyway showed one pending migration against the Neon Flyway Demo target.
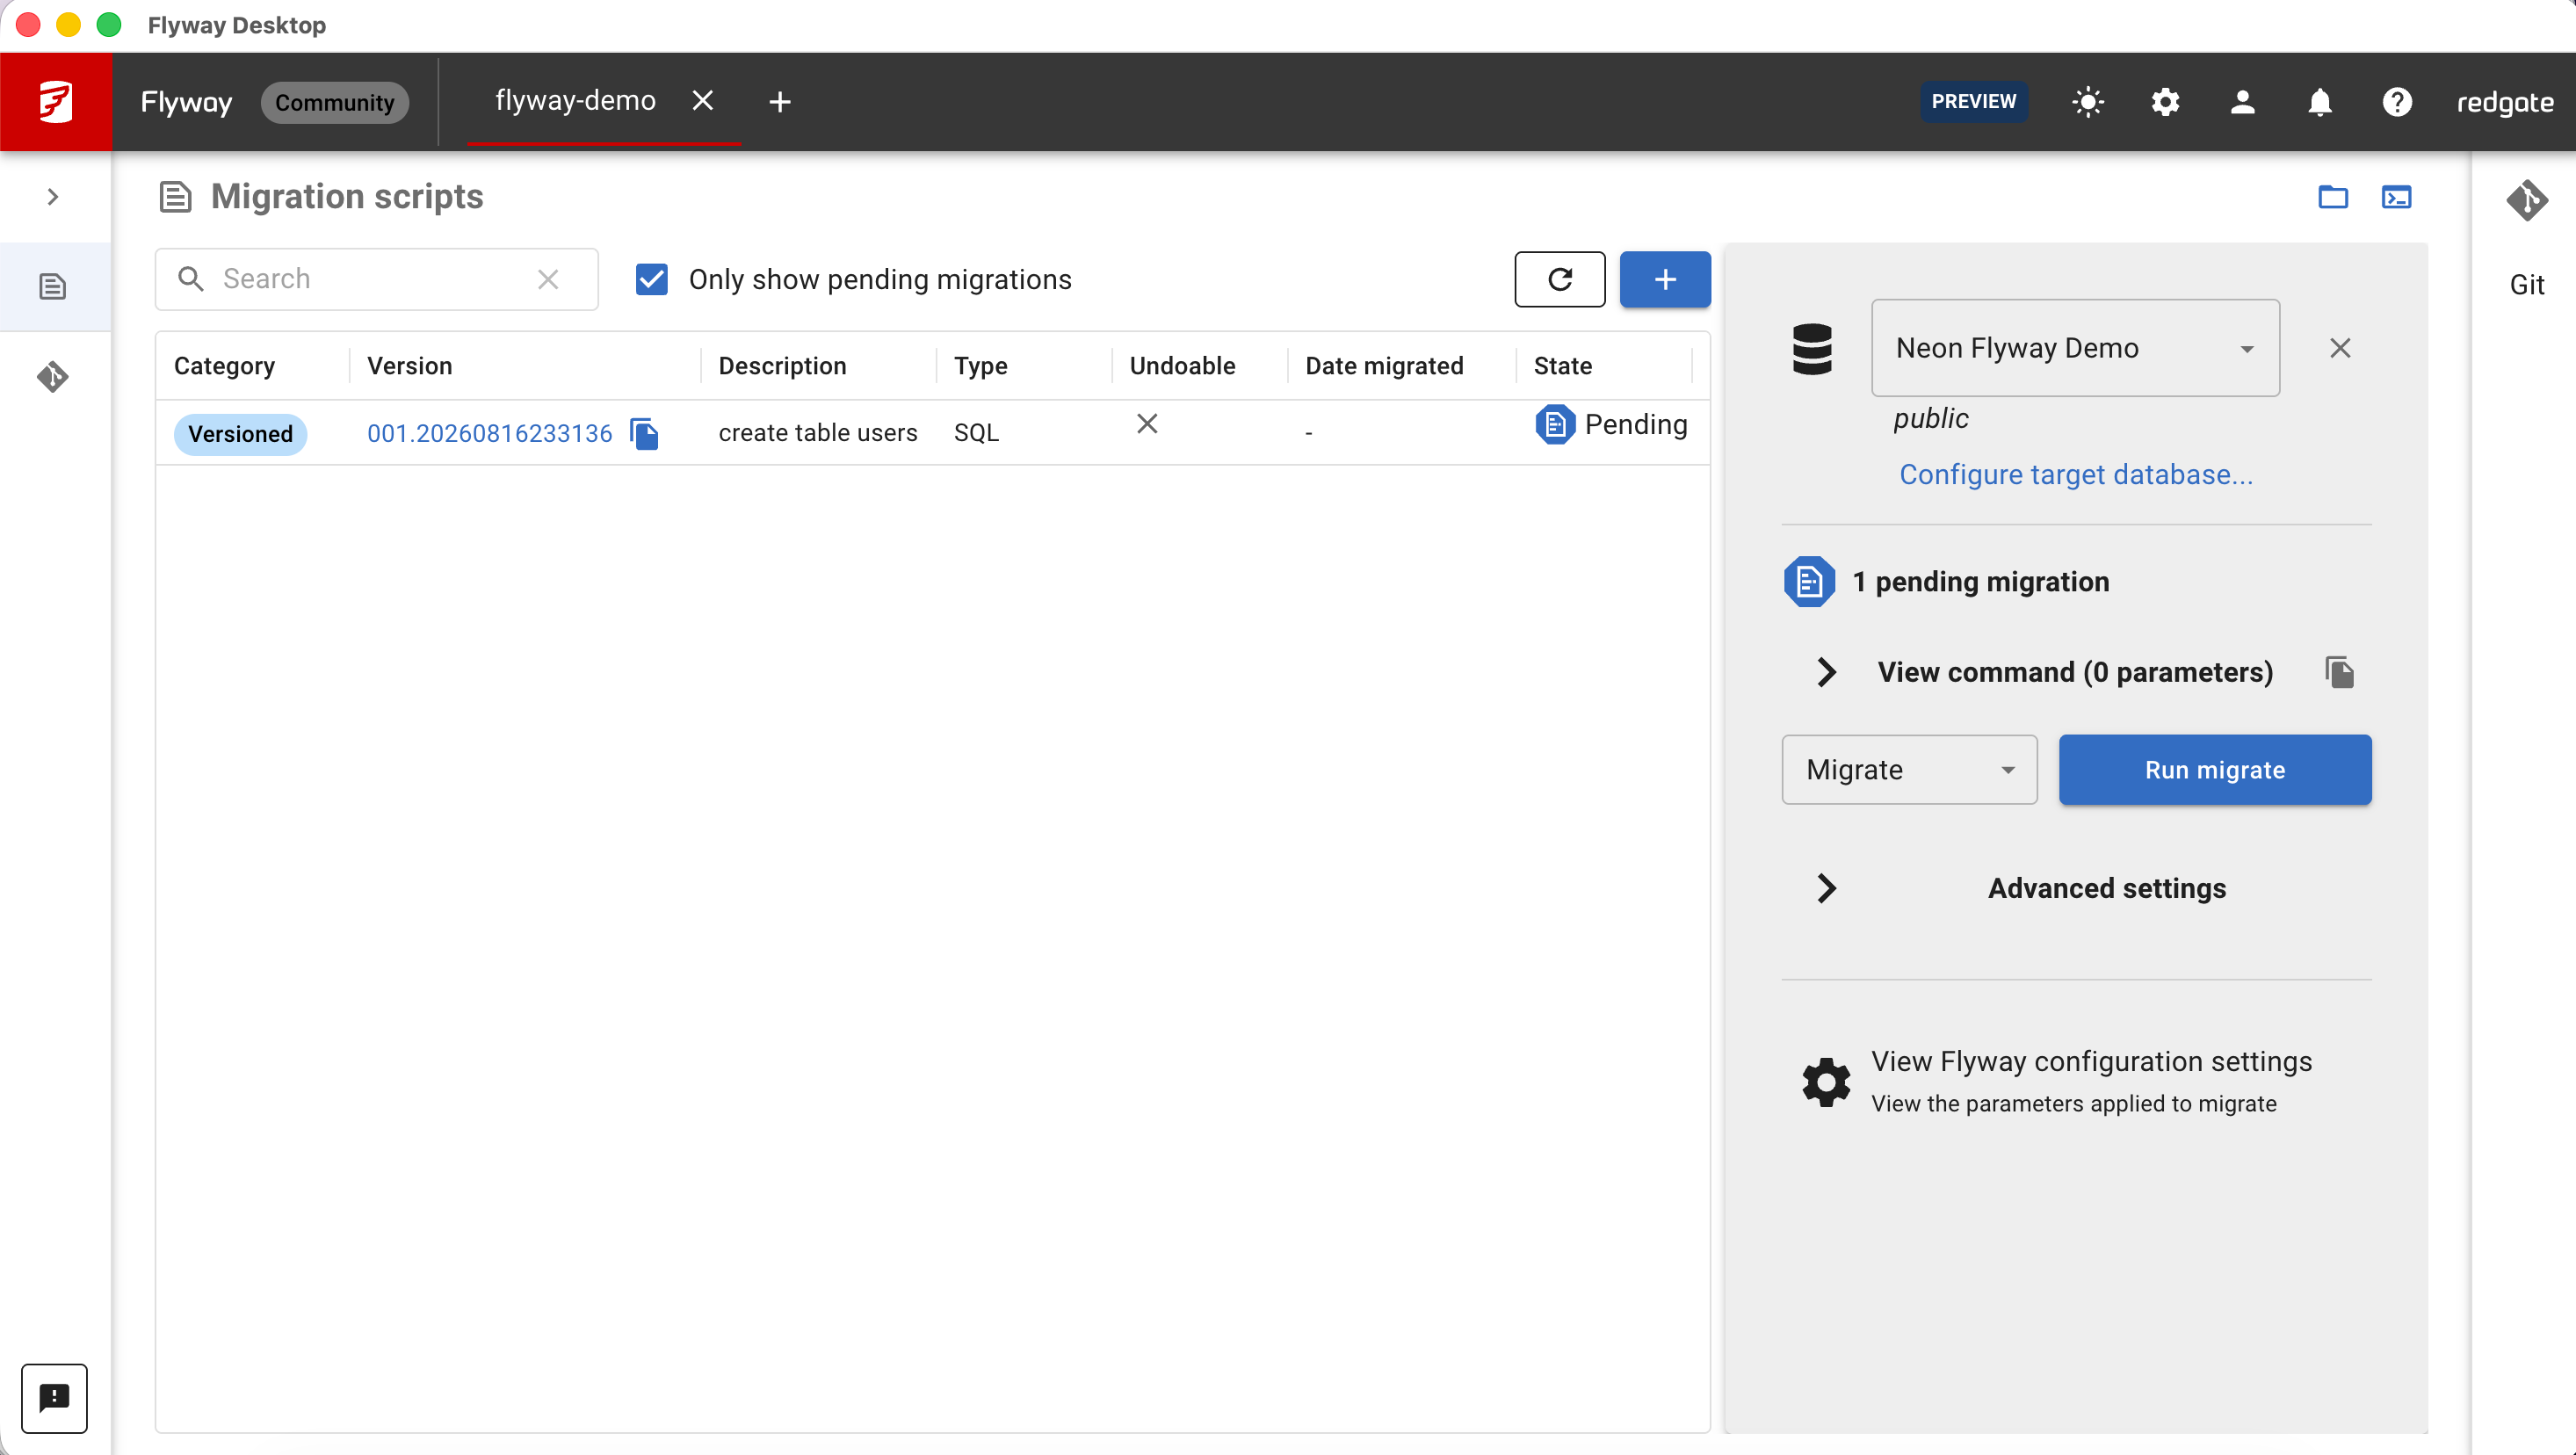 The new Flyway migration in Pending state
I selected Migrate and clicked Run migrate. Flyway applied the migration and its state moved from Pending to Success (466 ms recorded for the SQL itself).
What I saw at the finish line
The migration was marked successful and appeared in the migration history, with a managed record of the timestamp-based version being applied.
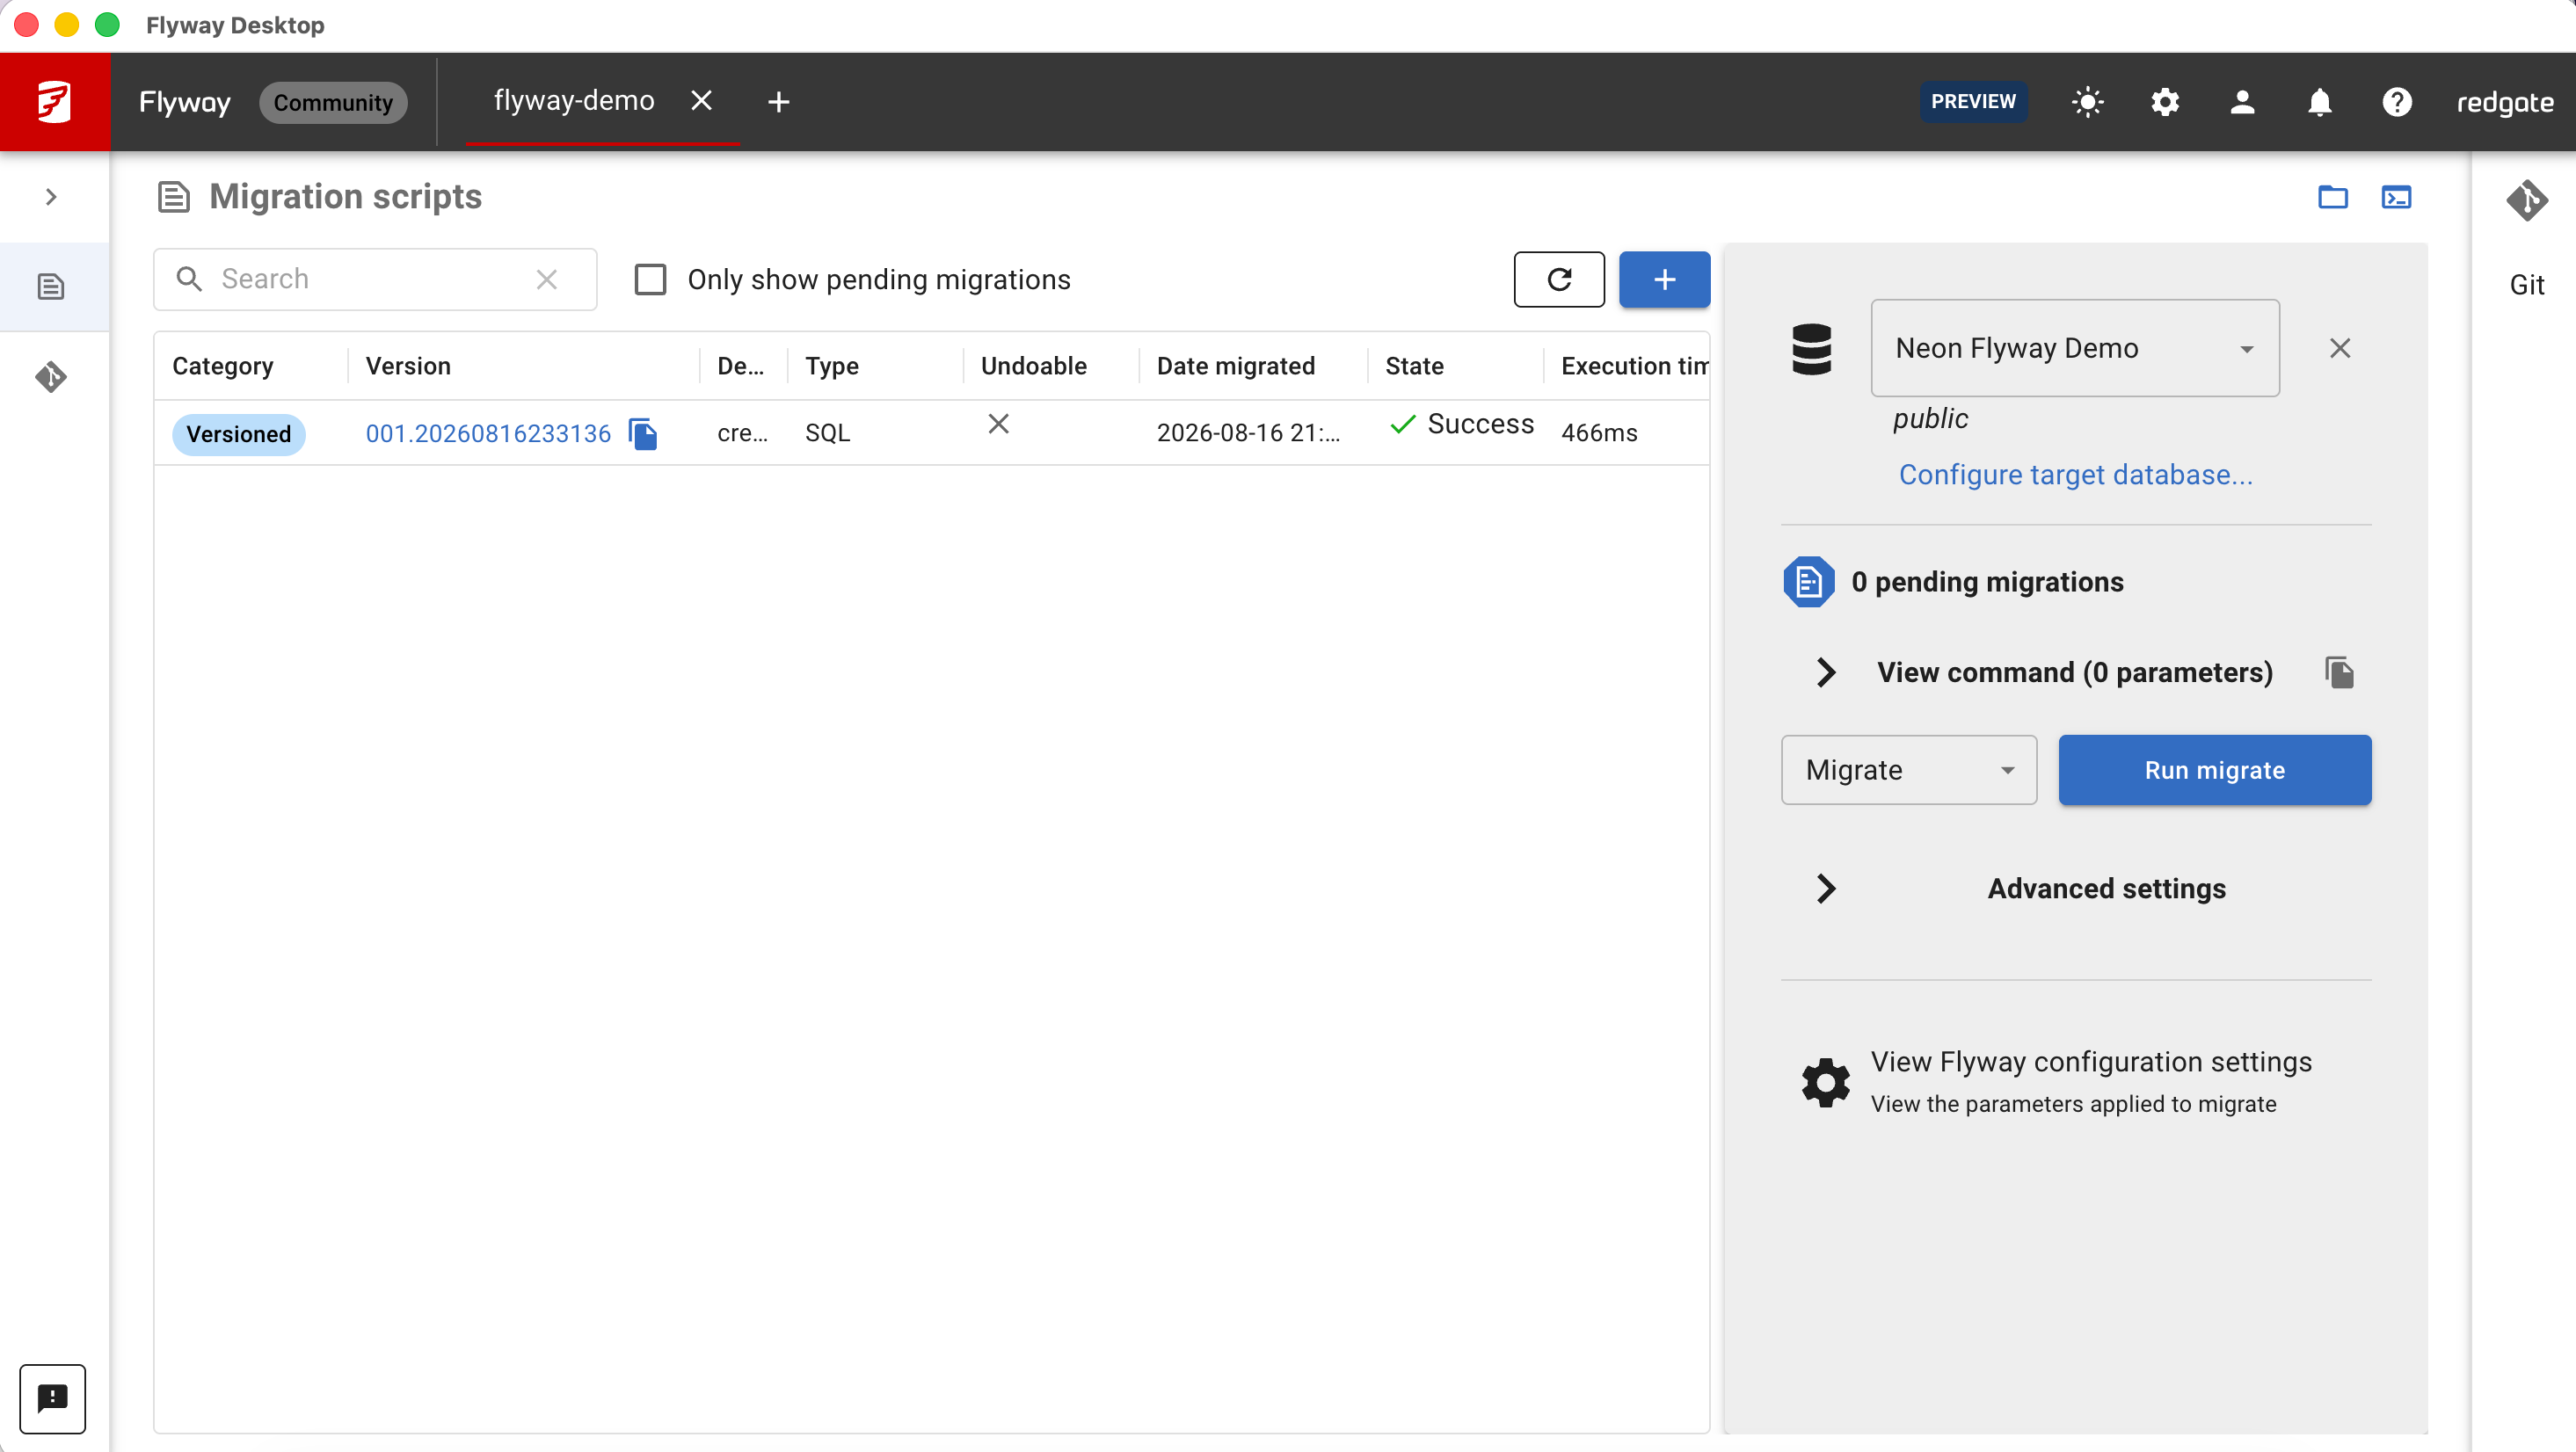 Flyway Desktop showing the migration as successful
I then opened Neon to verify the database state independently. The users table was present, and flyway_schema_history contained the versioned migration with the description create table users.
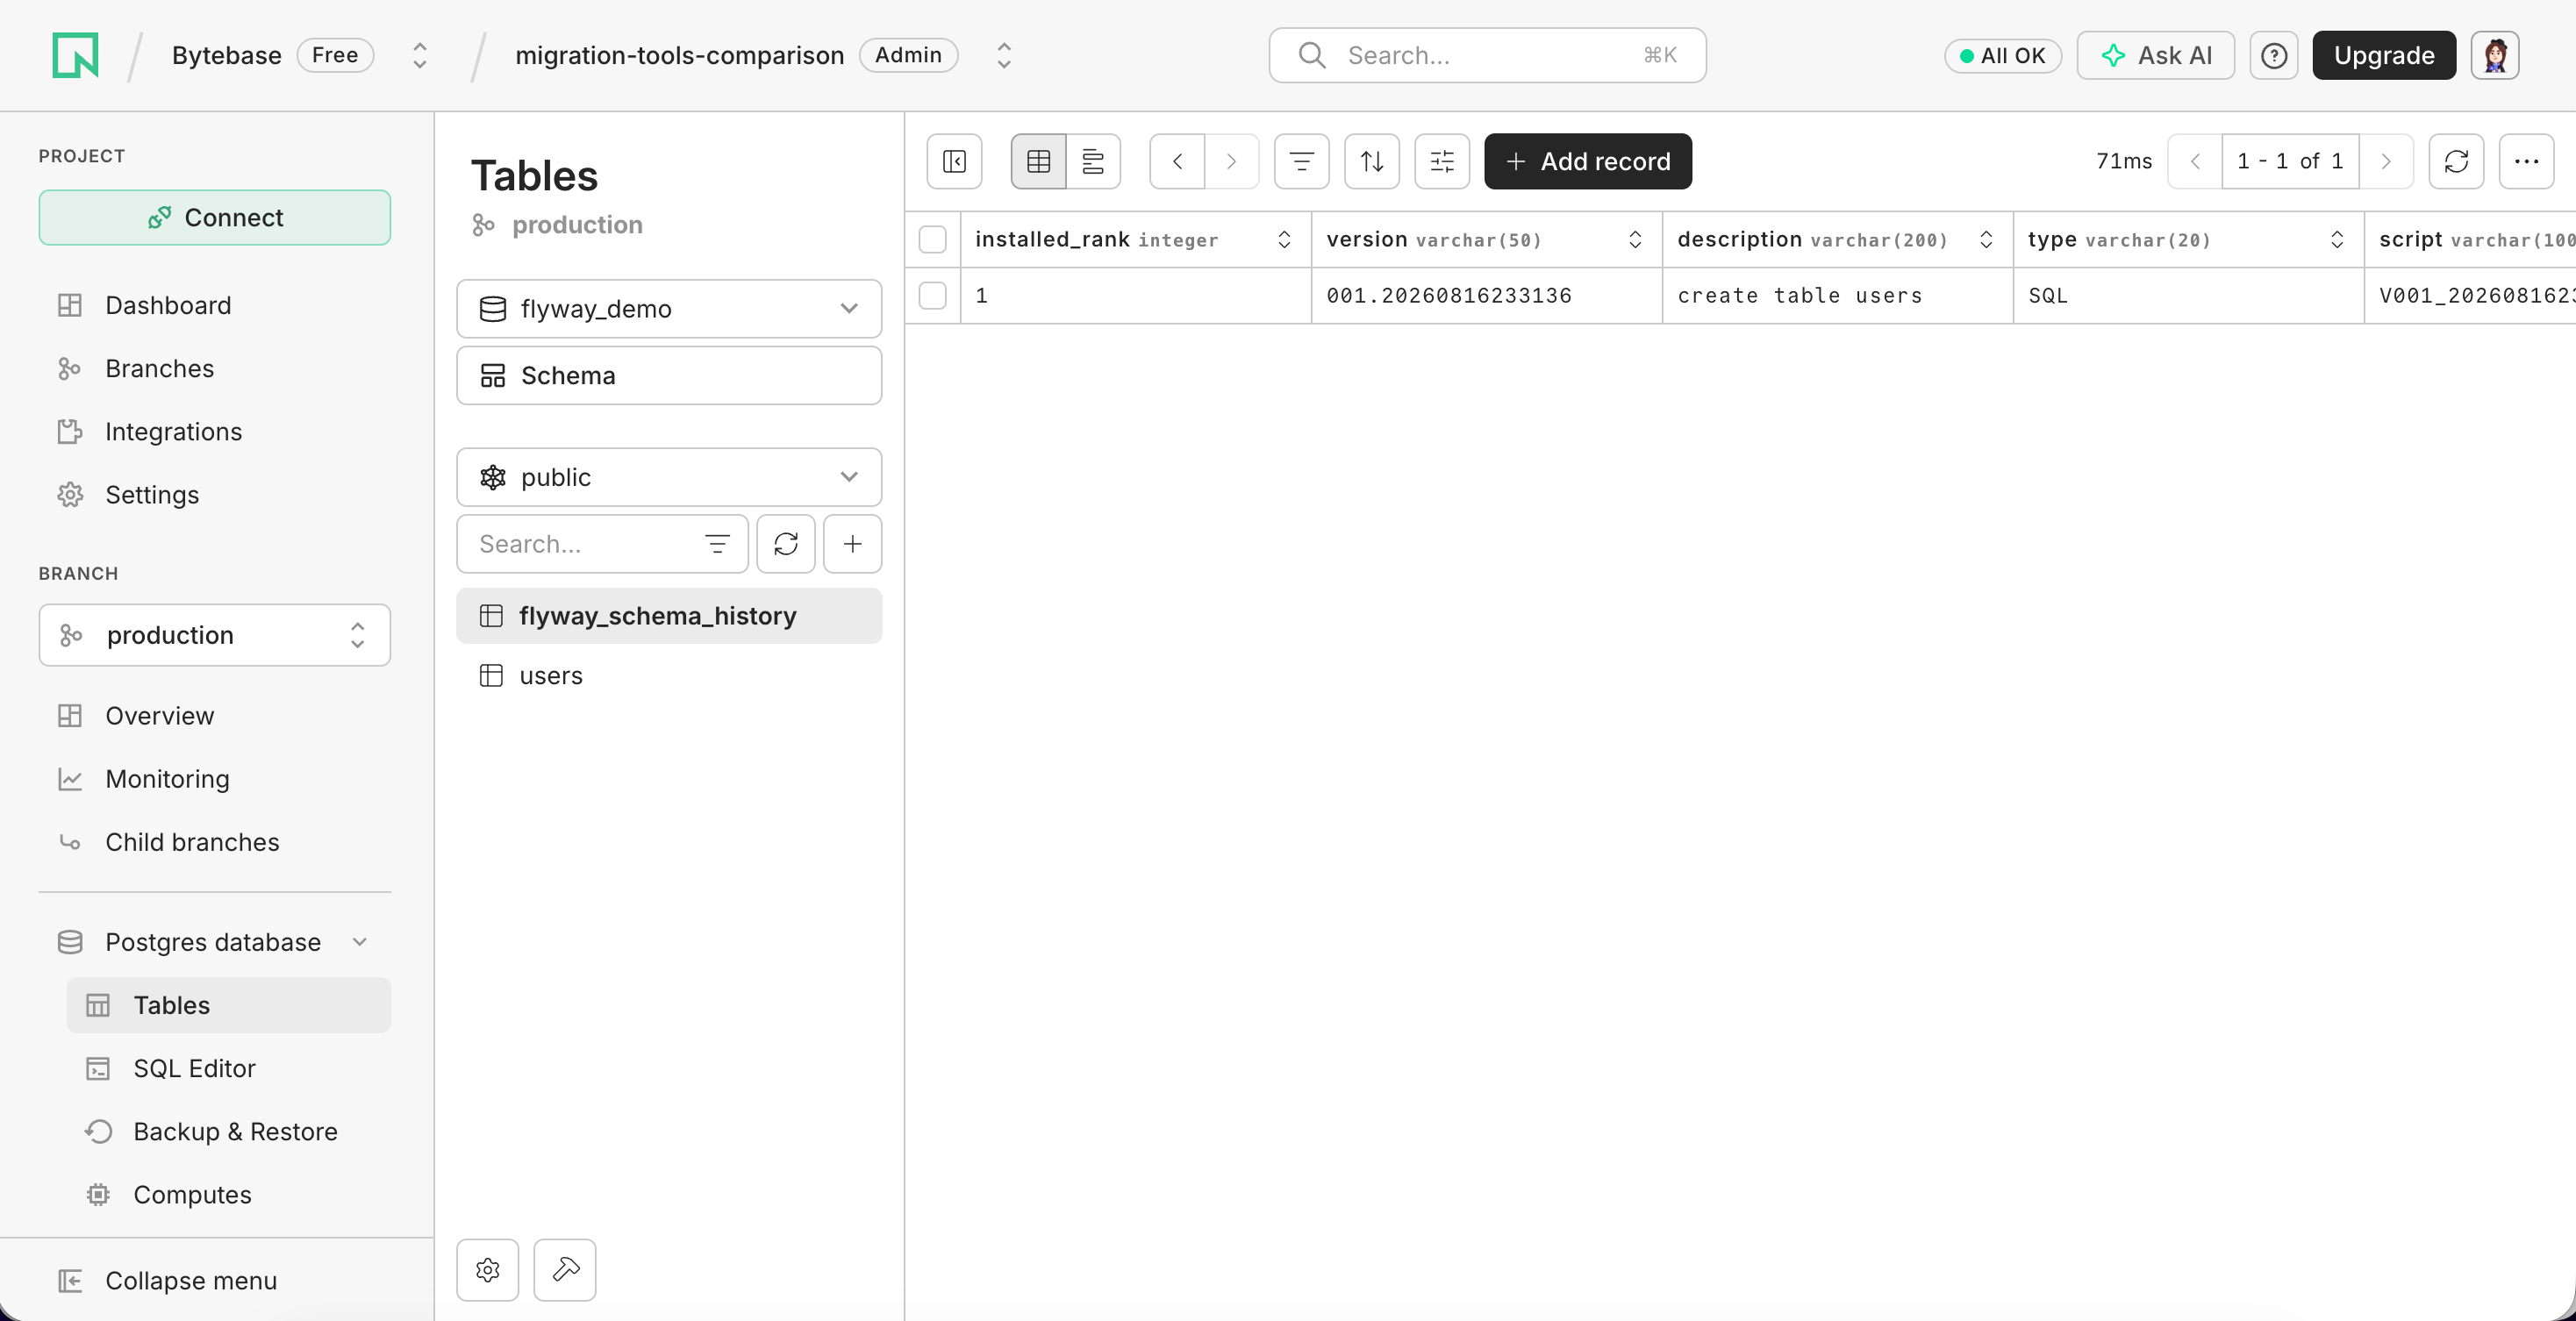 Neon showing the users table and Flyway schema history
The flyway_schema_history table stores the migration version, description, script, checksum, installation time, execution time, and success status.
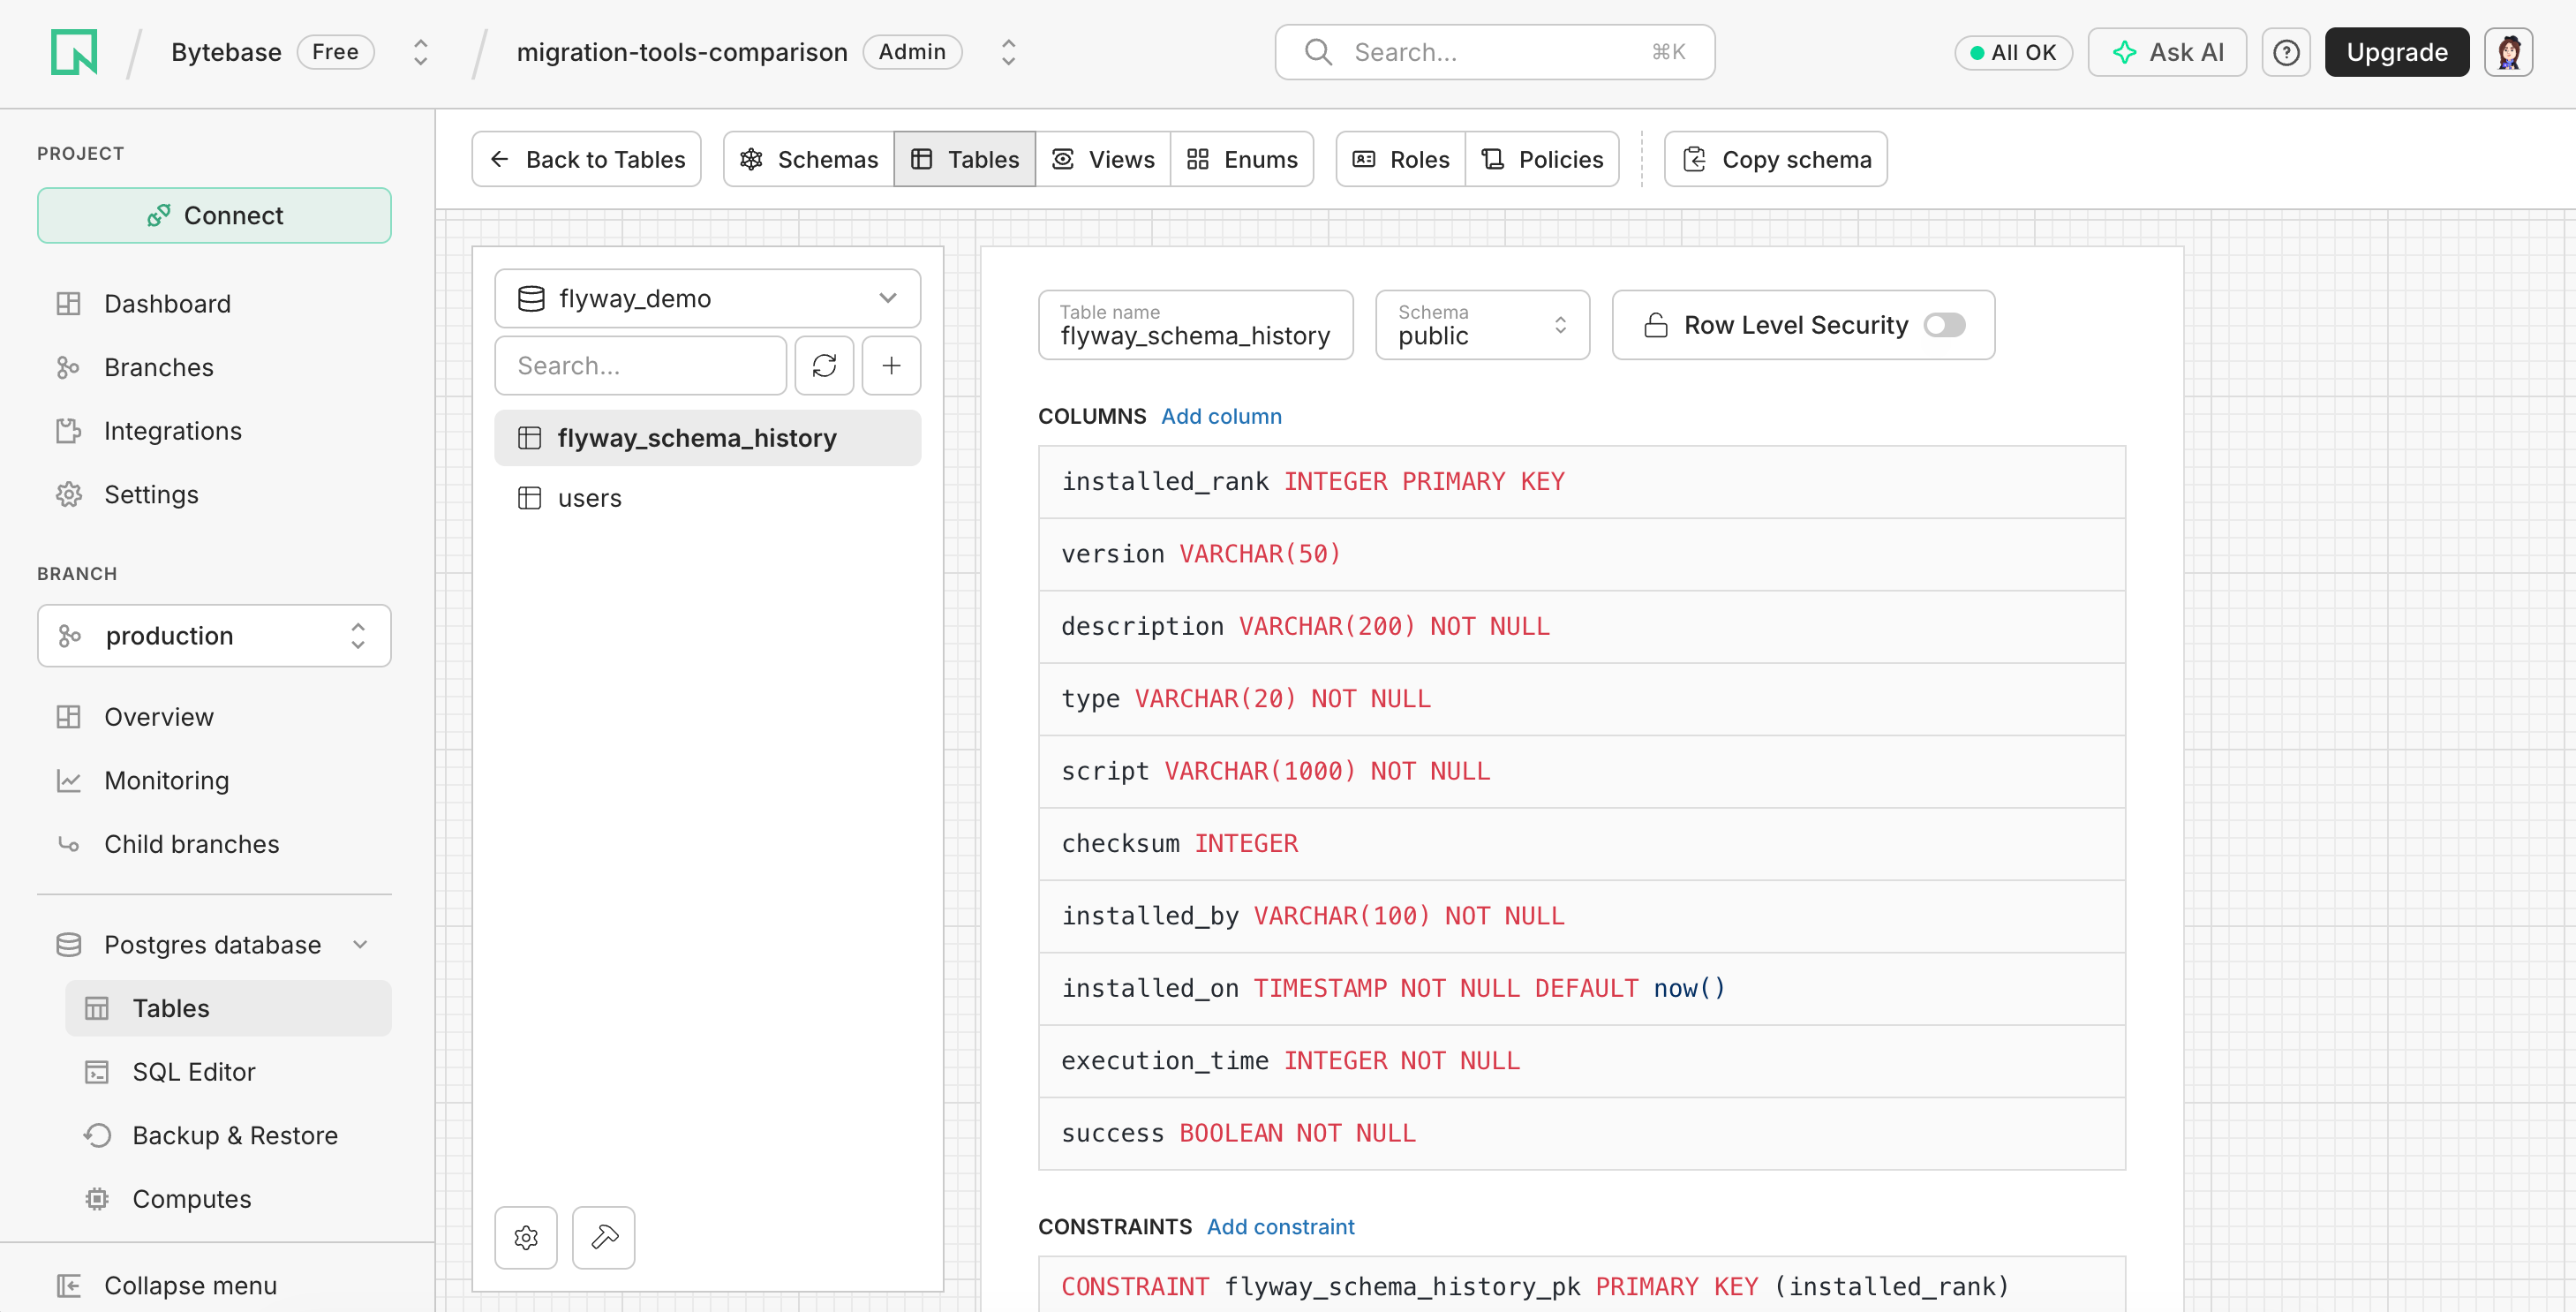 The structure of the Flyway schema history table in Neon
Rough time from download to visible history: about 30 minutes. Nothing in the guide contradicted what I saw, and I never had to leave it to find an answer. Redgate's quickstart estimates five minutes, and the configure-and-migrate steps it actually covers are about that fast. The rest of my half hour went to the 663 MB download, the account registration, and the email confirmation — none of which the estimate counts.
Beginner takeaway
Flyway Desktop keeps the main workflow visual: project, database target, migration file, and execution history. The user still works with a conventional versioned SQL file, but the desktop interface makes the target and result easy to inspect.
Liquibase Community CLI: three detours before the first update
I started with Liquibase's Install Liquibase and Introduction to Liquibase guides. On paper the path looked straightforward: install Liquibase, initialize a project, configure the connection, run the first update. My 5.0.3 run was not that linear — it became the most troubleshooting-heavy of the three.
The documentation summarizes the standard workflow as changesets inside a changelog, deployed with update, with DATABASECHANGELOG and DATABASECHANGELOGLOCK tracking the result. Here is the sequence I actually experienced:
| Point in the run | What I expected | What happened |
|---|---|---|
| Java setup | Follow the Java link and continue | The getting-started path led to Java 8, but Liquibase 5.0.3 requires Java 17 or later — so I installed a JDK twice. |
| Selecting the runtime | The newly installed JDK 17 would be used automatically | My shell still used the older Java installation, so I had to set JAVA_HOME. |
| Project initialization | The generated files would match the documented example | My 5.0.3 run produced only example-changelog.sql and liquibase.properties. |
| First PostgreSQL connection | Liquibase would connect after I supplied the JDBC URL and credentials | The PostgreSQL driver was missing. |
| Driver installation | — | I found the PostgreSQL-specific guide and ran liquibase lpm add postgresql. |
| Migration | liquibase update would apply the changeset | After resolving the earlier issues, the update succeeded. |
First obstacle: which Java version did I need?
The getting-started path pointed me to a Java 8 download — jre-8u501-macosx-aarch64.dmg, 93.2 MB. After installing it, I found it was not compatible with the Liquibase version I was running: the 5.0.3 system requirements put the minimum at Java 17.
So the first Java install was wasted. I went back and downloaded a second JDK, this time 17. Even after installing it, java -version still reported the old runtime — my shell had not picked up the new installation. I had to point JAVA_HOME at the JDK 17 location and put its bin directory first on PATH — on macOS:
export JAVA_HOME=$(/usr/libexec/java_home -v 17)
export PATH="$JAVA_HOME/bin:$PATH"
With that, Liquibase could finally start on the expected runtime.
Second surprise: the generated project looked different
I downloaded the Liquibase archive — liquibase-5.0.3.tar.gz, 8.3 MB — installed the Community CLI, and ran the project initialization flow from the introduction guide.
Initialization produced only two relevant files:
example-changelog.sql
liquibase.properties
That is a smaller project structure than the documentation showed, and I initially wondered whether initialization had failed. It had not: one file holds the SQL changelog, the other the connection and changelog configuration.
Configuring the Neon connection
I updated liquibase.properties with the changelog path and the JDBC connection for liquibase_demo:
changelog-file=example-changelog.sql
url=jdbc:postgresql://YOUR_NEON_HOST/liquibase_demo?sslmode=require
username=YOUR_NEON_USER
password=YOUR_NEON_PASSWORD
Third obstacle: the PostgreSQL driver was missing
My first connection attempt failed because Liquibase could not find the PostgreSQL JDBC driver. I left the introductory guide and found the database-specific Connect Liquibase with PostgreSQL page, which adds the driver through Liquibase Package Manager:
liquibase lpm add postgresqlThat gave Liquibase what it needed to reach Neon — installing Liquibase itself had not installed what it takes to talk to PostgreSQL.
Adding the SQL changeset
I replaced the example content in example-changelog.sql with a formatted SQL changeset:
--liquibase formatted sql

--changeset demo:1
CREATE TABLE users (
    id BIGINT GENERATED ALWAYS AS IDENTITY PRIMARY KEY,
    name TEXT NOT NULL,
    created_at TIMESTAMPTZ NOT NULL DEFAULT NOW()
);
The --changeset demo:1 line gives the change an author and identifier. Liquibase uses that identity, together with the changelog file path, to determine whether the changeset has already run.
The update finally succeeded
I checked the current state, inspected the SQL Liquibase planned to run, then applied it:
liquibase status
liquibase update-sql
liquibase update
This time it worked.
What I saw at the finish line
In Neon I could see all three tables together: users, plus the two management tables Liquibase creates, databasechangelog and databasechangeloglock. Inspecting databasechangelog showed the applied changeset and the fields Liquibase uses to track it — id, author, filename, dateexecuted, orderexecuted, and md5sum.
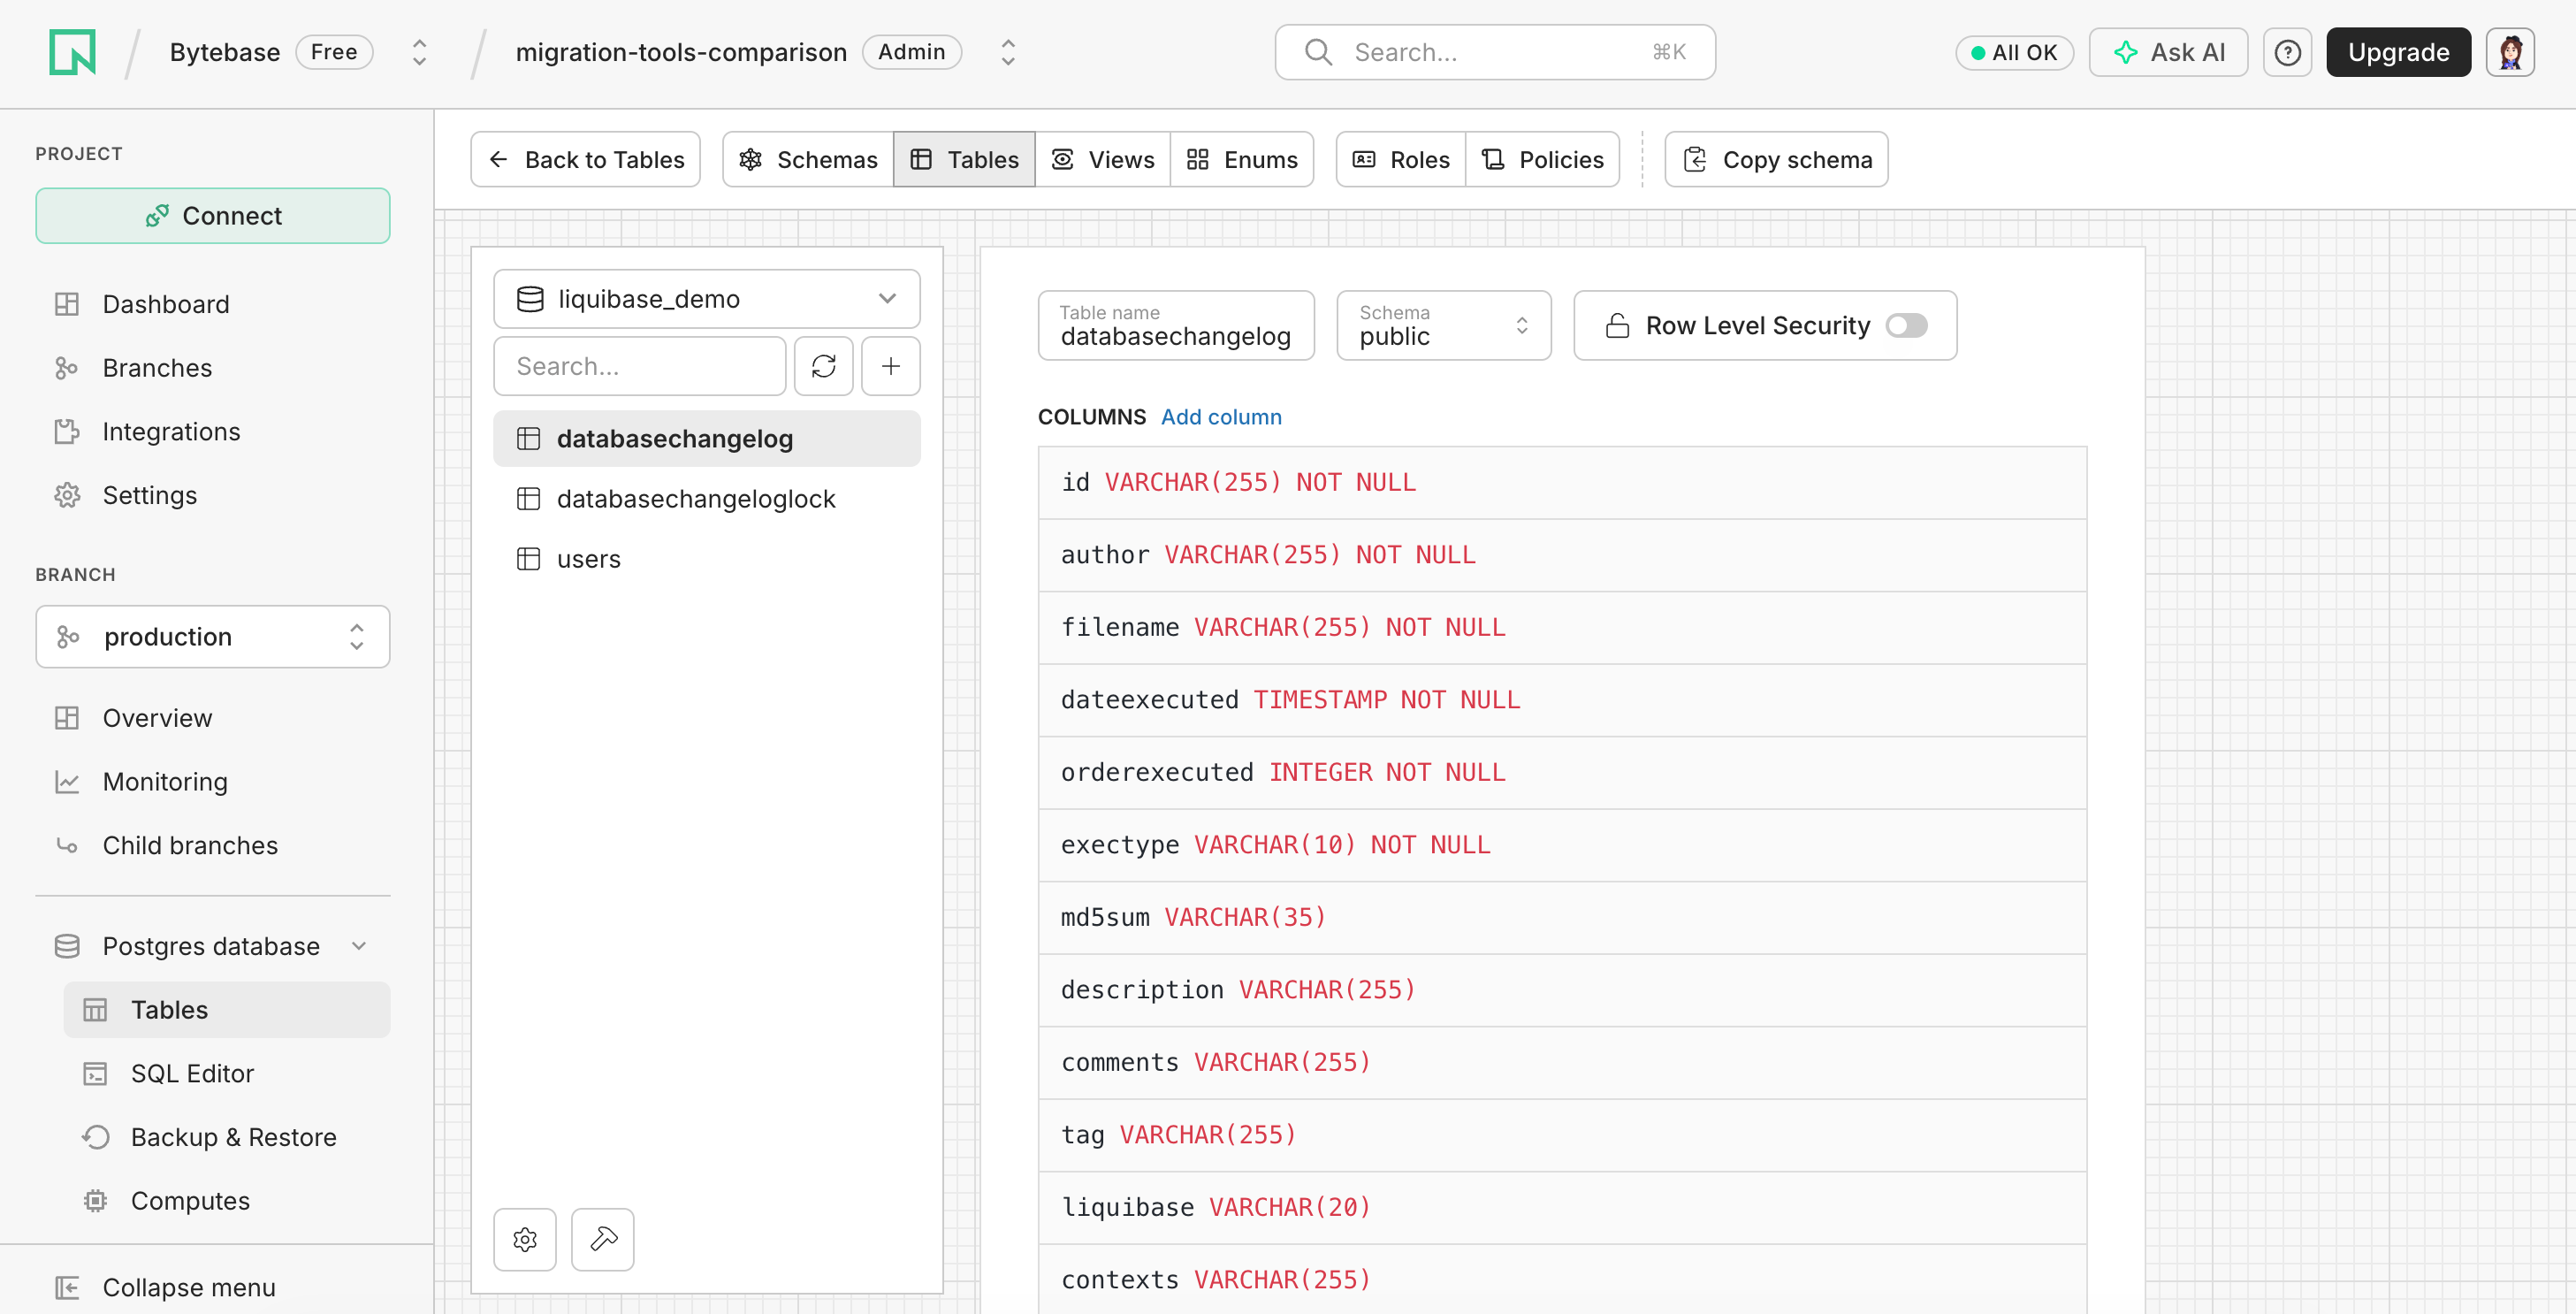 Neon showing the Liquibase tracking tables and the DATABASECHANGELOG structure
Rough time from download to confirmed changeset: about an hour and a half. Almost none of that was spent on migration work. The update command itself was instant; the time went into the Java version mismatch, the JAVA_HOME switch, the unexpected project layout, and the missing PostgreSQL driver.
Beginner takeaway
Liquibase exposes the moving parts clearly: the Java runtime, CLI, project files, JDBC driver, connection properties, and changeset metadata are all visible. But the beginner path did not prepare me for any of it — the guide sent me to Java 8 for a release that needs Java 17, and installing Liquibase did not install what it needed to talk to PostgreSQL. That's an onboarding problem, not an engine problem — though a new user has no way to tell the difference.
Bytebase Cloud: sign in, connect, plan, deploy
I followed Bytebase's step-by-step quickstart, whose first page offers Bytebase Cloud and self-hosted Docker side by side, and took the Cloud path it presents first. Because Neon was publicly reachable, I did not need to install Bytebase locally.
Signing in and connecting Neon
I signed in to Bytebase Cloud and created a workspace, then added a PostgreSQL instance using the Neon connection details, enabled SSL, and tested and saved the connection.
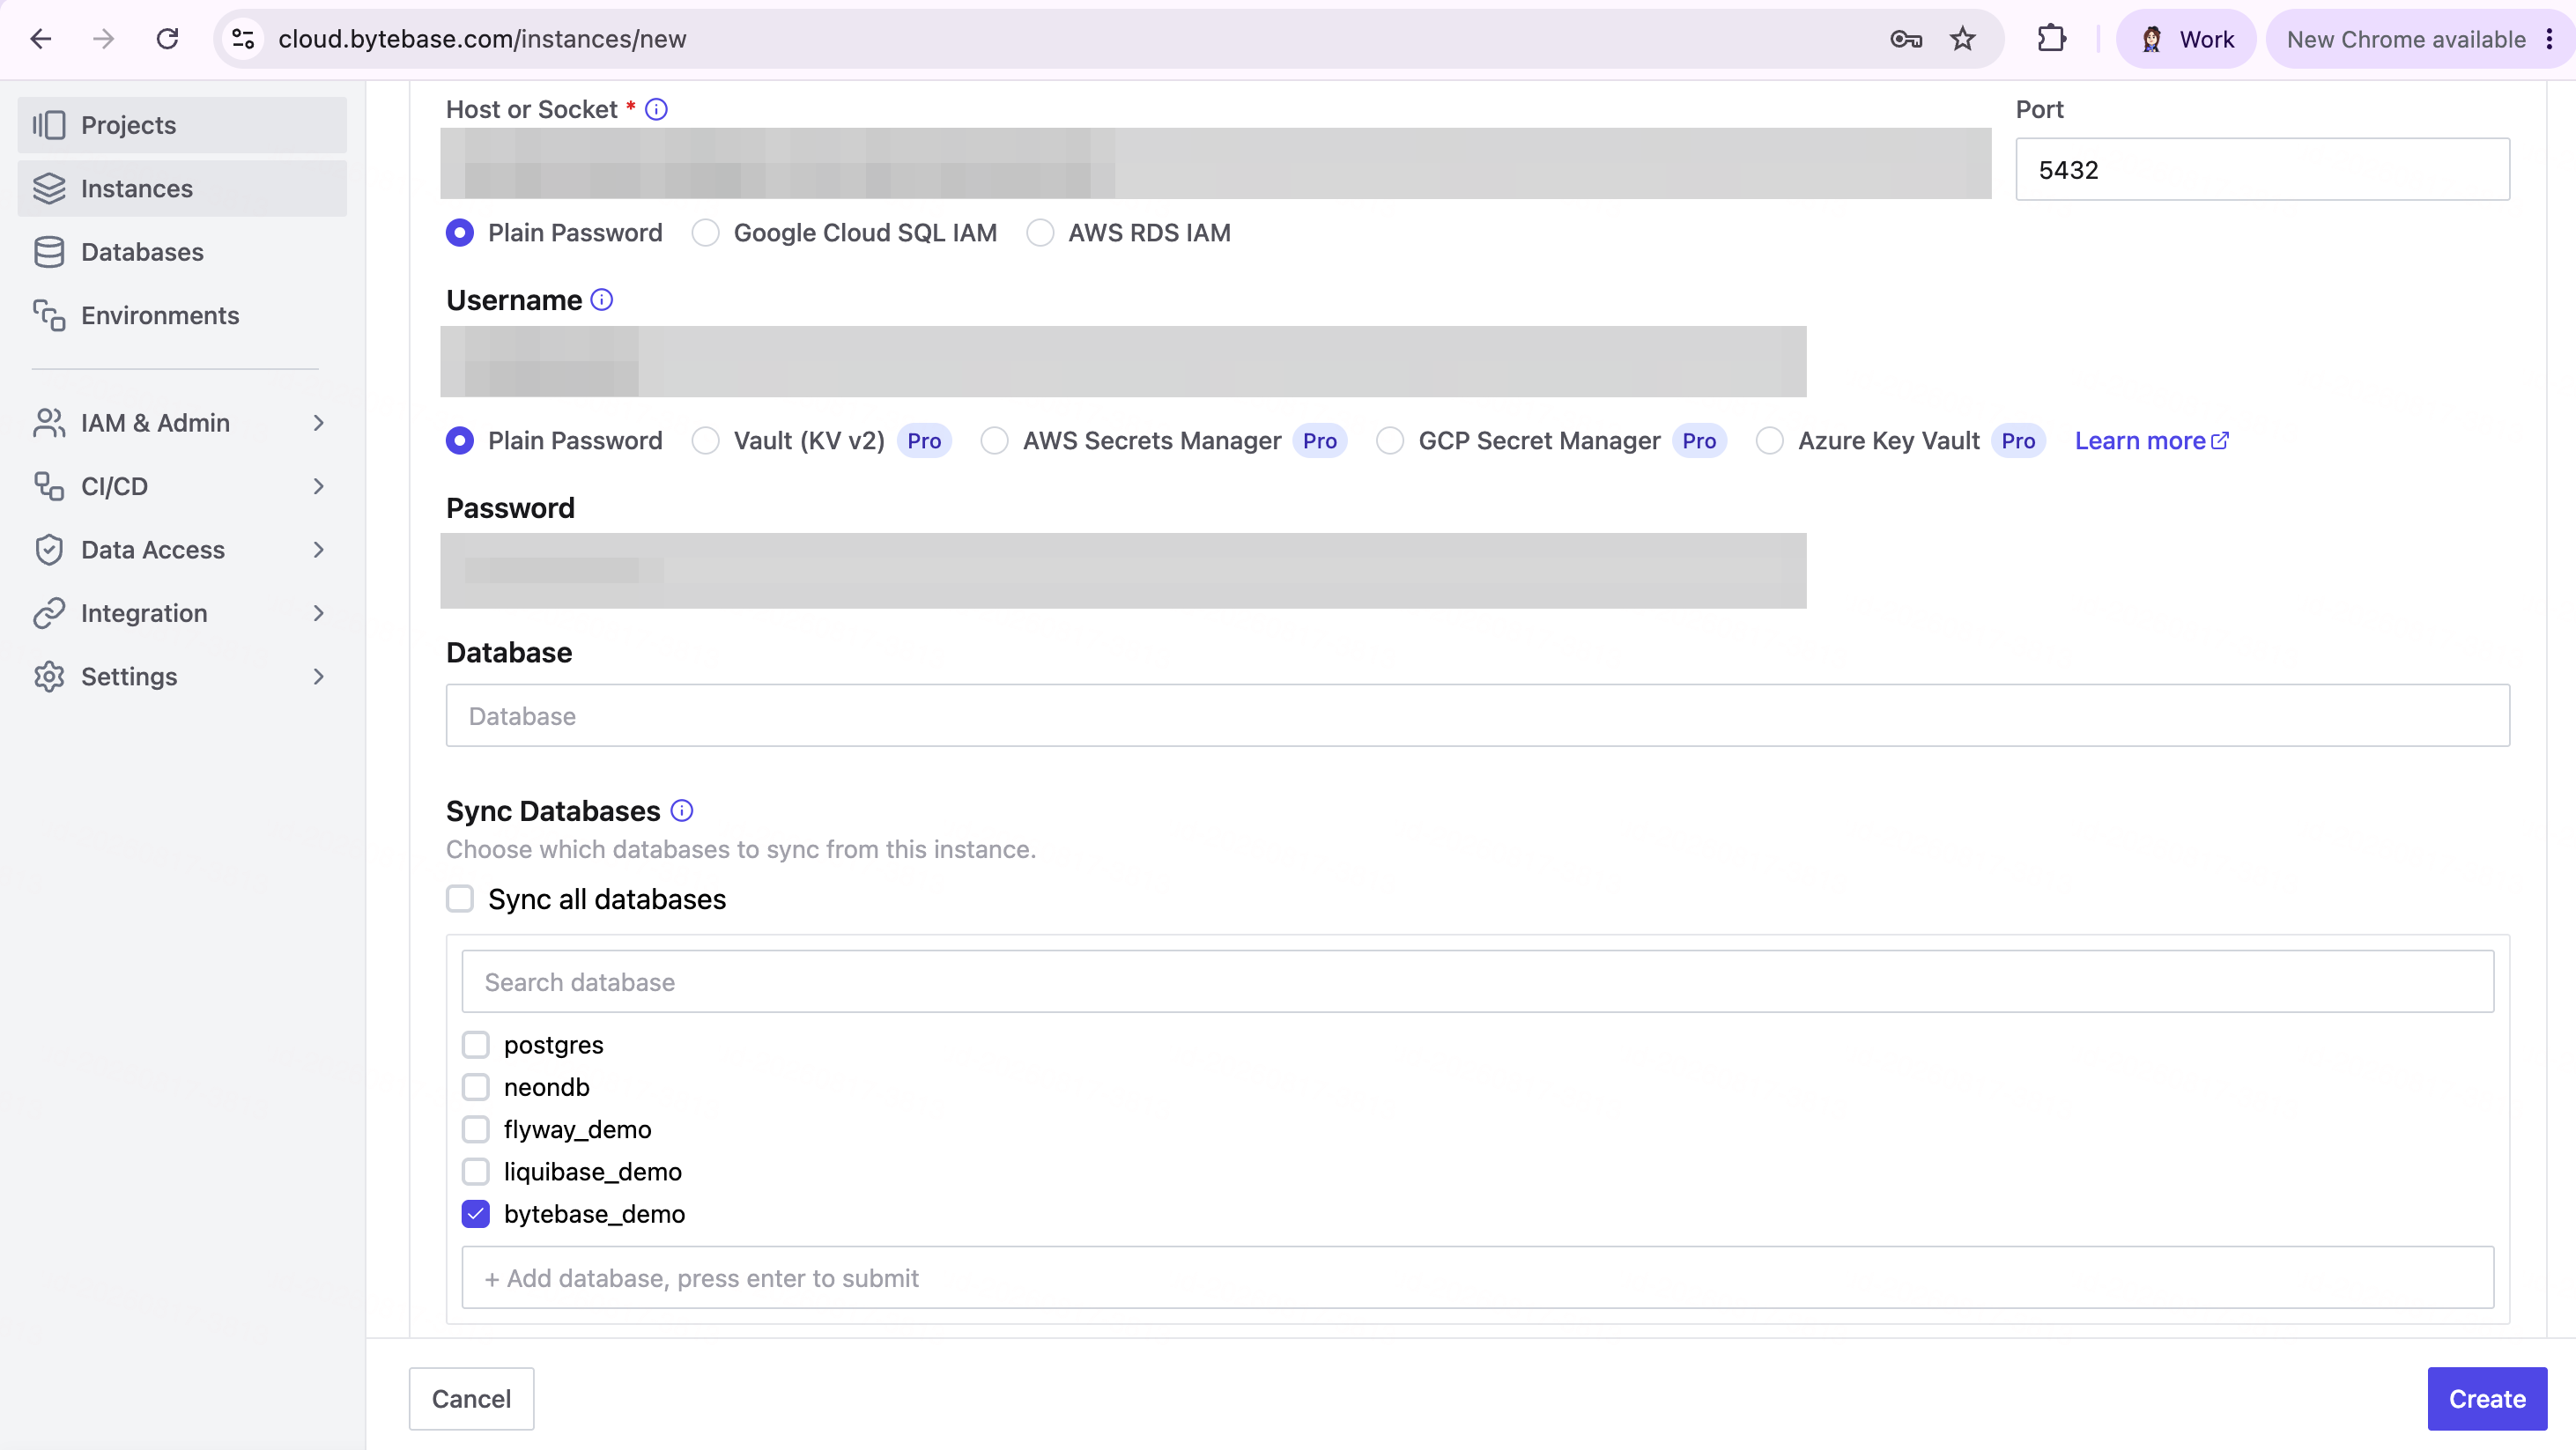 Connecting Bytebase Cloud to Neon and selecting bytebase_demo, with credentials redacted
Creating a project and transferring the database
I created a project, found bytebase_demo under the connected instance, and transferred it in.
Creating the plan
I created a new database-change plan, selected bytebase_demo, and entered the same SQL used for the other tools.
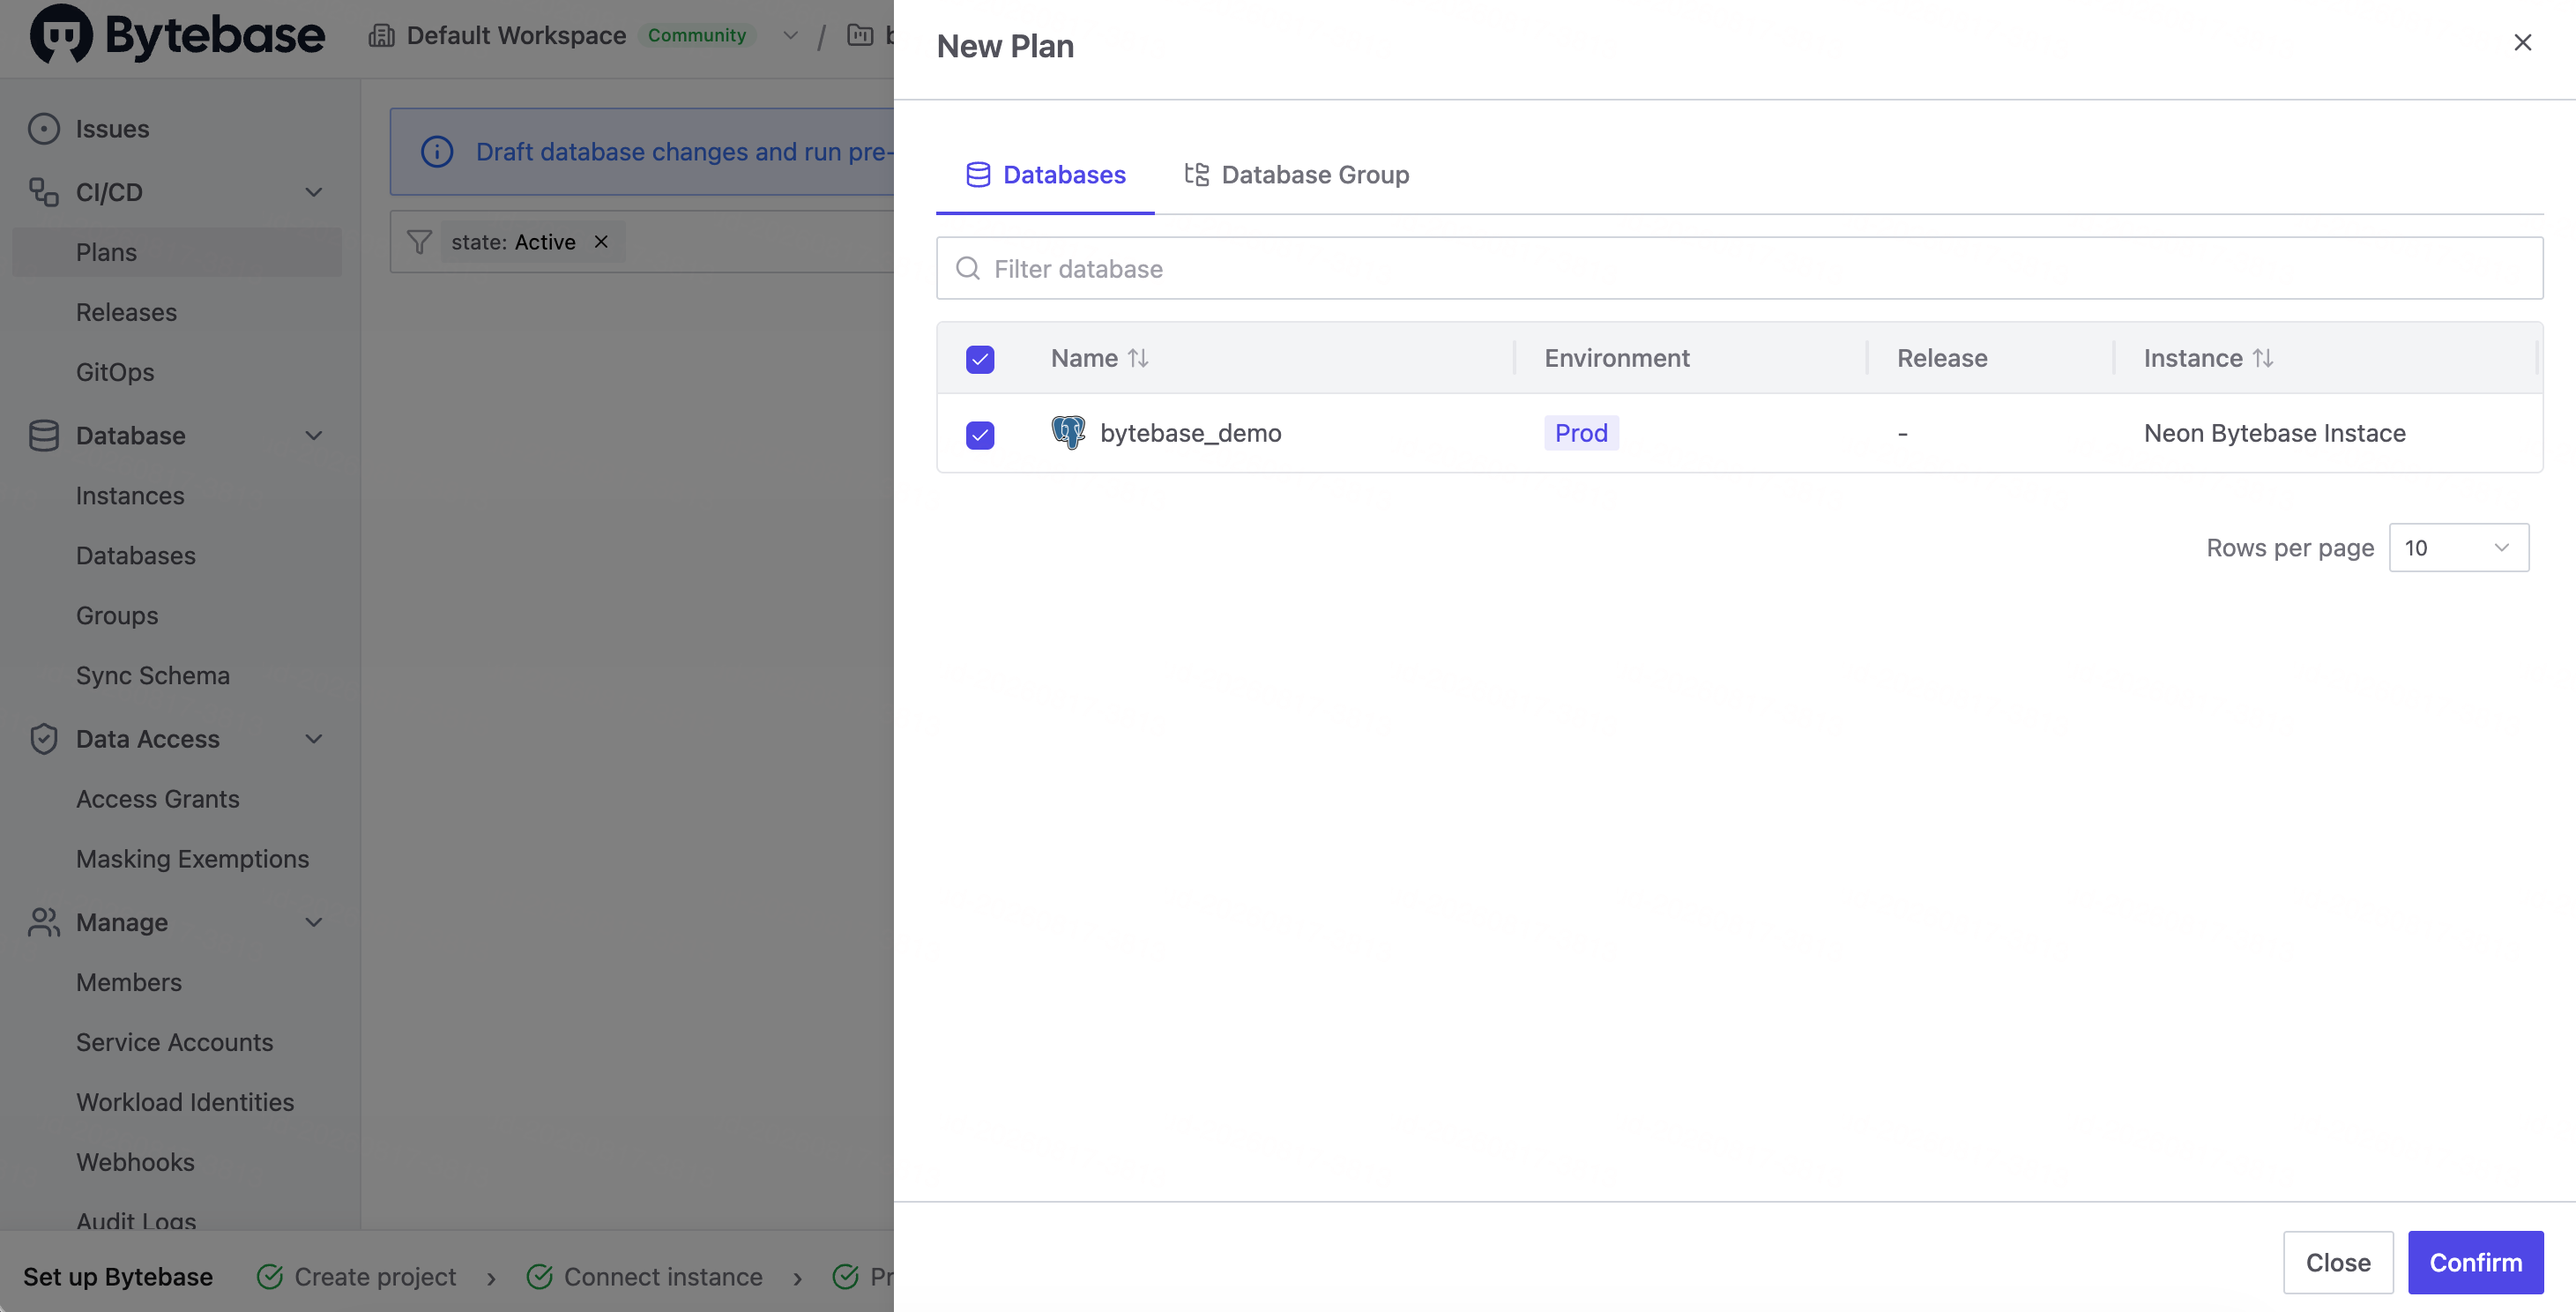 Selecting bytebase_demo as the target of the new plan
On save, Bytebase showed the target, the SQL statement, and the results of its built-in checks on the same plan page. Both checks passed, and the plan became ready for review.
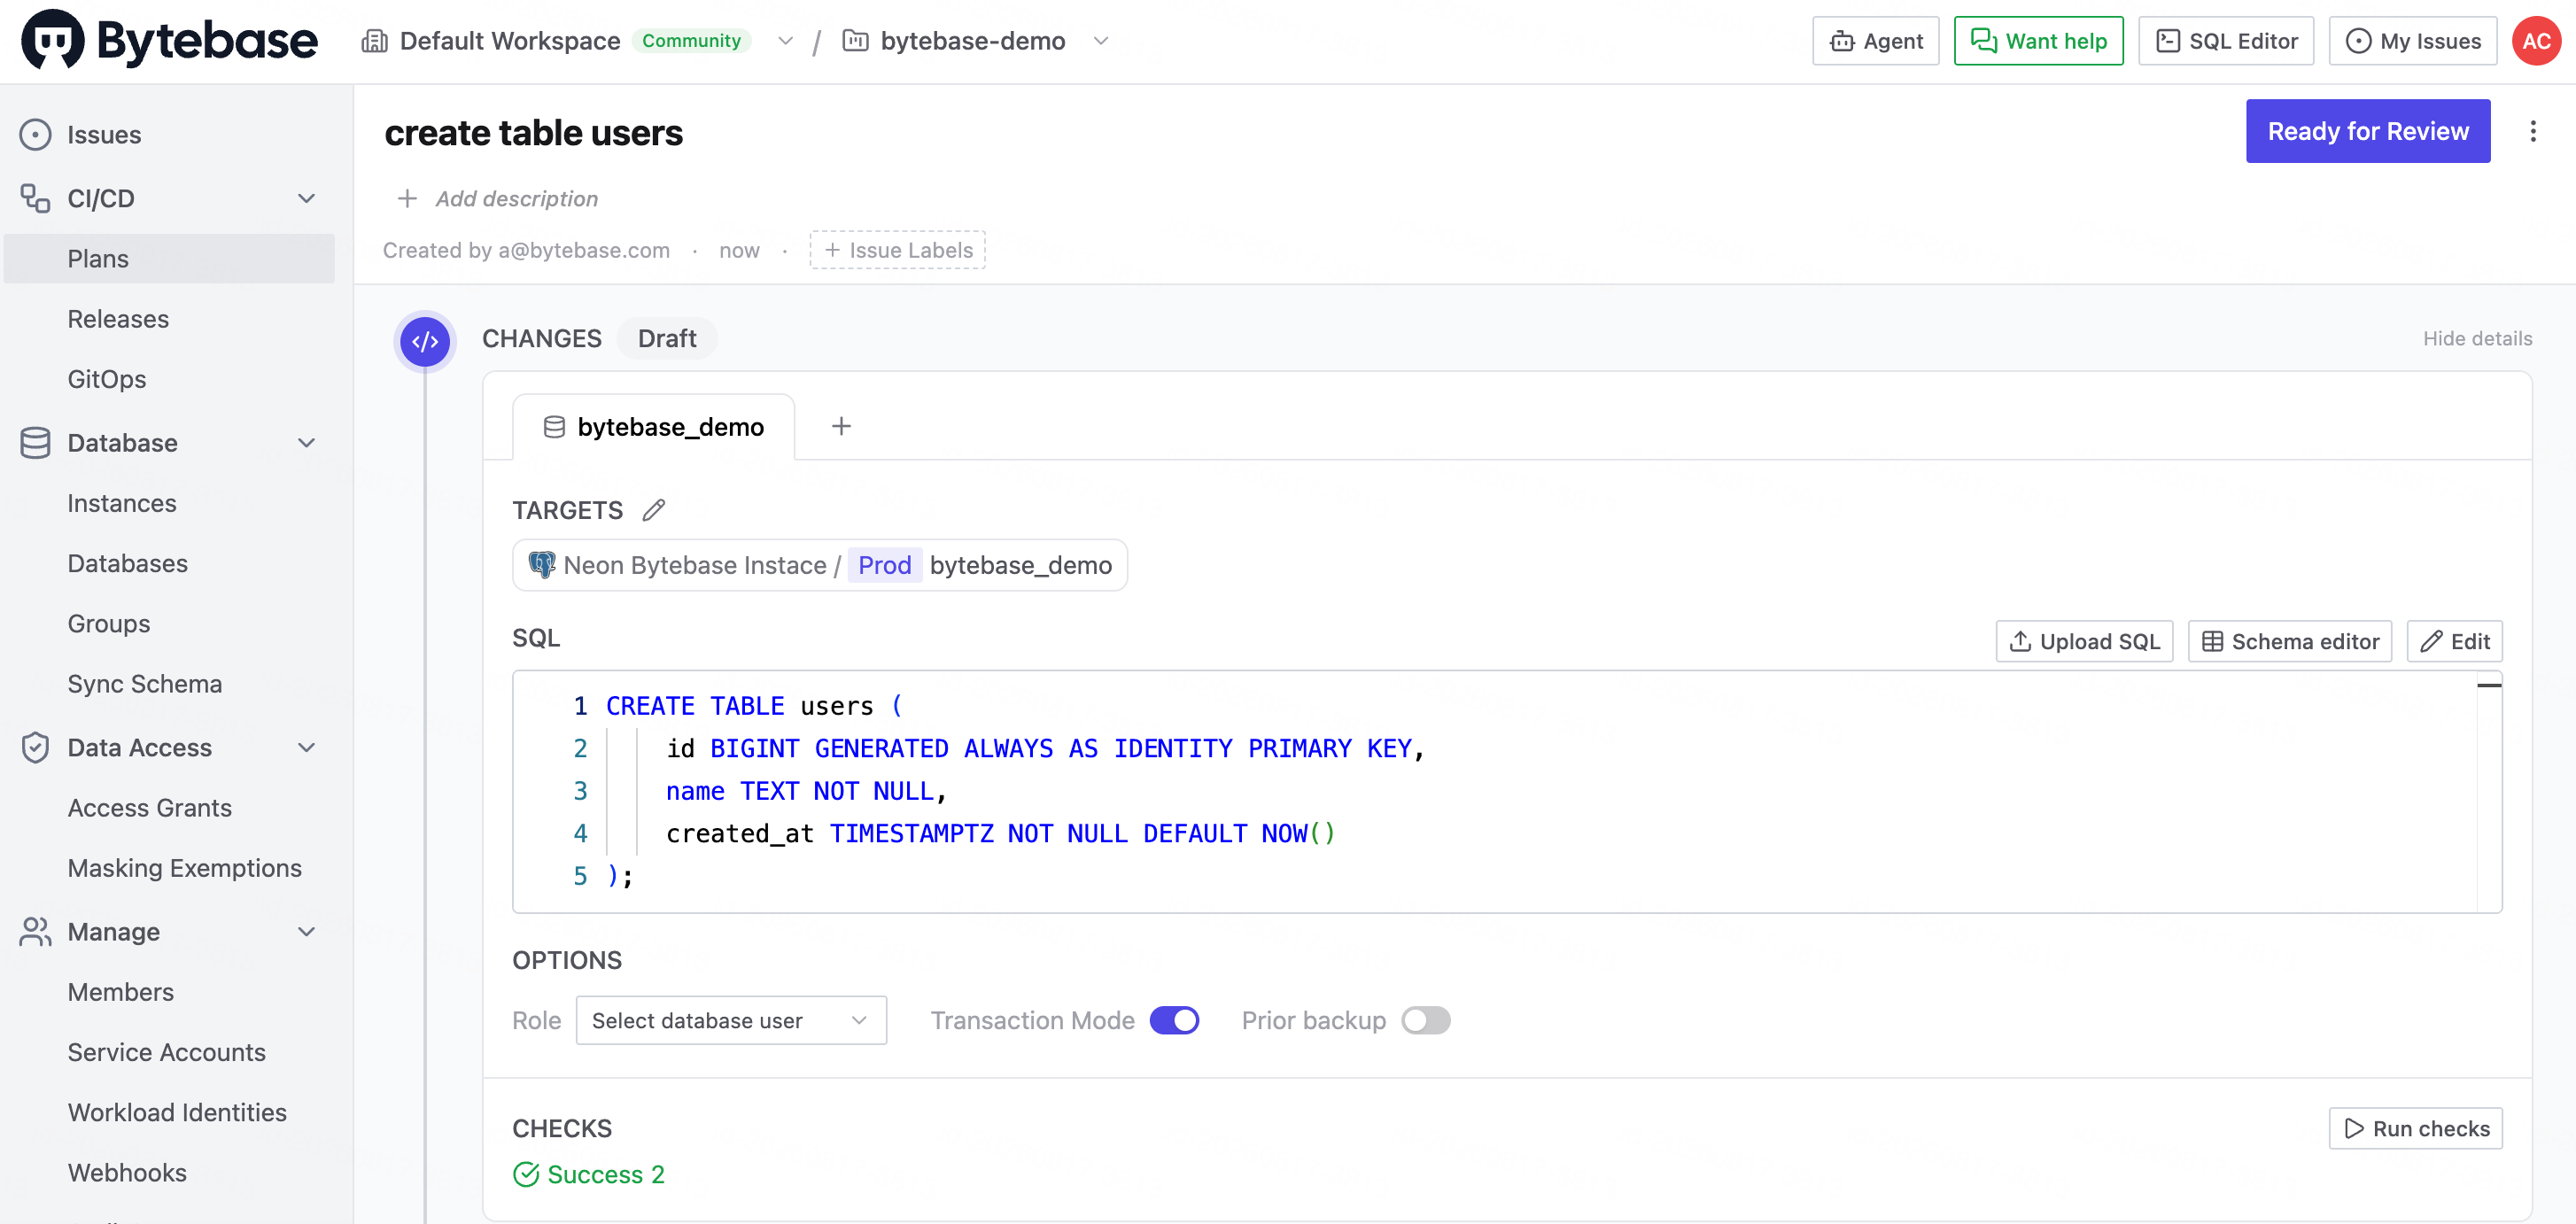 The Bytebase plan containing the SQL migration and two successful checks
Reviewing and deploying
In my fresh workspace I had not configured a custom approval flow, so there was no manual approval step: the plan showed Review: Skipped, followed by the deployment task for bytebase_demo. I selected Run immediately, and it finished successfully.
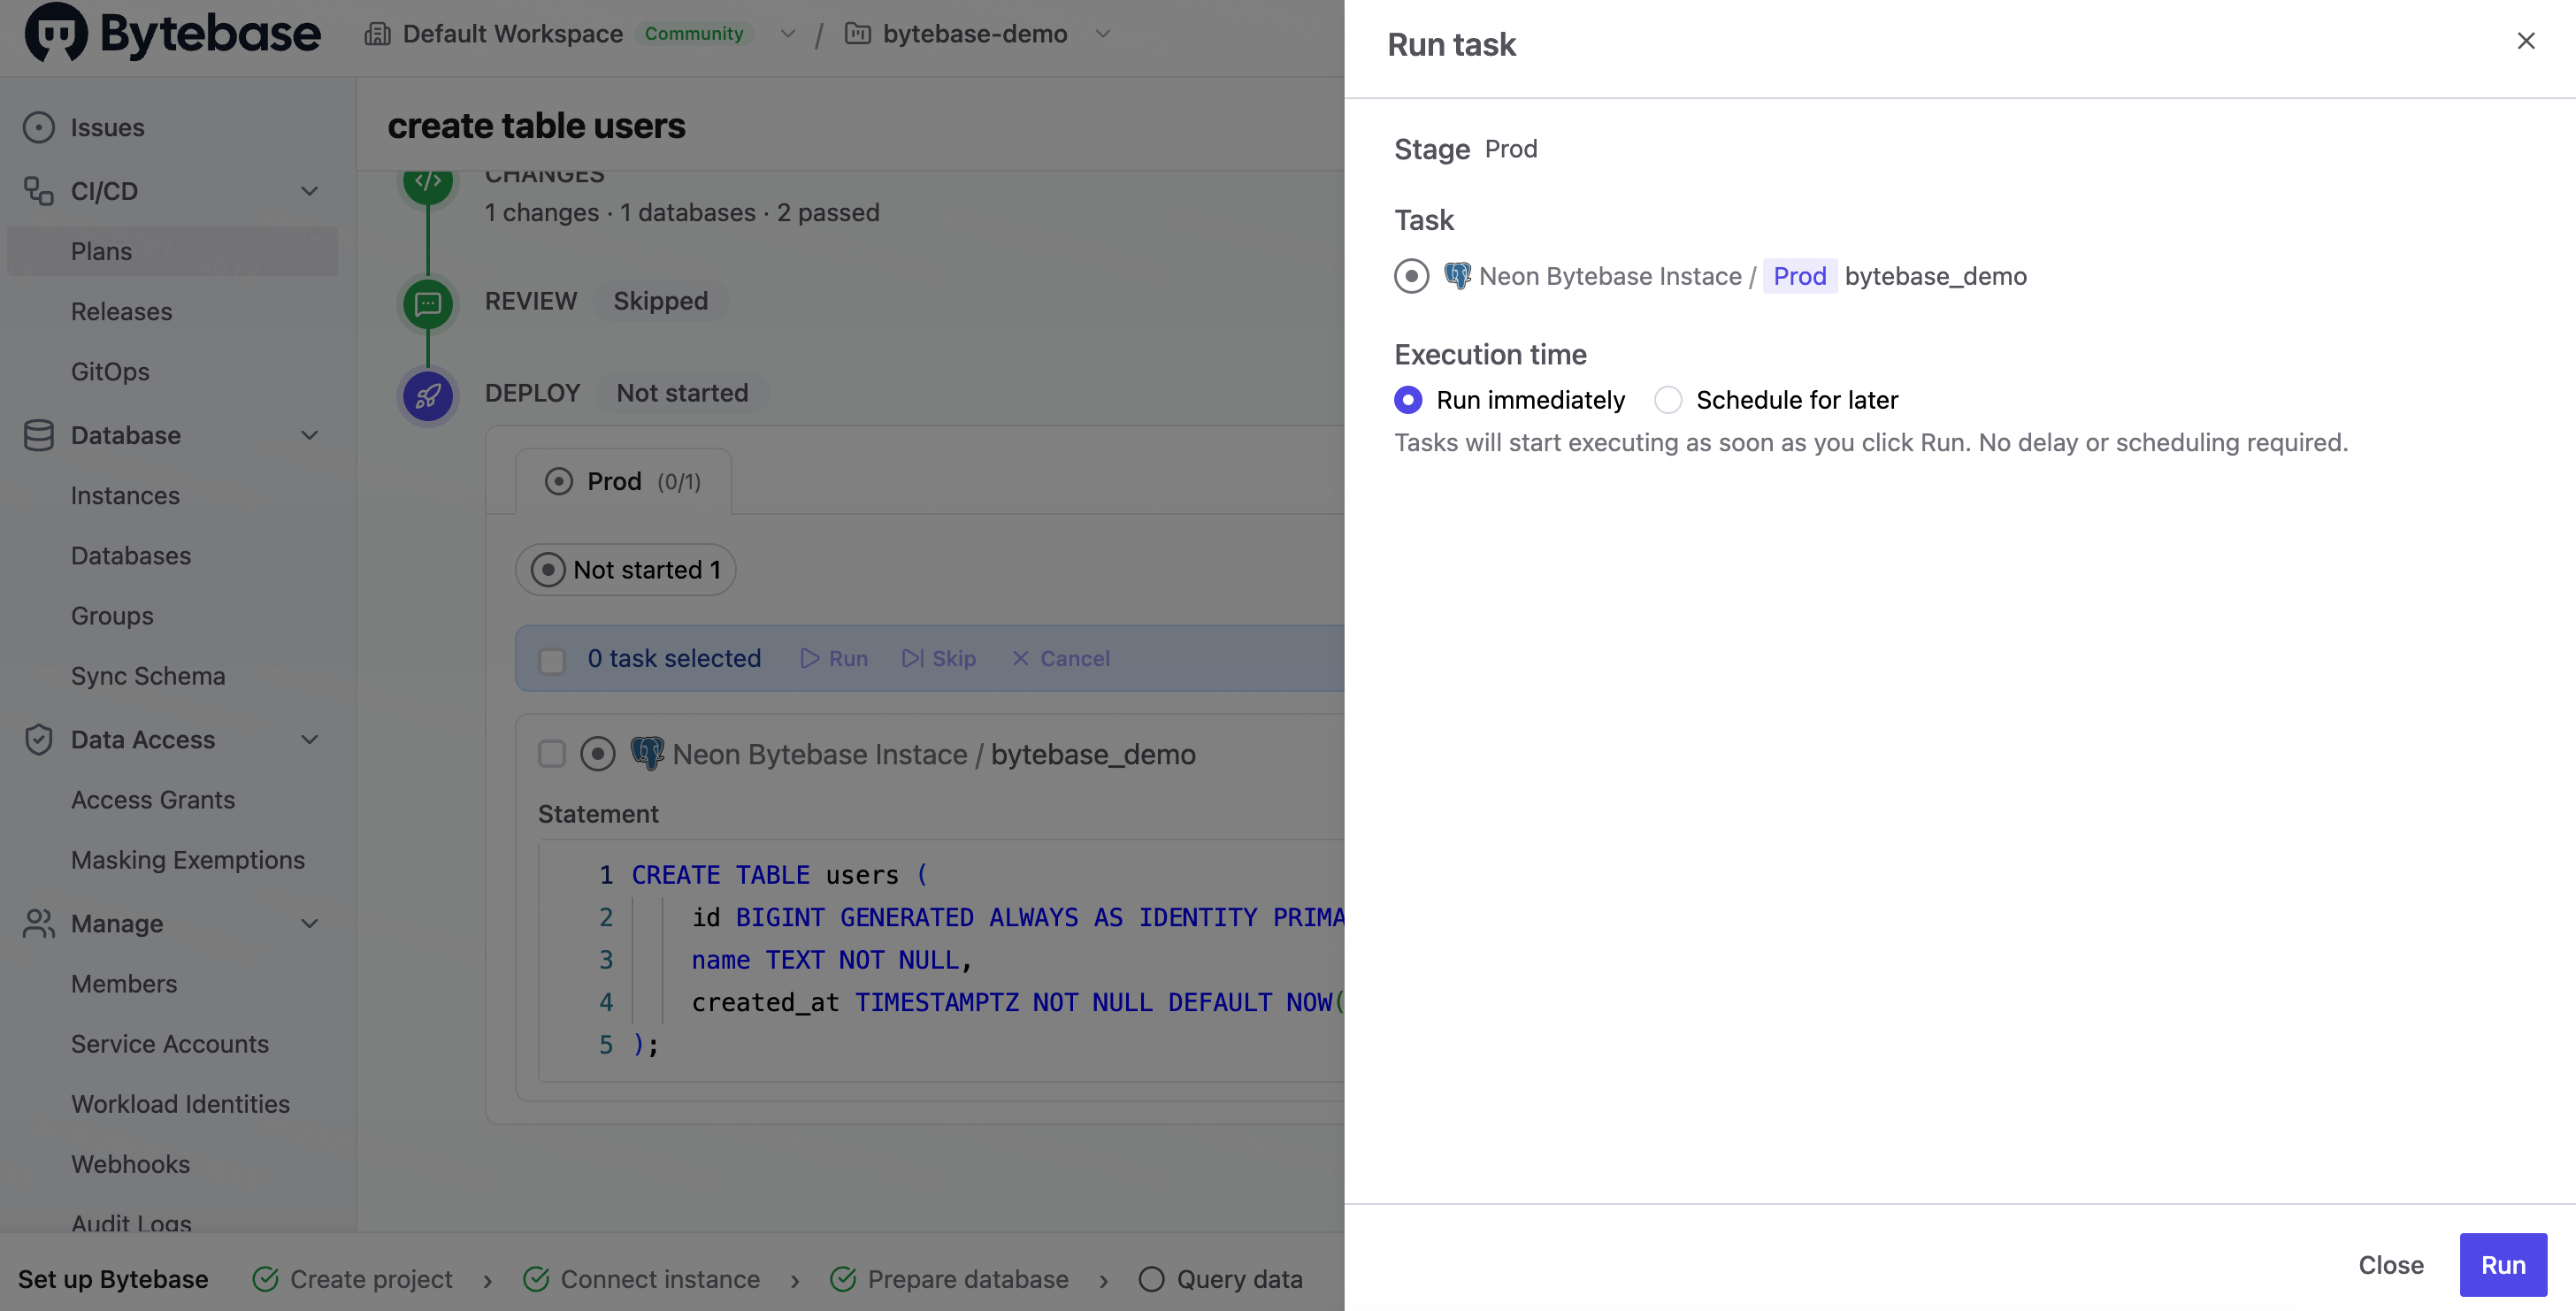 Running the Bytebase deployment task immediately after review was skipped
What I saw at the finish line
I opened the database Changelog and found the recorded schema change. The users table existed in bytebase_demo, with the execution linked to the plan that introduced it.
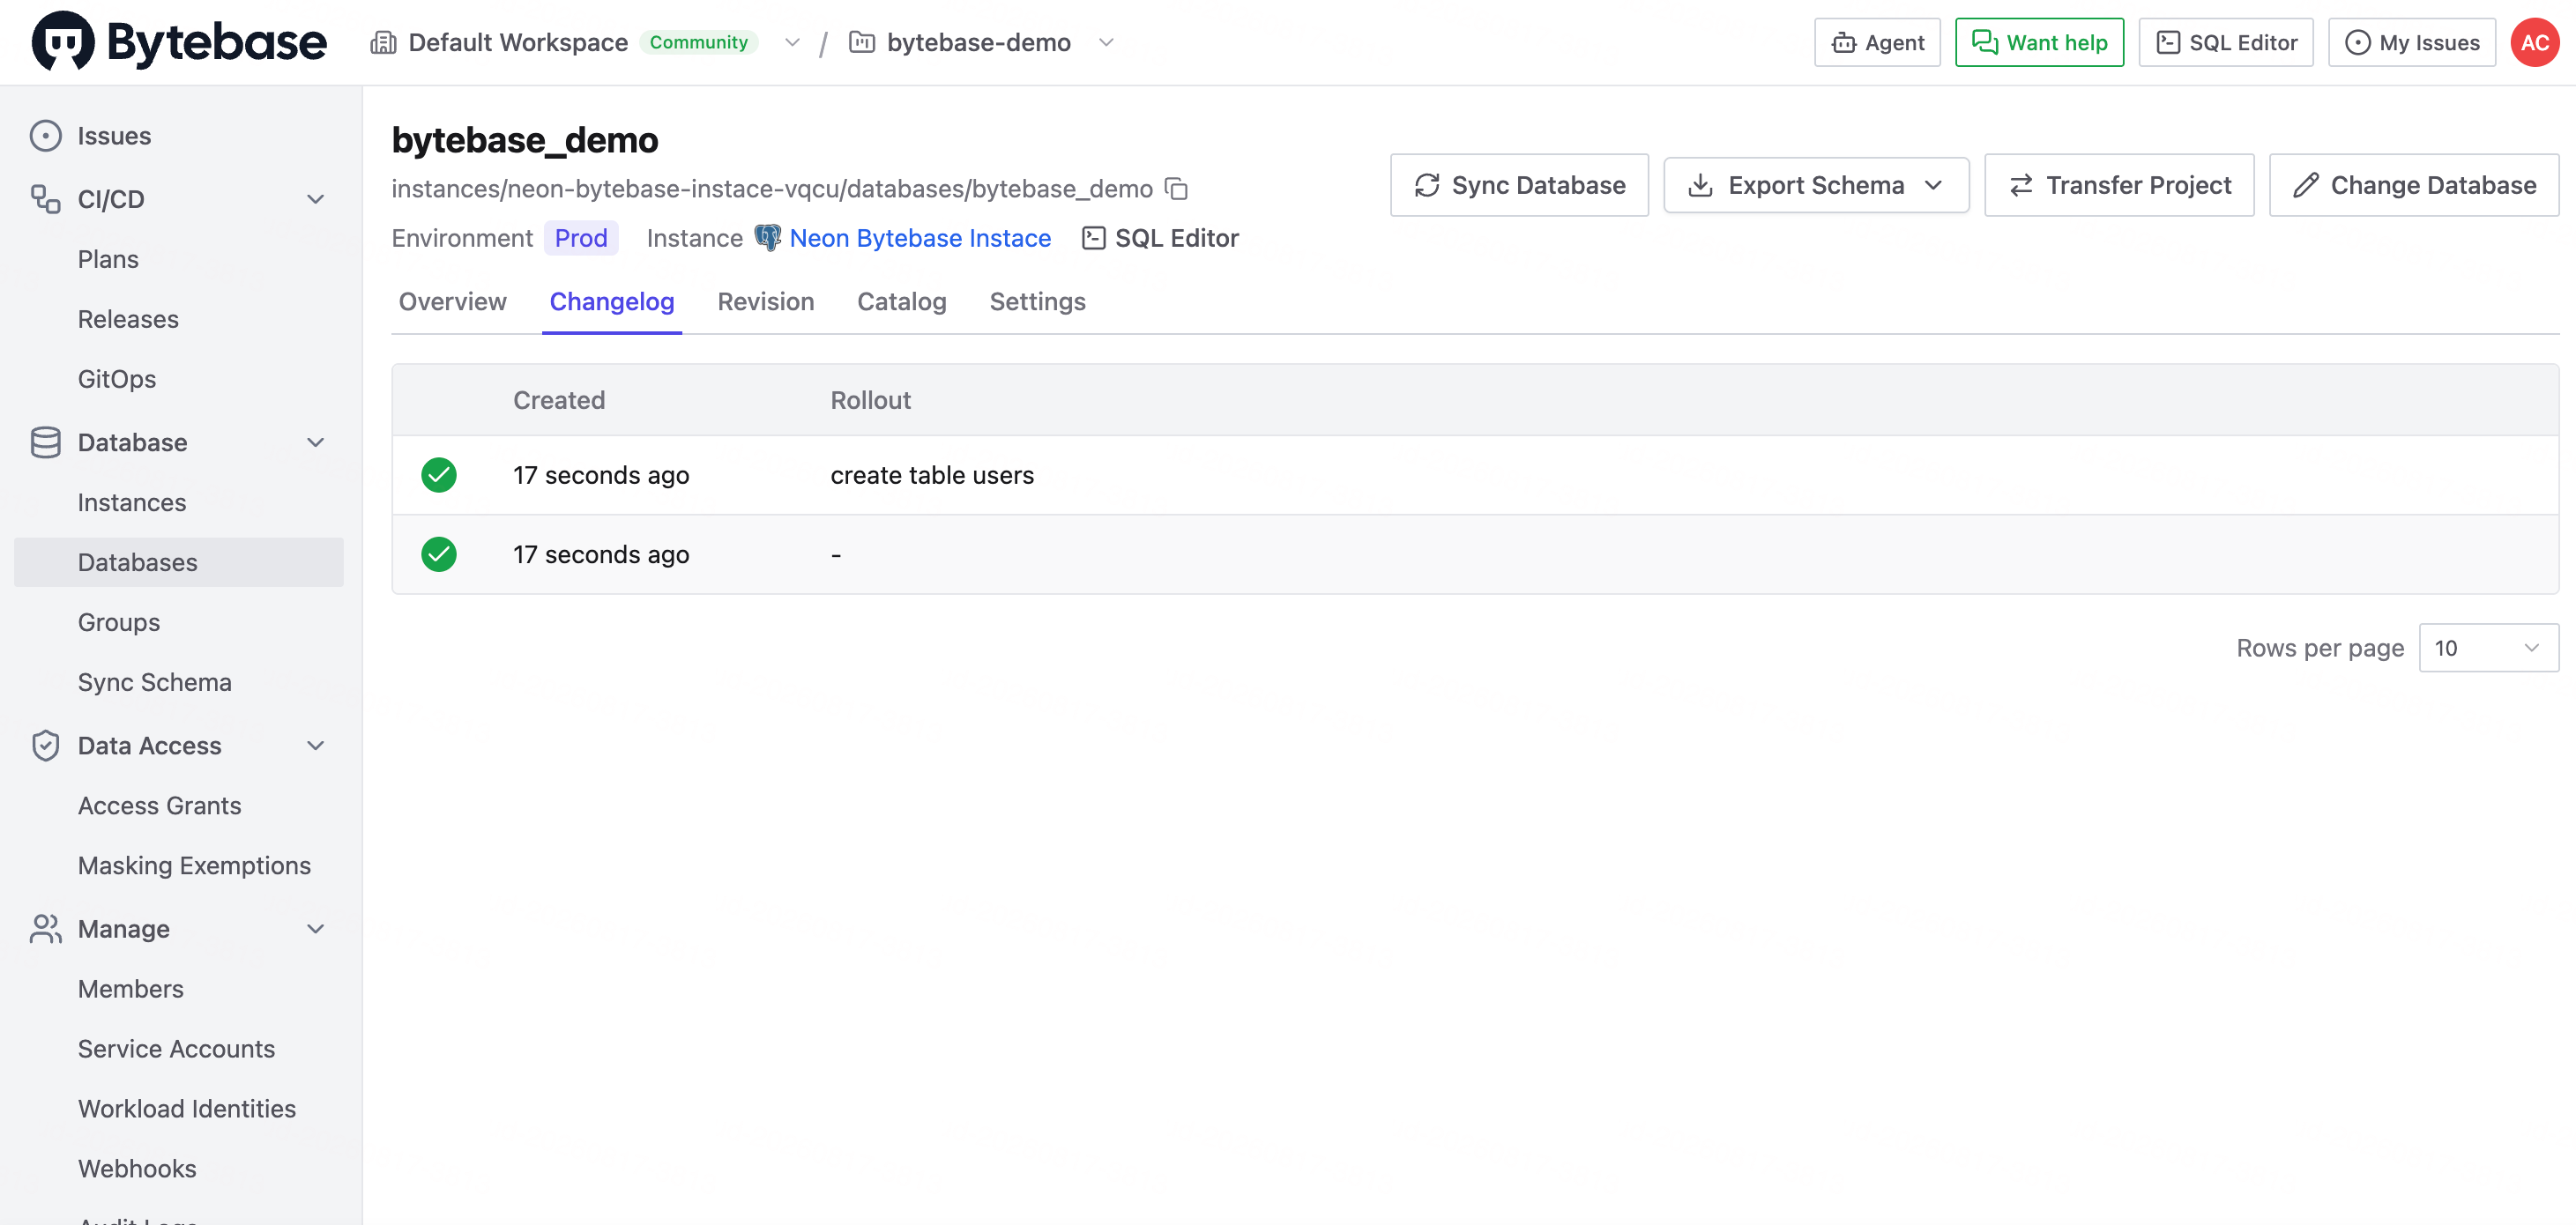 The create table users entry in the Bytebase Changelog
I also verified the result directly in Neon, where bytebase_demo now contained the users table.
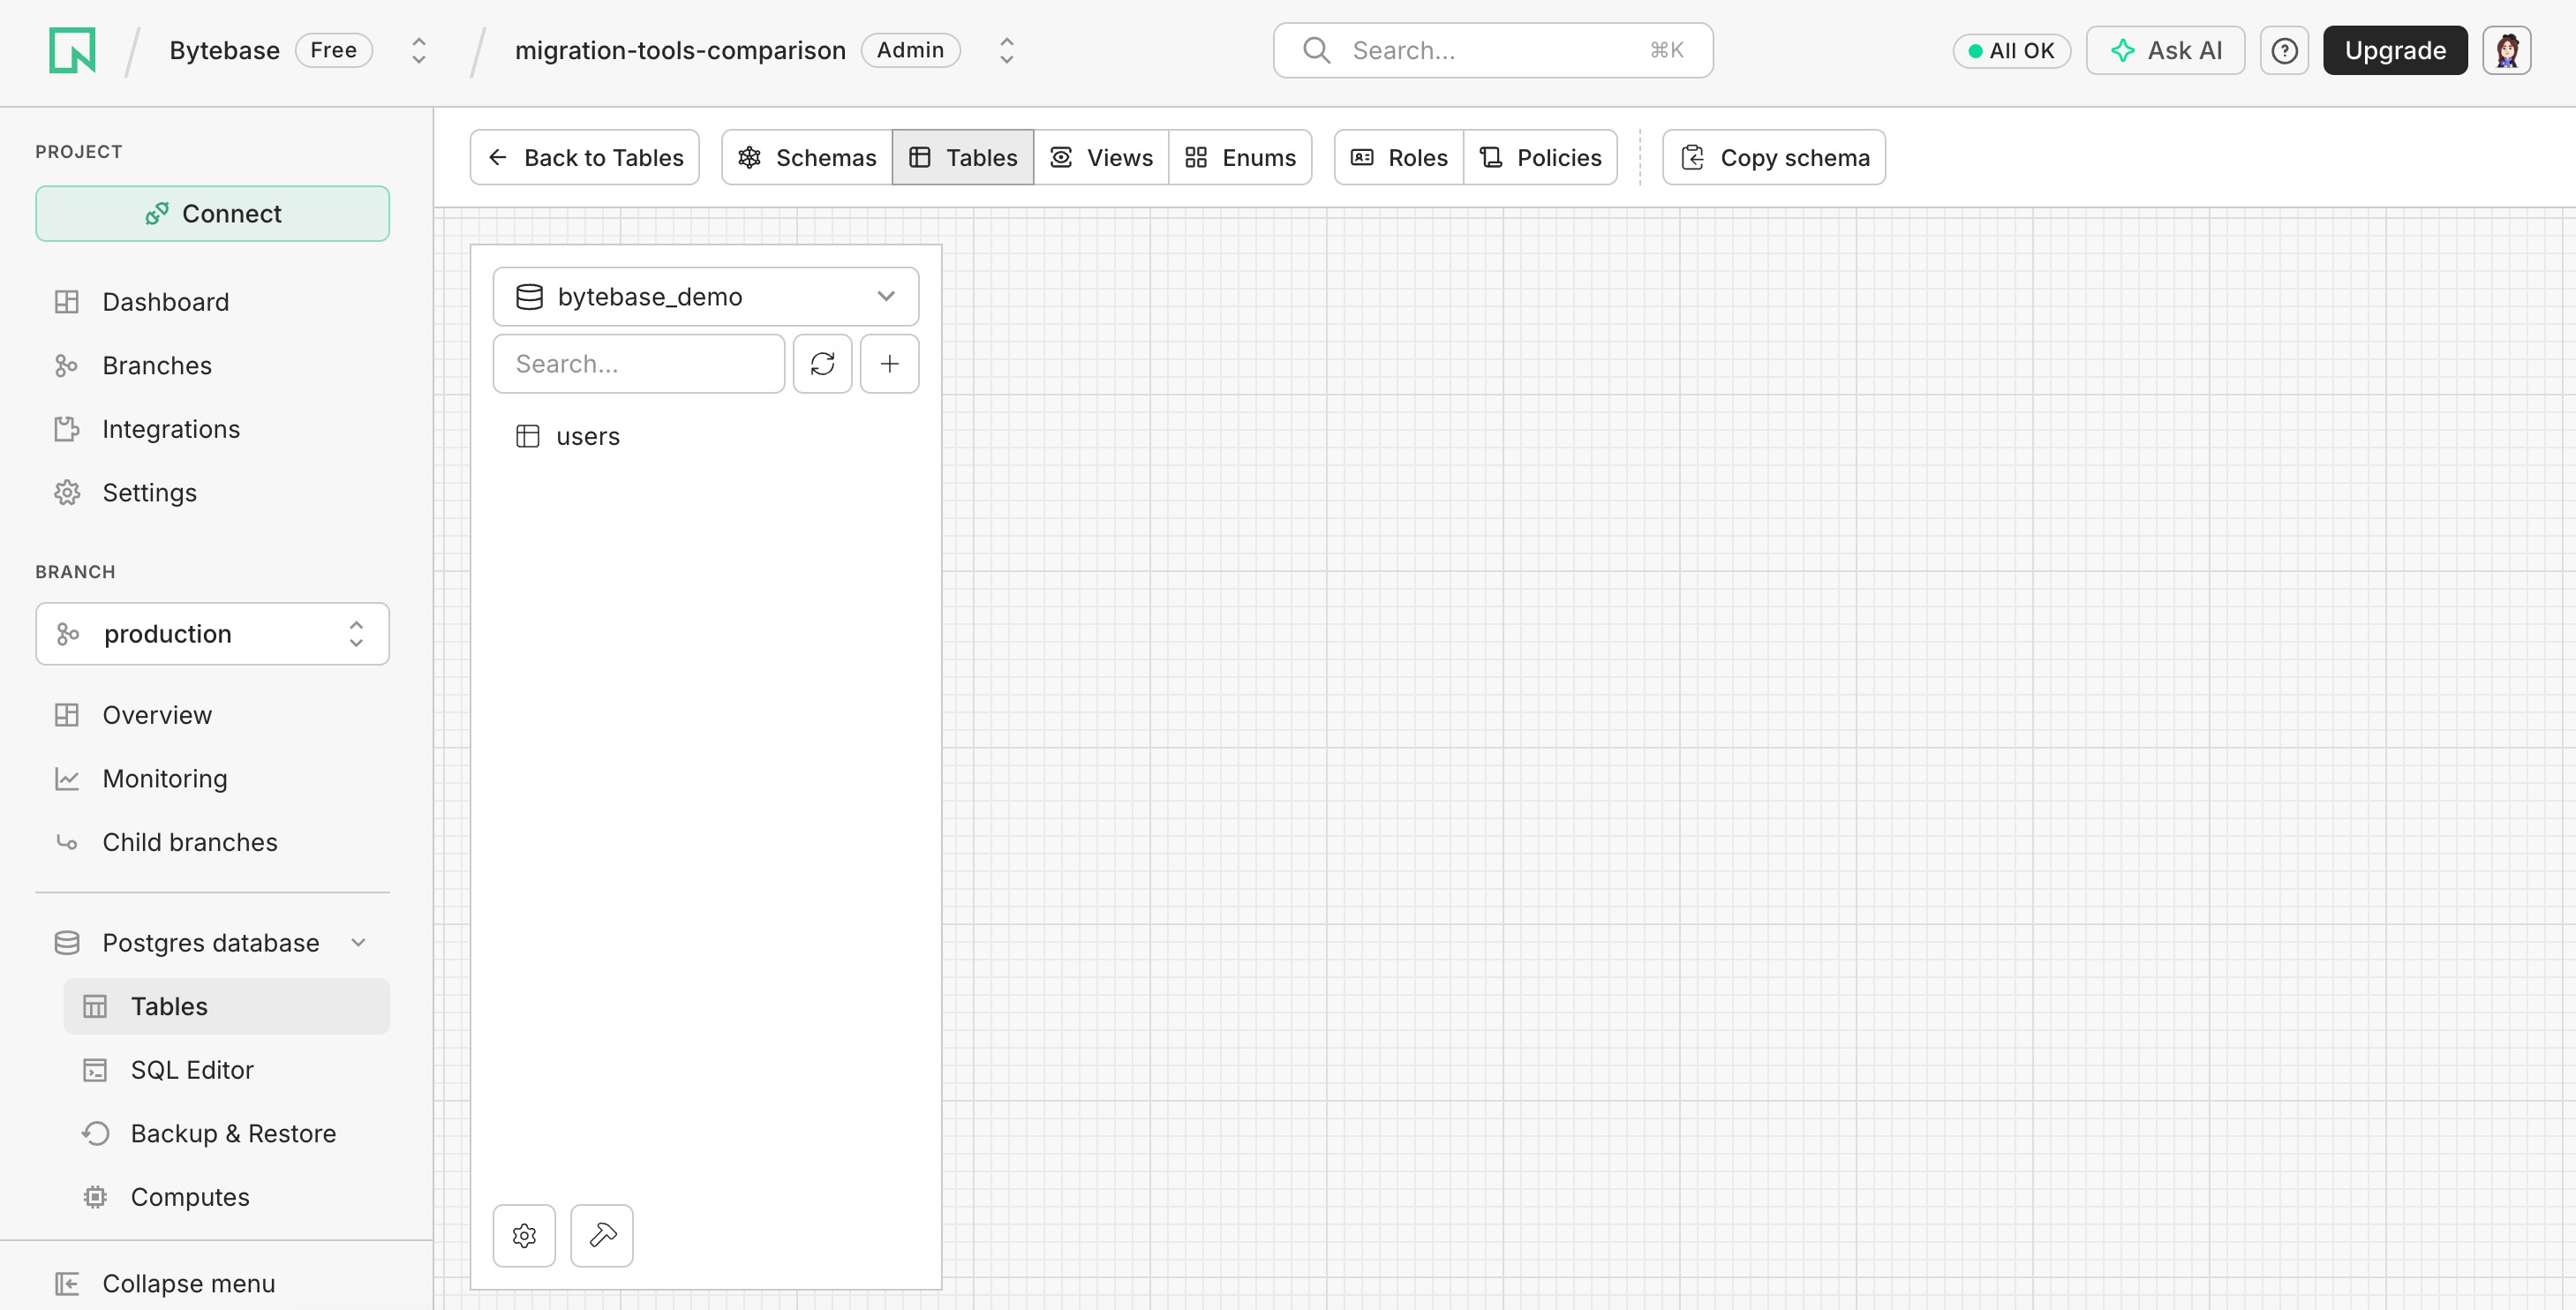 The users table in the Neon bytebase_demo database
Rough time from sign-in to visible changelog entry: about 30 minutes — effectively the same as Flyway Desktop. Skipping the install saved time, but the workspace, instance, project, and database-transfer steps spent it again.
Beginner takeaway
Bytebase Cloud skips local installation and presents the migration as a managed change request rather than a file plus a command. That means more vocabulary up front — projects, plans, review, deployment — in exchange for a review and deployment path that already exists by the time you need it. In a fresh workspace the review stage stays lightweight; the same structure supports stricter controls later.
Comparing the first PostgreSQL migration
| Tool | Interface | Main artifacts | Setup encountered | Managed history | Rough time |
|---|---|---|---|---|---|
| Flyway Desktop | Desktop GUI | Versioned SQL migration | 663 MB desktop installation, Redgate account, project, target connection | Migration history | ~30 minutes |
| Liquibase Community | CLI | Formatted SQL changelog and properties | Java 17+, JAVA_HOME, CLI, PostgreSQL driver, JDBC configuration | DATABASECHANGELOG | ~1.5 hours |
| Bytebase Cloud | Browser | Plan containing SQL | Account, workspace, instance connection, project, database transfer | Changelog | ~30 minutes |
Read these as onboarding observations, not speed rankings — a second attempt would be faster for every tool.
Flyway Desktop and Bytebase Cloud landed in the same range by different routes: Flyway spent its time on installation and an account, Bytebase on workspace and project setup. Neither had a step where the documentation misled me. Liquibase's gap is a different kind — the update command worked the first time I could actually run it, and the time went almost entirely into getting a runtime, a driver, and a project layout into the state its own guide assumed.
The more useful distinction is what each tool teaches during the first migration:
- Flyway Desktop introduces versioned migration files through a visual project and target-database workflow.
- Liquibase Community introduces changesets and database tracking through an explicit local CLI toolchain.
- Bytebase Cloud introduces the change as a plan that moves through review, deployment, and centralized history.
All three apply and track the same change. What differs is where configuration lives, which dependencies the user has to manage, and how early review and collaboration appear.
What this exercise does not compare
This walkthrough does not evaluate:
- migration performance or throughput;
- rollback strategies;
- drift detection;
- complex or long-running schema changes;
- team collaboration and permissions;
- CI/CD integration;
- policy enforcement across environments;
- licensing or total cost of ownership.
Those topics require a broader scenario than a single CREATE TABLE statement.
Next up: from test to production
A first migration is a poor proxy for daily use. The interesting comparison is what happens when a change has to move from test to production: pull requests or approvals, automated checks, and a deployment history someone else can audit. That is where migration tooling stops being a quickstart exercise and becomes a team practice, and it is what I plan to look at next.
If you want a feature-by-feature look instead of a first-run diary, see Bytebase vs. Flyway, Bytebase vs. Liquibase, and Flyway vs. Liquibase.